- Now Stephan, you were on here before
talking about hydroponics and hydroponic systems.
So why do hydroponics anyway?
- Let's just say you actually don't have the space
to have a garden.
Hydroponics is a great thing that you can actually have
in your home, set up your own climate,
and start growing, even during the winter time.
Winter months, during the fall, year round
you can actually grow with hydroponics.
- Sounds good to me.
I think we could do that.
Now what about building the hydroponic system?
- It's fairly simple.
A few parts, inexpensive,
and something you can actually assemble
within an hour or two.
- All right, Scott, how do we got about setting up
a hydroponic system?
Do you want to talk about some of the parts we have here?
- Yeah, absolutely.
The first step is to make sure we have all the parts
and everything is in order.
First thing we're gonna need is some kind of a storage tote.
Preferably something a little bit more durable
like this black and yellow tote,
just so as you move around the hydroponic system,
it doesn't go breaking over time
and doesn't get worn down from the lights outside
or what have you.
And also some of the smaller pieces, like some
of the neck cups and neoprene,
things that actually house the plant.
Then of course, the PVC parts.
We have 10 feet of pipe that will roughly make a tote,
usually a little bit more than 10 feet is needed.
A few elbows and some Ts.
And that's just to make the actual frame
of the spray system inside of the tote.
- All right, so you want to get started
on building the system for us?
- Yeah, absolutely, let's get it going, man.
- Let's get it going.
- Would you hand me the tape measure, Stephan?
All right, the first step is to open up the tote
and get some measurements of the inside.
That way we can go ahead and start measuring
and cutting our PVC.
- I'll take that.
- Thank you.
A good way to start is gonna be
to get the width measurement.
And how you want to do this, you just want to go,
what the PVC frame will do is actually sit down,
recessed about two inches.
We're gonna come down about two inches.
Looks like we're gonna be right at
about 16 and a half on width.
We'll go ahead and get the length measurement as well.
Why don't you come to right there?
About 26 and three quarter inches.
That'll be the good base.
What makes up the tote is the PVC.
How that frame works is we have elbows on each side,
or each corner, then we will have Ts on the bottoms
and then in the middle we have the downspout
for our water pump.
Then that'll pretty much look just like that.
Then these few pieces will be for the pump
and screw into the pump.
That's the basic layout of how this will work.
The first step is going to be to cut the pieces
of PVC that will fit in between these Ts.
What we're gonna do, it looks like
for 16 and a half inches, we'll need about
four and a quarter inch PVC pipe
to fit in between each one of these.
And we will get cutting.
You want to do some cutting, Chris?
- I can try.
- Excellent.
What we'll do, go ahead and grab this piece of PVC,
we'll start measuring.
We'll do four and looks like a quarter.
If you want to make a mark right about there, Chris.
- (Chris) Absolutely.
- We'll make six of these.
And that is the start of the tote.
What we want to do before we make all six
is we'll make one side of the tote.
We'll go ahead and check it with the inside diameter
just to make sure that we're on track.
Since we're not gonna be using any PVC glue,
we're gonna go ahead and just
smash these together real quick.
That way everything is nice and snug.
You want to check that, make sure it fits, Stephan?
You do want a little bit of a snug fit
just because things aren't glued together.
That way it doesn't pop off.
I'll just go ahead and do that one more time.
Those are our ends done.
Next thing we're gonna do is measure the inside.
We're gonna do these 12 inch pieces,
and we're gonna do four of these.
One big reason we're using these cutters like we are
instead of a saw or what have you is when you go
to cut PVC like that,
it'll turn into a fine dust.
That's the bane of any hydroponic system.
And it's really just a few simple pieces
and the tote starts coming together on its own.
Now we're gonna cut two 25 inch sections
for the outside.
Go ahead and put these on.
Then what we're gonna do now
is we're gonna build the down stem for the pump.
That consists of a T, and this is gonna sit in the middle
like this, and it's just gonna serve as a down stem.
And then we will cut a few pieces
to hook all of this together.
We're gonna make one and three quarter inch pieces.
We're gonna do two of those to fit on the inside of this.
So just snugly fit in there.
There's a bevel on the inside of each of the fittings
and it's three quarters of an inch.
- So that way your pipe slides in and stops.
- Put that in there.
- Let's face it up.
- Now let's check it.
Looking like it's just a little bit long.
Like I said, each tote is gonna be
just a tiny bit different.
Let's start with a half inch,
just so we don't take too much off.
Look at that.
That is what we want.
You want it to fit in there a little snug,
just so it doesn't move around or anything.
That is the basis of the spray frame.
Our next step is gonna be to mark our holes
and then tap-and-die them.
- For our sprayers.
- We're gonna have three sprayers on each one of the ends
and then this long end is gonna have three.
Then we'll have two on each one of these.
We have two different kinds of sprayers that go
into these totes.
We have 180 degrees, and you can see that they have
a 180 degree plane of spray.
That way you're not hitting the back of the tote
and causing any backsplash that would encourage it to leak.
- (Stephan) These will be placed on the
outer...
These will go on the outer end, spraying in.
- (Scott) We have a 330 degree.
It has two directions of spray instead of just the one
from the 180.
That way you can get both sides.
Those will go on each one of these.
What we found in these that we can have
such prolific root growth that the roots will get so dense,
they'll create dry pockets on the inside.
So you have to have plenty of these,
just to get around all those nooks and curves.
It doesn't have to be perfect.
All you really want to do is just try and center them
as much as possible.
We'll put one there, one there.
We'll go ahead and just repeat this for all of them.
You can try to get them as straight as you can,
but it's not too big of a deal.
These are going to be our tools for making the sprayers.
This is just a regular drill bit.
It's gonna be 10/24 tap and a die.
What we're gonna do is we're gonna take this
and we're gonna drill out each one of these holes.
Once those are done, we'll gonna clear them all out
and we're gonna go back with the die
and that's how we're going to achieve the spray.
One thing I would like to caution people about
is when you are drilling the holes,
make sure you get it as straight up and down as possible
because if you don't, sometimes the sprayers
will have a tendency to leak.
- Right, now that we have all the holes,
we can to putting the threads.
- When you do this, you want to put the drill
on the lowest setting, just so you don't
grind up the thread.
Turn it down a little bit.
Again, straight up and down as possible.
Just slow about it.
That is essentially how this works.
This drill bit, it'll be a tight fit at first
but at the very tip of it, it will start to cut away
at the hole, just to help increase that diameter
a little bit, then the threads will start
to take over after that.
When you do bring it back up,
you just want to let the drill carry itself,
because if you pull too much, you'll mess up your threads.
You don't have to go too much.
Just maybe a quarter of an inch in the PVC.
Just enough to get the threads.
Again, when you do come out, just slow.
Make sure you try and clear away all this little debris,
because if you do get that in there,
they tend to clog up these sprayers
and then you'll have fun.
- (Chris) All right, that's the last hole?
- Last hole.
Now all we have to do is get it cleaned out
and we can throw those sprayers in it,
then we can get to cutting up the tote.
- Be forceful with it.
- Yeah.
Make sure we lay everything out so we don't get it mixed up.
You can see the debris on the inside.
All we want to do is take the bamboo and knock that off
so it doesn't inhibit the system later on.
- (Stephan) A little bit came out of there.
- Good to go.
Yeah, cool.
- Now back to assemble it.
- Indeed.
- Let's install the sprinklers.
- We're gonna put these 180 degrees on the outside,
just so we don't get any backsplash
when we put them in the tote.
Most of these parts are fairly cheap
at your local hydroponics store.
The sprayers are 30 cents.
The neck cups and neoprenes, they're 25
to 30 cents each as well.
Now what we're gonna do is measure for the downspout
that connects the pump to the sprayer manifold.
How we're gonna do that is we're just sit this in here
how it would naturally lay.
About two inches down in there.
Then we will get the pump.
Stick that bad boy right there.
Want to come help us out, Chris?
- Yeah.
- Cool.
You want to measure it for me?
Measure from the bottom of this
to the top of the pump.
- Just right there, okay.
- Seven and a quarter inches.
We got seven and a quarter inches,
and we have to account for that three quarters
of an inch difference on each one of these sides.
What we're gonna do to account for those differences,
we're gonna take two and a quarter off of this.
What we're gonna do with this,
let me see those one more time,
we're just gonna cut them in two pieces,
one a bit larger than the other.
What the smaller piece will serve as is the part
that actually stays connected to the pump,
which is why we have this half inch coupling right here.
Then we screw our half inch adapter to this,
and this will actually be what connects to the pump.
That fits on there.
- That way, it's seamless when we have this sitting on top.
- And it makes disconnecting rather easy.
- That way you can take it out.
- We can set that inside and see where it stands.
- Indeed.
You can see it bulges up just a little bit
so what we're gonna do is we're gonna take a half inch
off of this down stem, just so we can go ahead
and give a nice little even plane,
because this is what the sprayer manifold doubles as
is also support cups when you get
big, mature plants and fruit.
And that is the completed sprayer manifold.
We have two different sized hole saws
for the drain and the power plug hole.
The power plug hole gets the one inch.
Try and get it as close to the top of it as you can.
You can even come in here and tilt it up a little bit.
Get it started.
Then level it out.
What we're gonna do is we're gonna put a hole right here,
as close to the bottom as we can.
We don't want to get too close to this lip,
otherwise we won't have a good seal.
What we'll do is we'll come about halfway.
Then we want to make sure we clear up all these
little frazzles.
- Yeah, little frazzles and stuff.
- And then sometimes these can be a little bit tricky
to get in.
This is a half inch grommet, and what this does
is it creates a watertight seal between the elbow
and the actual body of the tote.
That way we don't get any leakage.
All right, that is gonna be your drain.
We're gonna hook our 10 inch drain up the elbow
and then we're going to put the elbow into the grommet.
All right.
Bring it down a little bit.
And you bring it in until you get it set up
against the barrier right there.
And that is your drain finished.
What we do with the drain is you turn it like this
and just let it drain naturally.
So our next step is going to be to cut the holes
in the top of the tote for housing our neck cups.
If you would, would you hand me our cheat sheet?
- I will definitely do that.
I like cheat sheets.
- I do too.
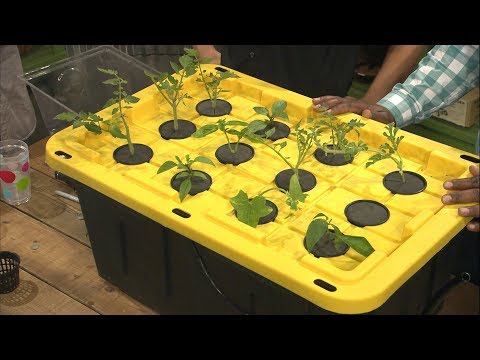
As you can see, this specific tote has 12 neck cups,
or 12 sites for each one of the neck cups.
Come in here and cut each one.
We only use those for guides.
Then we can start drilling our holes.
- It's a good idea to have someone hold it.
- All right, now that we've drilled our holes,
the next thing we want to do is clear all the debris
from the holes and then we'll be ready
to put some water in it
and make sure everything is watertight.
Now that we have everything done for the tote,
we have the top of the tote cut,
we have the PVC manifold built,
and we've connected some PVC to the pump.
Now it's time to throw everything together.
Our first step right now is gonna be
to fill the basin with some water.
Stephan, if you want to grab that other bucket.
- We do have water.
- How much do we need to fill it?
- You need about 10 gallons of water to get
proper head pressure out of the sprayers.
All right.
You want to grab the pump, and let's load it in.
I'll let you.
Stick the cord out of the cord hole in the back.
Feed it on around.
Connect up the PVC manifold, should be good to go.
- Slide that in.
- (Chris) So now we have power.
Look at that.
- Looks like we need to turn it up a little bit.
With the diaphragm.
- (Chris) Nice.
- The tote is watertight.
As you can see, there's nothing coming out of the cord hole.
So everything is good to go.
All we do now is throw the top on
and we can put some neck cups and some plants in it.
That is a tote.
And our next step is gonna be to put the neck cups in there.
They each take 12.
- (Chris) What do these do?
- These actually support the plant.
This is what we're gonna plant in, essentially.
These are gonna be our neoprene collars.
This is actually what holds the plant,
instead of the alternative, like expanding clay media
or vermiculite or perlite or whatever.
Now that we have everything set up,
our next step is gonna be to put some plants in it.
- Let's get the plants in it.
- I actually brought some plants.
- Can you tell us what you brought?
- Absolutely.
Here on this end, we have some San Marzano tomatoes.
Right here we're gonna have cinnamon basil
and then Thai basil.
And another San Marzano tomato.
Some Genovese basil.
Sugar baby watermelon, a purple beauty bell pepper,
and a cucumber.
The only thing we're gonna do to plant these
is just set it down in there.
I might just take this off.
We'll set it down in the neck cup.
- (Chris) Before you do this,
can you tell us what you have here?
- Okay, yeah.
- At the bottom of your
tomato plant.
- This is gonna be a rock wool.
It's a hydroponic planting material.
It's just molten rock spun like fiberglass.
It's nothing crazy, it's gonna be inert.
It won't have tendencies to raise or lower pH.
It's just a good material.
As you can see, our clones have some roots coming
out of the bottom already.
These are already mature plants
and they're ready to be transplanted.
Set the neoprene around the plant.
Neoprenes are a soft material,
so they're not gonna harm the plant at all
or pinch the stem.
And there you have it.
It is important to note that limitations with this system
plant-wise are gonna be root vegetables
like potatoes and onions and things like that.
Anything that will grow above the surface like tomatoes,
cucumbers, pickles, bell peppers,
anything like that will grow quite prolifically.
- How about that?
- That is the tote.
That's all it is, real simple, not a whole lot there.
- Definitely looks good.
Fellas, appreciate the demonstration.
- No problem, thanks for having us.
- Thanks for being here.
 For more infomation >> Le Rubis #35 - Duration: 14:06.
 For more infomation >> São Paulo acerta rescisão de contrato com Wesley - Duration: 2:30.


 For more infomation >> Mulher morre por falta de sangue durante parto de gêmeos - Duration: 4:05.
Không có nhận xét nào:
Đăng nhận xét