funny cats
cat
cute cat
kitten
cats
pretty cute
-------------------------------------------
Learn Photoshop in 40 Minutes - Duration: 40:03.
hey what's up guys Christian here for Chris Clark today we're learning
Photoshop all right super excited to get into this I haven't done a tutorial just
a straightforward tutorial in a while so I'm really excited for this a lot of you
guys have been asking me for photoshop stuff so here it is so this is kind of
like an introductory video whether you are just starting off with Photoshop or
if you already have some experience in it there's definitely a few tips in here
that you might find useful so let's jump right in and let's get started
alright guys so here we are in Photoshop and if you launch your application this
is what you'll see not these specific things because these
are my projects and things that I've been editing on Photoshop so you will
eventually have your most recent work once you have a few projects going but
this is pretty much where you find your your most recent so other than that you
can open them directly through here so you can browse through your finder or if
you're using Windows folders I guess and then you can create a new one so that's
what we're gonna do because we're just starting off and by the way guys if this
looks different from what you have it's probably because you have a different
version this is Adobe Photoshop CC 2017 everything else should be the same
especially for the basics we're not going to get into any of the additional
features with that it so it should be fairly similar for everyone across the
board so let's get started let's create a new project and here we're going to
just kind of select what kind of document we want to create so we have a
few presets here and I can just go for the regular you know 1920 by 1080 but
you can also put whatever value in here just whatever suits what kind of project
you're doing we're just starting off so anything will do and also this is your
you know measurement so pixels is usually what most screens and video
files and everything are measured in but if you're into photography and you need
these other options these are here for you as well this is where you can name
your project you can name it whatever you want you also have some preset
detail that you can load up and save and once you're happy with all this you can
just hit create and it'll create a new blank document for you now I have these
guides turned on but you can turn them on and off here where is it clear guides
okay so if this is your first time opening Photoshop and looking at this
interface or if you've never really touched it before it can seem a little
bit intimidating but it's really really simple and there's just a few basic
mechanisms here that once you learn those you'll be set for everything else
and everything else kind of build upon that so it's a lot easier than you think
don't let this kind of discourage you so let's actually start by breaking down a
little bit of what we have in front of us so we have our toolbar here this is
where you're going to pretty much selecting grab your tools and use them
for whatever you do in here this is obviously where you can posit your
pictures together where you do whatever Photoshop work you want to do we'll get
into a few different things and there's other tutorials on this channel as well
if you want to get into more advanced photography Photoshop stuff or other
post and filmmaking latest things so most of the tools that you're using in
photo we're all going to be here and we're
going to go through all of these individually in just a second and then
over here we have a few options for whatever tool you have selected so that
is usually what this top bar is for as well as a few other options that pop up
whenever we are moving things around and once we get into that sort of stuff
you'll see some awesome new options come up here and then here you have your you
know your usual file edit I don't need to go over these you can kind of see
what they do there's a few things that we'll go over later on such as you know
throwing in these adjustments you have a lot of adjustments here that you can do
and some filters so there's a few filters that you can apply to things and
we're going to get into all this in just a second and I know I've said that
already three times so but we're almost done so over here we have just colors
right now this might be different from yours and also all of this could be very
different from what you're seeing depending on what kind of workspace you
have so to change your workspace you can go under window and under workspace you
can select whichever workspace you want now most of you if you're just starting
off with Photoshop you're going to have the default essentials which is what I
have selected so you should be fine but just in case you're seeing anything
different then you can just go under window workspace and select essentials
so that's what we're gonna be using today so over here you're going to have
some information depending on what you're doing and then you have some
adjustments that are pretty much these quick buttons they're almost like
shortcuts of different adjustments that you can throw in this section over here
and this section is where you have all your layers so everything that you are
doing adding and creating and adjusting in Photoshop will show up here so this
is in a way kind of like your timeline if you're used to editing or it could be
different layers like what you have in After Effects so this is all very
similar to that and I love by the way how compatible these programs are so if
you're into the effects and you're jumping into Photoshop for that kind of
work or anything else where you need to go in and out of Premiere Pro or After
Effects I really love how compatible the whole suite is so definitely a big plus
for using Adobe products ok so we have a general understanding of where
everything is and it's going to get a lot easier once we get into things and
once we start using tools then you really start seeing how this workspace
comes into play and obviously in the middle here you have your canvas I can
just zoom in and now I'm using my trackpad I'm just pinching my fingers in
now this should be the same on most laptops if not you can scroll your wheel
or you can select the the zoom magnifying tool over here and you can
zoom in and out let's let's jump right into all these tools and by the way this
is our work area essentially this is our canvas this is where we are going to see
everything that we're going to be doing and if you're not happy with the size
you can always go under image I'm going to say edit but it's image canvas size
and in here you can select pixels since that's what we're what we're using as
unit of measurement you can see that this is the the numbers that we put in
earlier but we can change these at any time and we can change the size of our
canvas another way to do it is by cropping it in so you can use the crop
tool here and I know and we're going to we're not going to go in order here but
it's okay we we live on the edge and here you can freely move this around and
change the size of your of your canvas and you can crop in and out or you can
even select a certain ratio maybe you want to do a one by one square picture
for Instagram well then you have this kind of preset we can crop in wherever
you want and then you know you can just clear this out and and you can move this
freely around again so if you want to play these changes to this crop you can
select this checkbox icon over here and that will apply this cloth or if not you
can just kind of have this undo button here and if I click that it'll bring me
back to what I had so you can see how this side of Photoshop is going to
change a lot depending on what tool you're using so right before we can dive
deeper into this toolbar we should probably import something so that we can
play around and you can really see the full effect that these guys over here so
there's a few ways of importing things into Photoshop so my way of doing it
just because it's quick and easy is just going under finder opening up whatever
folder you're looking for and then just dragging and dropping whatever element
you want to import so we've imported this lamp and this is just a previous
picture that I cut out in Photoshop and that I already saved and is before the
website I just launched I just made a few web elements in Photoshop like this
one and if you guys want to check it out by the way it's Chris Cort calm just a
quick little website plug there but there's a lot of free tools on there so
maybe you guys will find something useful so now we have this thing moving
around in our canvas here and you can see the same two options are appear when
you import things you can actually move them around scale them and make changes
to them so right now I can scale it down and I can you know warp it
around like this as I hit command Z that will undo that and now if I hit shift
and scale it down now it's going to scale it down proportionately so we've
scaled this down and you can see that as I move this there's these kind of lock
guides and you can able them or disable them but personally I find them really
useful because I know when my item is centered and that's that's pretty nice
then once I'm up here you can see that my cursor is changing to these curved
arrows and that is because I can rotate this image once I'm outside of the box
so inside I move around outside I I can just freely rotate it and if we
right-click on this element we have a few additional options so we can scale
and rotate like we've been doing we can also skew it and use a really
cool because now if you go on the line you can skew it like this
a command Z to bring it back and then I can skew it on this side so all of these
sides are skewing I guess now you would say then you have perspective and if you
drag the points in you can see that it's almost like yeah like laying it flat and
then depending on which direction you go in you can modify it that way so I'm
going to do that as well and then you have a few other options you can distort
it you can warp it and these are fun to play with you know you can even have
this sort of grid so you can really distort the image and these are really
fun and they're really great and useful when you're placing things or one of
your compositing things so this is definitely good to know all right so
let's say we are happy with our changes we can always undo them but if we're
happy with them we can hit this and now we've applied the changes to our image
so now you can see here on my layer panel that we have a new layer so this
layer is the lamp so we have the lamp layer and we have the background layer
now I want you to notice something when I turn off this background layer we have
this checkered pattern and what this checkered pattern is in Photoshop and in
most other software is a way of telling you that this is transparent so we have
a fully transparent background so if we were to render this with transparency so
maybe as a PNG image we would only see the lamp and nothing else because we
have turned off our background and we can't do much else with this because
it's locked right now so this is just by default backgrounds in Photoshop when
you're starting off are going to be locked as a layer but
you can always unlock them so doesn't kind of useless but then you can just
select them or delete them we don't really care we don't really need a
background we do what we want so now we do have something here in our workspace
let's just keep experimenting with these so the very first one is our move tool
or a selection tool on the shortcut for that is V so you can switch to that and
just really move things around just by selecting them and once you have a lot
of stuff you might need to select them from your your layer panel here and then
that's how you'll be able to kind of move things around when things get
really cluttered and you have a lot of layers overlapping each other but for
now we're keeping it simple with our lamp here all right so next up we have
this this thing it's a rectangular what is it's called rectangular marquee tool
and the shortcut for that is and I really actually don't know the names for
these I just use what I need but essentially what this does is you know
you can select this and this has made a selection and now you can't move what's
in it you can only move the selection you might think that that's useless but
hit command J on your keyboard and if you do that boom look what happens
nothing nothing seems to have happened but actually we created a new layer and
now if I turn off this bottom layer which is our lamp we're only going to
see our newly created layer and what this is is just a section that we copied
from our lamp image here so when we made that selection we pretty much told it I
want to make a copy of just what's in here so that's what this selection tool
is and you can do a lot of other things with it one thing that we'll get into
with selection that's really useful is layer masks and in a way it's almost
like like an alpha mat that you would have in After Effects or any things like
that I don't know if fun if these references are helping you or if you
don't use After Effects and I'm not making any sense but we're get into that
we'll jump in in that in just a second but let's move along to the next tool
for now and this is the lasso tool and one thing that I want to point out is
we're going down this list for the rest of these is that you can actually click
and stay clicked on them or yeah hold your click and and then from there it'll
open up like a submenu here and you can swap this tool for something else like
this this our artboard tool which I've never used but you can do that for all
of these so you can see how you have an people Alec elliptic elliptical
selection tool here and a few other options for that and they're all kind of
in the same category so you have your lasso tool which is what we're going to
look at now but you also have a polygonal lasso tool and a magnetic
lasso tool so we're going to see the difference in these right now let's just
zoom into our image here and this is still going to make a selection so the
way I do it is I'm going to click and drag and you can see that I can freely
just draw whatever selection I want and once I let go we've made that selection
so everything that we saw with this rectangular guy here applies to this
type of selection so we can make a copy of just this of whatever is in this area
or we can do a few other things now one of these other things that we can do is
once we get into brushes which I guess we might as well get into that now
because I've been postponing way too many things so if we were to select the
brush we can click on the brush right here and don't worry I haven't forgot
about these we'll get back to them we can select the brush here or you can hit
B on your keyboard and that will bring up the brush although right now we're
seeing this icon and it's telling us that we can't do anything but that's not
how this works we tell Photoshop what we want to do so what we're going to do is
we're going to click on this and it's going to say again Oh blah blah blah
whatever this says and you're just going to click OK because you don't need to
worry about that for now just know that if you want something you
get it done okay so I'm going to turn this this guy off for now so we have the
selection made on our lamp layer and we have our brush tool selected so if I
draw here nothing's going to happen and that is because when you have a
selection made and when you have a brush you can only draw in within that
selection now I can invert that selection so if I hit command Z real
quick I can hit shift command I and that's shift control I if you're on a
Windows and that will invert your selection so now if I can draw out here
I can do it but it's excluding the other selection so I can just go over it and
it's not going to affect this area so that's really cool for a lot of
different reasons you can do a lot of different tricks with just that but
another thing that we can do with selections in general is something I
already mentioned which is adding a layer mask now the way you do this with
any layer selected is you go down here these icons are and we're going to go
in-depth into all of these but for now we're just going to click on this one
and this is what creates a layer mask for whatever layer you have selected so
if I click on that it's going to do this to us
now why did it cut a hole in our lamp well that is because whenever we have a
selection it's going to apply it to that layer mask so it's going to pretty much
cut a hole based on what you have selected so the way that it's cutting a
hole isn't just by cutting it now you can see that for this layer in my layer
panel we have two thumbnails kind of next to each other so we have these to
this new element that we added by creating a layer mask and this is our
layer mask so essentially what a layer mask is and how it works it pretty much
tells where your image is transparent or not and the way it tells that to this
image is with black and white values so black is transparent and white is fully
opaque so I know that sounds a little convoluted but let me show you what I
mean so if I have this layer mask selected and I have my brush selected
you can see that my brush is now black or white and if it isn't you can always
click on these colors and you can you know just make sure that it's black or Y
or whatever color you want this is applies to all the brushes and now if I
go over this and I start painting in you can see that I can paint transparency in
but I'm not erasing anything I'm just painting the layer mask black so that's
really cool I use layer masks all the time because it's very non-destructive
and what I mean by that is like I don't want to just permanently delete things
and then not be able to go back to that step instead of I'm compositing things
in and let's say I just went too far here I can invert the colors by hitting
X by the way another shortcut if you hit X on your keyboard that will invert
these two colors here so you have like a primary and a secondary color you can
toggle back and forth kind of like your primary gun or secondary gun in the game
and you always have them here you can toggle between the two of them with X so
that's good time-saver but ok so now that we're on Y if I go back and I start
painting things over my image or my layer mask I should say now you can see
that we're introducing the lamp back in so white adds and black deletes keep
that in mind and of course you can always invert these colors and inverting
just a quick shortcut is command I or control I so if we have our layer mask
selected and then hit that so I am during the colors now you can see that I
am I've essentially inverted the selection and that is because we've
inverted this from a white background to a black spot that was deleting things to
a black background and a white spot that is keeping things in hopefully that all
made sense and hopefully I didn't lose you but essentially that's that's how
layer masks work it's really simple it's just two ways of doing it black or white
and of course you can use grey and get fancy and that will show some of it
through but not entirely depending on how dark the gray is but another way of
achieving grey in a way is to lower the opacity of your brush so see how this
changes for every tool now that we have our brush selected you can see that we
have a few different additional properties for our brush so I can lower
my opacity here and if I set it to like 39 or whatever you can see that I'm
adding a lot less information back into our image now if I click on it again
it's adding another 39 percent of it and if I click on it again it's pretty much
introducing the full opacity of the layer we're going to say opacity but
that makes no sense let's keep going down this list we have other ways of
selecting things we have the polygonal lasso lasso tool these are really hard
words but essentially you click on a point takes you and then you you don't
have to keep clicking you can just go somewhere else click on the point click
on another point you get the idea it's now making a different kind of shape and
then you can go near where you started like really close to where you started
and I don't know if you can see it because the image is really dark but
there is a o or a zero or a loop that is close or a full circle that appears
around the icon of my cursor and that is telling you that you can now close that
selection so once you click that it makes a selection for you and same deal
as these other guys so we know what to do from here all right let's take a look
at magnetic lasso tool now this will stick on things based on contrast
essentially that's how this tool works so it's an easy way to quickly let's say
going in here and I want to just select this part I'm really doing a bad job at
and so is Photoshop but you can see that I
kind of tried to follow along the lines here and it kind of lost it a little bit
here but what it's doing is it's creating a really quick in easy
selection based on things that are around it so you can see how it's kind
of snapping to lines and things that have a lot of contrast sometimes it's
magic sometimes it doesn't understand what it's doing but that tool is there
for you and that's another way you can make selections so that is it for this
list now we have other ways of selecting things and this is the magic wand tool
and the shortcut for that is w what this does it selects similar colors in your
image and it makes a selection based on that so I could use that for some of
this wood here this isn't the ideal image where you would be doing this
because there's a lot of different colors here this is a nice way if you
have like a solid wall that you want to select or something that has similar
color this is a great tool to do that in a quick and easy way and here you have
other selections as well quick selection tools so you have a lot of ways of
selecting things we get it so let's move on we have the crop tool which we
already talked about we have the eyedropper tool which essentially you
can just use it to take a color and now we have selected that color from the
image then over here you have a few things that are used for more
photography than anything else so we won't really touch upon those but the
Spot Healing Brush tool and the Healing Brush tool are really simple to use and
they can take away pimples and like little small skin imperfections so it's
really used a lot by photographers and there's a few other things here that are
really simple to use and I could really help some pictures or some people out
all right so we have some brushes and we already talked about that then we have
the clone stamp tool now this is a huge one in Photoshop so first of all before
you jump into the clone stamp tool which I now have selected I'm going to get rid
of this selection and the way you do this nice and quickly in Photoshop is by
hitting command D or control D on your keyboard and that will get rid of any
kind of selection that you've made so now we have the clone stamp tool and
this kind of looks like a brush and that is because it behaves like a brush for
the most part now one thing that I skipped with brushes and then I'll get
into here because it'll be pretty much the same thing is the size of the brush
the way you change this is by right-clicking wherever in your
in your canvas and when you right-click it'll bring up these options so this is
the same as with your regular brush so you're going to have the same window up
here if you right-click here you can change the size now you can see that if
I move it back onto the image you can see the size of it now I can change it
again you can see that it's much smaller or make it bigger so that's how you do
that and then over here you see the hardness and hardness is almost like
feathering and after effects okay I need to stop doing After Effects references
but it kind of softened things out i soften the edges so if i have a let's
let's get a brush real quick so I can show you this so if I have a soft brush
and let's bring our path City all the way up so you can see what I'm talking
about so if I click here we have a very soft spot now if I right click and I
bring these options again and I increase the hardness now if I click back out
here it does a pretty solid circle so that is what this thing is doing it's
pretty much how much is a blurring out or feathering out the edges of your
brush and then of course you can select other brushes here you can import
multiple brushes you can go crazy with brushes but there's a lot of different
options and different ways that you can you know maybe brush some things in so
that is really cool I love brushes and they can do wonders when you're
compositing things together and now they're great but that's not what we're
talking about let's go back to the clone stamp tool so let's turn this off for
now and let's just turn on the layer that we copied for no reason other than
just to show that we can change different layers depending on which ones
you have selected so in here we're gonna explore the clone stamp tool so what
this does is essentially it looks like a brush because it behaves like a brush it
paints things in but it's painting things not based on color but based on
what area you have selected here so to select an area to kind of paint in or
copy I can hit all on my keyboard and you can see that my cursor now changed
to this kind of target cursor and that is because now I can select a certain
area or a certain part of my image and once I do that I can paint that area
anywhere I want so you can see that now the brush actually shows the area that
you've selected so if I were to click on here you can see that I'm painting the
the image back in is really really useful you can use it
to paint people out of pictures if you've seen this and other tutorials on
YouTube for Photoshop it's a really popular one and that is what this tool
does so it's really useful you can use it for a lot of things I use this all
the time in matte paintings so it's definitely good to know and I mean
photography - there's a lot of uses for the clone stamp tool next we have the
history brush tool which kind of brings undo stings undoes things based on what
you have selecting when you're painting but I really don't use this very often
then you have the eraser tool which erases things and this behaves just like
a brush so you can again right click and you can change the size and the hardness
and you can just erase whatever you want your image I don't usually do this too
often just because I use layer masks whenever I want to delete or you know
change things that way because it's like I said before it's non-destructive
versus this way you need to undo things rather than being able to just paint
things back in so that's why I rarely use the erase tool but you know it's
quick and easy it's there if you need it next we have the paint bucket tool
wherever you click it paints that entire layer or the empty part of that layer of
a solid color and you can change whatever color you want here and you can
do that so it fills things in based on similar colors so if it's a fully
transparent area it'll fill that area or it'll kind of act like the the magic
wand tool that we that we looked at earlier and it also has a gradient tool
which is really useful you can kind of create these quick and easy gradients
with this and this can be really useful even in layer masks and you can toggle
back and forth to these like we did before and all the other ones then we
have a let's go back to an image here let me turn this off bring our lamp back
in then we have some other tools that I don't really use much but this is a blur
tool and right now I have my other layer selected so I need to make sure that I'm
selecting the lamp that I want to change now this blur tool let me just zoom in
to really show you what it does it surprise surprise blurs things out what
yeah so right now I have the strength sets of really low so this is how strong
it will blur things out or how much it'll blow them out so I'm going to
increase this all the way to a hundred percent and now you can see that I'm
really really blurring things out so over here you can
click on this and you can also sharpen things up so this behaves just like a
brush like we've seen with all these other options so just like how I was
blurring things I can sharpen things back up so you can see that on it's
obviously not going to make them go back to normal and it will start to create
some distortion if you sharpen things a little bit too much you know that noise
is really going to stand out and now you have let's see what else is in here a
smudge tool this kind of is like the liquify tool so you can smudge things
around could come in handy these are nice and easy and quick to use if
anything so I like that they're here then you have a Dodge tool and let's
bring the size of this down well the Dodge tool will just brighten things up
let me just pull this up so you can see that it's just brightening whatever area
I want so you can do some cool light effects with this and if you're
compositing things together this could be definitely a cool way to add a little
bit of integration in into your scene like so like if I were to drop this desk
on a table and there's a window that's emitting light from this way then I can
you know it's a nice little detail that you can add with this tool over here
same thing you can burn things you can darken things it's called the burn tool
so you can create some shadows you can darken parts of an image you can do
whatever you want and if I'm going over the same area while I'm still clicking
it that's just something that is true with all brushes it's it's going to
pretty much keep the same intensity but now if I let go and I click again it'll
make that same area darker so that's why I keep that in mind when you're using
these tools the more that you click the the more you will affect that area so
right now especially we have our exposure set to 50% so we can even go
100% and again this is kind of like the strength of how much is dark hang things
but you can see that if I go over that same spot it'll darken things a lot more
so the more you pass over certain spots after letting go of your click the more
it'll you know it'll show up with whatever you're doing if you're
darkening things or if you're using a brush with like a lower opacity same
kind of deal so like you can see that it's go over again I'm adding another
layer of opacity and so on so that's a kind of an overview on these tools then
you have the pen tool which is another selection tool and this is similar to
After Effects and know this is not just a reference
this is literally like they have the pen tool and after-effects and I've used it
a lot I actually used After Effects before jumping into Photoshop so for
selections I'll use this a lot of times so you can click then click again and
you can also hold and click so you can make some curves out of these lines or
you can make just some some straight lines just by clicking you know so you
can click and drag again you have these knobs that you can move around and you
can make some interesting shapes and you can cut around certain things that would
be otherwise difficult with these more freehand tools so you can go back to the
initial point and you'll see that same circle appear and once you click on that
it hasn't made a selection yet it's closed it's a sort of path of this of
this pencil to make a selection you have to go up here where it says make
selection and once you click on that it'll tell you how much you want to
feather the selection that you're going to make and feathering again it's like
blurring out the edges so I put it for point 6 pixels it's barely noticeable
but it still blends things in a little bit so it works for most selections that
I make but if you want things to be really blurry you can go up to 2 pixels
3 pixels and up from there really experiments see what that does
so 0.6 we'll hit OK and now we have a selection so this acts like any other
selection tool that we've looked at before so from this point on it should
be all the same I'm going to delete that selection by hitting command D or ctrl D
that gets rid of that next we have the title tool now once I click on here you
can see that it creates its own layer and this will be our title layer so I
can say hello and you know I can select my move tool and I can move this hello
around and we can see that it's its own layer so I can again I can select this
lamp so we can move this lamp around that we've kind of damaged and we can
move the title around we can also place the text below the lamp and now we can
see that the hello goes underneath the lamp the way that this works is because
this is a low mode that my computer is about to die hold on next we have the
path selection tool but we're not going to be using that for much so we're going
to skip that for now and then we can create some basic shapes so we can
create a square and now that created a new layer called rectangle for us and I
can always notice that up here our options are changing so we can change
the color the fill of this of this rectangle or we
can give it a little bit of a border like a nice little stroke and we can say
how thick we want the outline to be and then from there we can create different
shapes so we have a few presets over here rounded rectangle tool and Eclipse
the polygon tool a line tool and you can create a custom shape tool so right now
there is an arrow selected and you can change the shape of this right over here
and the cool thing is you can import your own images here so you can create
some custom shapes and you know just drag and drop them like this so then we
have the plan around tool and this is kind of what I use to navigate whenever
I'm zoomed in now if I hit V on my keyboard and go back to the selection
tool if I want to just pan around since I'm maybe moving some things around and
I don't wanna just go back and forth you just hit spacebar and that will change
this icon to the hand so now you know you're kind of panning around and while
you have the spacebar press down you can kind of navigate the same way so the
nice thing is that once you release that you're back to the selection tool and
you can go and do whatever it is that you were doing so that's nice and easy
there's a lot of really useful shortcuts and I've mentioned a few already
throughout this video but i definitely recommend learning them as you go
because they definitely speed up your workflow quite a bit now there's a few
things worth mentioning on this side over here
you can see that we can we have a bunch of layers now because we made all of
these custom layers but I am tired of looking at this lamp so I'm just going
to import something a little bit more exciting so we can play around and take
a look at layers and how they work just pop up finder over here so I'm gonna
select an image and I'm going to drag and drop it not on here but I'm going to
drop it over here right next to our project in this area over here and this
is going to create a new project with the same dimension as that image and
we're seeing that image so we can always go back and forth between different
projects or we can close projects if we're done with them we can save them
not save them I'm not going to save this but yeah if your Photoshop or if your
computer starting to run a little bit slow and you have too many projects open
you might want to close a few down and the same goes with any apps or anything
like that so we have our image import here and this will help us kind of see
what these adjustments are going to do a little bit more clearly than just a lamp
this is my friend by the way Maria Garcia she's a really talented model so
you should check out her Instagram it's really really good so let's start
throwing in some adjustments and see what we can do so I'm going to start
with some of these on the bottom here so we
don't with this icon does this is the layer mask so just just a little
reminder we won't be needing that for now instead we're going to go right next
to that and we're going to click on this half white half black circle and over
here we have a bunch of different options and these are things that you
can you can add you can add solid colors gradients and you can add a few
different adjustments and effects as well so let's start with a solid color
so you click on that it fills the entire canvas of a certain color you can pick
whatever color you want and you can click OK right now I just randomly pick
a color but let's say we wanted to give it a give our image a nice vintage tinge
well with a solid color like this if I were to set this to overlay and by the
way I didn't mention this but in your layer panel here with all of these
layers you have blending modes go away you have blending modes and this is a
way to blend the layers with each other so right now it's on normal but if I go
on screen you can see that it's kind of blending itself with the image below it
and I'm not sure how to really describe each and every one of these but you can
kind of see what they do and the main ones that I use our overlay screen or
add that definitely makes the whole thing a little bit brighter so they just
blend together in different ways depending on which blending option you
pick so I'm going to go with overlay for now and right now it's obviously way too
much it's completely destroying the image but if I go on the opacity for the
layer so again we have the blending options and we have the opacity for each
layer that we can select so if I select the color I can lower the opacity of it
and we can make that change much less drastic so if we go to like maybe like I
don't know 12 10 yeah and if we switch back and forth it's not a huge
difference but you can see that we're blending in the colors a lot more
together and we're giving it just a more of a unique and uniform feel so I mean
this is getting kind of specific and you can definitely play around with this in
many other ways so let's let's move on the list you can
create gradients and that's really good and maybe if you have a landscape you
can create some nice gradient effects for the sky and things like that but I'm
just going to move through these really we because it's just fun to experiment
with on your own so brightness and contrast these are adjustments and they
get created as their own sort of layer and this will affect anything that is
below it so right now if I increase the brightness over here you can see that
it's affecting everything if I increase the contrast or if I decrease it you can
see what's happening there so pretty straightforward and again I want you to
notice that with all of these layers that we're adding you have a layer mask
so if we were to let's say go back to the effect if we were to brighten this
up a lot but we don't want to see maybe the stuff in the closet here I can
select the layer mask of that adjustment layer and then with my brush selected
with black you can see that I can I can darken that up because I'm actually
subtracting this area from this adjustment by using the layer mask so
that's that's where layer masks come in really really handy and I really love
using them so there we go we can just do that little quick adjustment this looks
pretty bad so we're going to just select it and delete it and we're going to add
something else so levels and curves an exposure these
are all just different types of adjustments of two different things
with levels you have more control over your shadows and your mids and you can
kind of control it that way curves let's just add these in real quick
curves with RGB selected you can do something similar so you can control the
mid-tones and the shadows in terms of luminance but then you can also go we
just make this a little bit bigger then you can also go in the individual
adjustments of of each color so the red has its own curve and you can play
around with the red curve like so you can go on the green you can we take out
a little bit of green and make it more violet ish or purplish I don't know you
can have fun with this but that's essentially curved so you can make some
color adjustments really quickly in a nice visual way I really like curves and
I use this all the time so moving on we have exposure that changes your exposure
that changes the the exposure of your scene so pretty pretty self-explanatory
then we have vibrance hue and saturation we we just have a lot of options that
you can go through you can click them you're adding them the same way you can
increase saturation decrease the saturation something cool about this
adjusts that you can go under the individual
colors just like in curves you can control the hue of just the Reds or the
saturation of just the Reds so definitely really cool there's a lot
there to explore definitely go through the rest of this list everything else
works pretty much the same way you can add them and and just experience with
the sliders so very very simple stuff there now I'm going to bring in just
another random image these are all images from Instagram by the way so if
you want to follow me on Instagram definitely do so at crisco art I try to
post there as much as I can and I'm posting stories daily so if you want to
see what I'm up to definitely do that and I'll be in Italy for this time
around depending on when you're watching this video and I'm just going to make
some room here and by the way you can notice how all of these workspaces you
can just resize them so we have this image and we're going to drag it and
place it right above our other image so we can see that we're getting all of
those same adjustments now onto both images so you can see that just from
that movement alone you can see that there is sort of a layer hierarchy so
the the more they're up towards the top the the more it's going to ignore
whatever else is below it so if I move this just below the curves now it's only
going to be affected by the curves and this image is also being affected by my
curves because it's underneath to move it again
wait move it again there we go and it's being affected by the levels adjustment
and now if I move below the solid now it's also getting that overall brownish
reddish tinge so that's kind of the hierarchy of layers and layer panel and
how they work definitely keep that in mind and it can get tricky when you have
a lot of layers but let's say you want to apply these effects only to this
image and maybe you don't want to move this image above them because then it'll
it'll block everything else out so how do I apply these effects only to let's
say just this image alone so I'm going to show you a little trick if you hold
alt on your on your keyboard and you hover right in between the layers you
can see that the handle kind of changes slightly whenever you're in between each
layer so let's let's try to do it with this color so I'm going to I'm going to
click right there so when you do that you're telling Photoshop that you want
to contain this layer in this image so I'll show you exactly what I mean I'll
do it for these ones as well so you can kind of see what that is doing so
you've assigned essentially these to adjustments and this color only to this
image so now it's kind of bypassing the hierarchy and it's containing all of
these elements all these layers within this element and you do that by holding
alt and you go in between the layers so you can undo it by doing the same things
for your you see how the cursor is slightly different has like a line
through it if I go up here that will just undo that sort of selection a few
things that we didn't really go over are are the filter galleries here and a few
other things but really it's just it's very simple and it works kind of the
same way except that it doesn't create a layer so if we want to apply these
filters we want to select an image and then we can go filter maybe we can like
add an unsharp mask and we can sharpen this image and if I click OK that filter
is being applied to that layer so we're not going to create another adjustment
layer it's just going to be applied to that layer but for right now I wouldn't
worry about it too much just know that there's filters here that you can apply
directly to layers and you can definitely you know go through each
little section category and experiment with them all right guys I hope you
enjoyed the start in Photoshop hopefully they didn't bore you too much I know
there's a lot of tedious stuff that we needed to cover but hopefully you
enjoyed it hopefully you learned something from it and if this is your
first time on this channel I don't usually make Photoshop videos I do more
filmmaking and visual effects but if you guys want to see more photoshop
definitely let me know because I really love it I'm but using it a lot lately
even for VFX so let me know what you want to see next if you want to see more
of this definitely let me know in the comment section below anyways guys thank
you so much for watching my name is kris trini for kris carr and i will see you
next time
-------------------------------------------
ДАТА РОЖДЕНИЯ 18 ОКТЯБРЯ🍒СУДЬБА, ХАРАКТЕР и ЗДОРОВЬЕ ТАЙНА ДНЯ РОЖДЕНИЯ - Duration: 6:53. For more infomation >> ДАТА РОЖДЕНИЯ 18 ОКТЯБРЯ🍒СУДЬБА, ХАРАКТЕР и ЗДОРОВЬЕ ТАЙНА ДНЯ РОЖДЕНИЯ - Duration: 6:53.
 -------------------------------------------
E-element Z88 81 Key Mechanical Keyboard - Unboxing & Review - Duration: 8:23.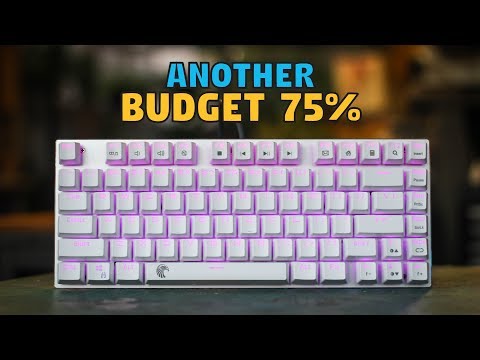
Today we're gonna check out another budget mechanical keyboard and this one is from E-element,
who have quite a few budget boards in the market, and this is the Z88 81 key version.
And I wanted to check this one out because of how common it is on Chinese sites with
its price, and I want people to know what it's about and what to consider.
This was provided by Banggood.com for review, so a big thanks to them for their continued
support.
Links will be in the description.
Opening up the box we have the keyboard itself.
We have a bag of goodies.
And some paper work, which does include English.
In the padded bag we get 5 extra switches.
A plastic ring keycap puller.
And a keyswitch puller.
This is another 75% keyboard in the budget market.
So it's approximately 75% of a standard full sized keyboard.
It has 81 keys, so it's only a few keys short from a tenkeyless keyboard which has
87, although is a bit more compact.
75% keyboards are a great choice for people who want to try out smaller keyboards, but
don't want to go to 60%, as it still offers most of the primary functionality of a tenkeyless
board.
It also gives us more space on our desk, and more space for our mouse, allowing for a more
ergonomic experience with our mouse closer to the centre.
The build is what you expect from a budget mech.
It's nothing special, but it features an aluminium plate that the key switches are
mounted onto.
And this makes it quite sturdy, showing minimal flex.
The aluminium does look nice in this silver colour though, but it does also come in black.
And the edge is chamfered all the way around to reveal a chrome finish.
This design is extremely common with keyboards that have a floating key design with an aluminium
plate, since it's cheap and easy to make.
For example, it's just like the Ajazz AK33 which is also a 75% keyboard.
And this keeps everything very simple, and quite slim looking.
However while the enclosure is clean, the keycaps of course are the typical Chinese
gamery font keycaps.
You really just have to accept it with many of these keyboards, and that is unfortunate,
because I know for sure that most would prefer a more simple and elegant typeface.
That being said, this is marketed as a gaming keyboard and it does fit the theme, and looks
are subjective, so it's up to you.
Replacing keycaps though will be quite tough because of the odd layout.
It's a bit of a different layout to other 75% keyboards out there, in that it has some
gaps between keys.
Usually 75% keyboards would have the whole thing covered.
But we do have our gaps in the function row.
Then there's just heap of gaps in this cluster.
So the arrow keys are spaced out just a bit, and while it looks a bit weird, it doesn't
bother me personally in how it feels in use.
And that brings us to the small right shift key which is a 1.
5u key cap.
And just to clarify, a 1u key cap refers to key caps like the letter keys.
So a 2u key would be double the length of say the R key.
And this right shift keycap is pretty much impossible to replace, because it's not
even a normal 75% size which is already somewhat difficult to replace.
Although it is possible with uniform blank keys.
However since there is no right control key, you could put that key there, and it wouldn't
look too out of place, being a 1.25u key.
Although if you don't plan on changing the key caps anyway, then I guess it's not a
problem.
On the bottom of the unit we have some indents in the plastic, which does make the plastic
case a bit more sturdy.
We get 4 flat rubber feet for non slip, and 2 flip up feet which are also rubber tipped.
Out of the box it does come with the cable attached, which led me to believe it wasn't
detachable, but fortunately it is.
And this has a micro USB port.
And finally we have 3 drainage holes at the bottom for liquids to seep through in case
of a spill.
Under the key caps we have the ever prominent Outemu Blue keyswitches.
So these are just Chinese clones of the Cherry MX Blue switches, and are very similar, being
clicky, tactile, and loud.
These are using the dust resistant switches from Outemu, having these modified stems.
These switches are also removable without the need of desoldering.
But these are pretty tight, and I found the included keyswitch puller to be hard to use.
Some of them required a lot of force to take out which for sure will confuse some people.
So basically how this works is that there's sockets soldered into the PCB, and the switch
pins just fit snugly into those sockets to make the connection.
And this is useful if you want to replace a keyswitch for whatever reason.
Although the issue with these sockets are that they're too narrow.
The Outemu switches fit fine because the pins are slightly thinner than other switches like
the Cherry MX switches, Gateron's, Kailh's and such.
Although people have been able to supposedly file down pins to fit the sockets.
Now to the lighting.
This is marketed as an RGB keyboard, and while it does offer red, blue, and green.
There's only the 7 colours available, so it's not very customisable.
So it makes most of the effects and patterns look pretty tacky.
However, this still gives us 7 options for still lighting which I know most will use.
And most importantly, there is white which does have a touch of a blue tinge, but is
pretty clean.
And that's what matters for me.
Taking the keyboard apart is super easy with a couple of Philips head screws on the top.
And this is a very basic construction.
We have the aluminium plate that the switches are mounted to, which is about 1.5mm thick.
The plastic base doesn't feature ribbing, but is reinforced by the indents.
Again this is very basic, and because of this, it's quite a light keyboard.
The PCB is clean though.
There's SMD LEDs because of the hotswappable keyswitches.
The sockets used for the switches are more like holtites in it's shape rather than
the larger modules I've seen on other hotswappable keyboards.
Although these are soldered in, rather than fitted like holtites.
Unfortunately I didn't have my soldering station at this given time, so I couldn't
take them out to see how they would fair with other keyboards.
But they still have the switch pin fitting issues.
Overall it exactly what I expected.
The 75% form factor is a cool size for those first looking to getting smaller keyboards
that aren't 60%.
Although it does have an odd layout, straying from the standard 75% layout.
The build consists of a thin aluminium mounting plate, and a plastic base, so it is a light
keyboard.
And sure, it does feel a bit cheap, but again it is a budget board.
I think the biggest thing though that tells me perhaps you shouldn't get this, is that
the Drevo Excalibur exists for a bit more.
And that has a very nice CNC'd aluminium base, with a better 75% layout, and is in
my opinion one of the best budget options out there.
And there's even the Drevo Gramr which is even cheaper, but has a different design.
Then there's the ever popular Magicforce 68, if you don't require the primary function
row.
That being said, this does have a few extra features, with the removable keyswitches,
and multicolor backlighting.
But for me, if you don't absolutely require those features, then you would be better off
getting the other options.
Thanks again to Banggood.com for providing this keyboard for review and their continued
support of the channel.
Links will be in the description.
-------------------------------------------
Who Will Kill Cersei Lannister? - Duration: 3:12.
we thought it would be fun to have
a little debate with our friends.
Allow me to introduce you to these wonderful people.
first of her name,
host of podcasts,
The Night is Dark" and "TV Show Show" and...
Rider of Dragons.
host of the Dan Cave and must watched
author of books about fandom and lacker of olfaction.
We're gonna ask you a question,
and have a little discussion.
Dan I'm going to start with you.
Ready, Go!
Now, It all stems back to the prophecy that Maggy Frog gave Cersei
when she was but a young girl,
a Valonqar is going to wrap his hands around your throat.
Now what does "Valonqar" mean?
It's high Valyrian for little brother.
Now some people might erroneously think that means, Tyrian.
But, if you think back, Cersei is a twin, she's the older twin, her younger brother
is also Jaime Lannister, that means that she is going to get taken out by the Kingslayer
himself is going to add Queenslayer
to his resume, because at the end of the day, he's
gonna have to make the tough choices,
Jaime Lannister knows sometimes the only thing that
can stop a Mad King or Mad Queen…
HODOR!
Dan you made my point almost for me,
but I'm going to change the brother, it is in fact
Tyrian.
The little statured brother indeed.
At the moment he's in the best position.
He's advising the queen to be,
Queen Daenerys Targaryen,
and basically she's got the Unsullied,
she's got three dragons,
she's got the will to take over Westeros,
which is her next destination.
All Tyrian has to do is slide in and make the killing blow,
which he has done before,
with his father Tywin on the can.
So I believe it is going to be Tyrian…
HODOR!
Yes, he's killed his dad before, who hasn't thought about doing that from time to time?
It's going to be Jaime,
because, when the forces of Daenerys et al, march on Kings Landing,
do you really think Jaime's going to let the love of his life die at the hands of his
crappy little brother?
No!
He is going to strike the killing blow himself while she bleeds out into her wine aquarium,
and then he's going to drink that blood and kill himself.
You say it dies at the hands of the little brother.
Jaime has only got one!
He physically can't choke out his sister because this hand doesn't move.
I think that's a very able-ist view of assassination..
I think that Tyrian's got that one, even though there little hands, he has choked out
before, his previous love.
As she says in the trailer, she has enemies on all sides.
So really, everybody wants to take Cersei out.
She is going to die.
Maude, where can people find you to argue with you?
And Dan?
and if you want to tell me just how right I was,
you know what to do.
Smash that follow button fam.
and you are watching HitFix on Uproxx.
Keep coming back for more fun Game of Thrones debates!
-------------------------------------------
Zainab (ZainabLaLaLa) | The Road to Nerdfighteria - Duration: 3:39.
Hello, wonderful people of Nerdfighteria. My name is Zainab and today I wanted to
share with you how I found Nerdfighteria and what it means to me.
So, my initial introduction to John and Hank was through more educational videos and
these were introduced to me by my sister, who isn't really a big fan of YouTube
and YouTube community, but she does enjoy YouTube from time to time.
Where I actually found the Nerdfighteria community and actually started watching John and
Hank's videos weekly, and not just sporadically, was when I
made a friend through another YouTuber. And I think the main thing I love about
YouTube generally is just how communities overlap and how
when you meet someone who loves YouTube, they could be into a completely
different style of video compared to you. I've basically made a friend through a
completely different means and they were really into Nerdfighteria and I was like,
"Wow, okay, let's find out what this is about!" Because before then, before I made this
friend I didn't really know about a small YouTube. I didn't really know about
the community side to YouTube so much, I'd never been to a convention or
anything like that. So when I met this friend and they went to
VidCon and they met Dave, who at the time was successfully, weekly running the NFI
collab channel, which stands for Nerdfighters Info. Isn't really an info
channel. It's a collab channel. It was really, really cool because I got to meet
so many different people from across the world, who are all united by their love
for John and Hank and just their love of sharing their experiences and talking
about weird and wonderful things. And I think, over time,
what Nerdfighteria has meant to me has been like opening myself up to tell
all the weird and wonderful things and seeing things as
complexly as possible. And that's been really, really cool because for me,
especially because I feel like I watched the Vlogbrothers and listen to their
podcast in what I would call my formative years, which has probably been
in my latter teens compared to my early teens, even though obviously you're growing all the time.
But, Nerdfighteria for me has reminded me that even though I may feel
really normal and really small, that's what everyone's like. Everyone's weird
and wonderful in their own way and it's only together as like a big group of
people that we can make a difference, Nerdfighteria has also been the place
where I felt the most comfortable. NFi was the first place where on Google
Hangouts and Saturdays, I felt like I had a home on the internet and I was still
call NFi my home on the Internet. And it was the first place where I made a vlog
and it was the first place where I found out what community means on the Internet.
And honestly I have to say that the friends I've made in Nerdfighteria have
been the best friends I think I've ever had, genuinely speaking. So Nerdfighteria
for me has been a way to explore myself, a way to appreciate that I don't
know many things, but that there are some things that I know better than anyone else.
So yeah. Thank you so much for watching! I hope you're having a wonderful time
doing what you're doing and I hope you enjoy the rest of the videos and the
rest the stories that are being shared here. Bye, guys!
-------------------------------------------
11 жестов, которые выдают лжеца - Duration: 10:26. For more infomation >> 11 жестов, которые выдают лжеца - Duration: 10:26.
 -------------------------------------------
RANDY SANTEL $20 @SUBWAY CHALLENGE | 4 footlong sandwiches | MANDELVSFOOD & JOE BURGERCHALLENGE - Duration: 12:03.
English subtitles.
-------------------------------------------
Cedar Shake Tiny House (300 Sq Ft) | Tiny House Design Ideas | Le Tuan Home Design - Duration: 2:50.
CEDAR SHAKE TINY HOUSE (300 SQ FT)
-------------------------------------------
Как Вожеватов будет отмечать свой День Рождения. Безумная РАСПРОДАЖА. - Duration: 1:12. For more infomation >> Как Вожеватов будет отмечать свой День Рождения. Безумная РАСПРОДАЖА. - Duration: 1:12.
 -------------------------------------------
Donner du fil à retordre (apprendre le français) - Duration: 5:23. For more infomation >> Donner du fil à retordre (apprendre le français) - Duration: 5:23.
 -------------------------------------------
How to Customize Your YouTube Channel Layout in 2017 - Duration: 1:01.
In this video, I'm going to show you how to customize the layout of your YouTube
Channel, so you can go from this... to this. That and more is coming up right now!
Are you currently customizing the layout of your YouTube Channel? Let me know in
the comment section down below. If your YouTube Channel looks like this, you'll
know it's not completely customized yet because it still has a list of all the
videos you've uploaded in order. After signing into your YouTube Account, all
you need to do is click the gear icon next to your subscribe button, and
turn on the option that says customize the layout of your channel. Click Save.
This one setting allows you to customize the layout of your YouTube channel for
returning subscribers, as well as for new visitors. This includes setting a custom
YouTube channel trailer, as well as adding your playlists on the front page
of your YouTube Channel. If this video helped, feel free to leave a comment in
the comment section down below, and subscribe so you don't miss any of my
future videos. Thanks for watching!
-------------------------------------------
Skeleton Life 3 - A Friend Of Mine - Minecraft Animation - Duration: 4:27.
Hi loyal subbies! Enjoy this new episode !
Thanks for watching !
SUBSCRIBE! SUBSCRIBE!
-------------------------------------------
Lijepi Brener- Jučer, danas - Duration: 3:36. For more infomation >> Lijepi Brener- Jučer, danas - Duration: 3:36.
 -------------------------------------------
SHANIA VIDEO SWINGING WITH MY EYES CLOSED - Duration: 1:36.
HEY TRIPPSTERS more Shania news apparently it has been confirmed that
she is actually working on a video as we speak for her second single that will be
out in a couple of months which is called
swinging with my eyes closed there is a photograph of her standing with the I
think executive director I think is who it is have just sent Colin for this
information Colin you're my buddy you know I love you man thank you so much he
actually has this on his a Shania now Facebook page I will link to that in the
description below if you guys want to see it you just click the link it'll
take you right to his page but apparently des picture was taken on set
day before yesterday while she was making the video for
swinging with my eyes closed which says to me that if she's working on that when
she must already have last about to get good finished so we should be seeing the
official video for loss about to get good right here shortly I'm thinking
within the next couple of weeks now that's just me guessing guys listen
Carrie what I wanted to keep you guys up to date on the whole news that is the
news concerning sniping and all of her new music so she's got one video done
and is working on the second so whoo when it comes out I will let you guys
know when we get a release date for the second song I will let you guys know and
Colin thank you again for keeping me up to date on Shania
so I can keep the other people up-to-date on Shania so but that is
going to do it for now this is ICEPETS Queen and I am tripping out
-------------------------------------------
Game of Thrones 7x02 & 7x03 Comic Con Promo "Stormborn" "The Queen's Justice" (SUB ITA) - Duration: 0:58. For more infomation >> Game of Thrones 7x02 & 7x03 Comic Con Promo "Stormborn" "The Queen's Justice" (SUB ITA) - Duration: 0:58.
 -------------------------------------------
Jacquees x Jeremih Type Beat - Strip (Prod. By Sir Rahmal) | R&B Instrumental - Duration: 4:18.
BUY 1 BEAT GET 1 FREE | www.SirRahmalBeats.com
-------------------------------------------
Classical Musicians React: BTS 'Blood Sweat & Tears' - Duration: 15:12.
Umu: Okay, so that means we're for blood sweat and tears Lindsey: OH MY GOD
Lindsey: Blood Sweat & Tears
both: B-T-S blood sweat & tears
Lindsey: ohmygod it's happening davis: you asked for it, you've got it lindsey: omg
we're here to deliver what you've asked for <3
davis: now is the time lindsey: blood sweat & tears babyyyy
Rock on
*Rossini's Semiramide Overture plays*
jarod: blood peyton: sweat
tears
Yunyi: Wow, I've never heard of this music video song it's not like I really don't think anyone knows it
and it's not like anyone requested it or anything
Umu: This song and music video broke a lot of records too, it won a bunch of awards
It got the most views in one week it got was the fastest kPOp music videos have a reach 10 million and 40 million views
umu: etc etc etc lindsey: ohmygosh! That's a lot of millions davis: what you're telling me is BtS are champions. umu: Yes
Jarod: alright umu: Just come out a music as much as possible and enjoy jarod: yāt yih sàam- in Chinese. This is K-Pop. oops.
henry: it's like a museum. it's like at one video where they'rrreeee
detectives
Fiona yeah that one. umu: Oh sher- sherlock henry: yeah
naoki: it would be really funny if he just knocked something over
shimon: that would be Horrible
henry: don't ride a bike in a museum. you are a barbarian.
gwen: opera glasses!
hugo: in an art museum
davis: is he gonna disappear?
umu: *wheezes*
Peyton: cue classical music
naoki: oh. Mozart Requiem?
gwen: that dank choir doe
yunyi: Mozart's Requiem? Kevin that's my first guess. I don't think so. It's not in the right key
Henry: there definitely also
B diminished going to C minor so a lot of that going on here.... *GASP*
lindsey: ooh they look so classy
fiona: whoa
henry: he looks.....fabulous
kevin: I like how this is f sharp which is the base of the last chord.
Jarod: Oh. dang
fiona: this is awesome!
henry: bruhh. I dig this.
naoki: we had 1-7-6-5 again shimon: yeah
kevin: my gosh
what a pretty man
Hugo: his voice is so high and so clear gwen: yeah I really like the androgynous style that they go for
Naoki: What do you call that? a walking bass line? idk i don't remember shimon: yeh something like that
kevin: oh, God. yunyi: Oh, this is such a pretty song
I'm liking the contrast of textures of- simon: oh yeah
Jarod: That guy-liner tho
kevin: outfit
peyton: woo
kevin: It's a very good song
jarod: the Bird...the color
peyton: oh man jarod: the drink peyton: the DRANK
Wow, these guys are classy af
Lindsey: They really like the whole like color drop kind of thing
Someone drop something they drink and when you look at it, there were like a bunch of colors
I mean theoretically it's kind of descending Tetrachord
yunyi: mm hmm kevin: that's it
gwen: that's a very interesting- hugo: sings
gwen: I wish i could riff like that
ooh Yeah,
kevin: oh those legs. Oh that was such a pretty profile. kevin: Oh, oh this legs. both: Ohhhhhh
my heart! kevin: *continues to 'oh'* beyonce can't top that
OHHH, they're in a painting. and it's
Beautiful
this song uses less symphonic instruments and more electronic instruments but i'm reeeally digging it gwen: but it still works
shimon: oh, paint
Yeah
There was no bow and arrow in the videos right? shimon: apple
naoki: have we seen an apple yet? shimon: Yeah, we have. not in this video but in a past one.
like willima- naoki: ohh William Tell! right! *i have no idea what they're talking about here tbh*
hugo: his voice is so high (gwen: I LOVE IT) it sounds like a woman. It's so good
gwen: sounds better than a woman. hugo: He does
If there's any CGI in these videos, I can't tell
but that's how falsetto should sound (still talking bout jimin) like light, but still with tone
fiona: this is...this is so deep
henry: *GASP* WHAT THE-
that was cool to the background with the painting but he was sitting up on like the windowsill and jumped off
wow man that's dope
You could say it's a period, right?
it's a two plus two form
in which the first half is a half cadence and then the- shimon: ohhh they're fine again
OH! YES! yunyi: ohmygosh kevin: give it to me
Oh My God
if there was a lot of hype about this video coming out before it came out
It definitely like lived up to the hype
both: OHMYGOOOD
OHH
oh god it's so high- listen
oh...that's interesting
he's gna let go of the balloon he's gna lose the balloon
wow
Wow, I thought there was gonna be like a drop there, but it went into the rap mon narration davis: deceptive
naoki: oh this is really cool
goodness
shimon: that contrast naoki: blood shimon: it's ridiculous naoki: and death shimon: holy cow. organ? naoki: that's very ominous
lindsey: the f- church organ? davis:....sick
gwen: are those the pipes???
fiona: I love Organ by the way- i'm A fan
yunyi: we need an organ major here kevin: i think it's a bach trio sonata. that's my first guess.
naoki: it's bach for sure, right
I'm going to look it up after this video
it's gna be eve? shimon: it's probably one of the members
oh what was that...that was freaky shimon: wings. black wings.
yunyi: so far it sounds like a solo piece kevimn: no Trio as a Trio sonatas are for working solo. yunyi: Oh, (umu: guys!) kevin: yes
ohh man
i swear on everything...if that thing moves..
shimon: Oh, tht's terrifying naoki: yeah, I thought it was gollum at first or something
jarod: what the peyton: wow oh wow
lindsey: OH WHAT THE F*CK
Whoa, whoa jarod: WHOA...
i knew it. i knew that for some reason that they were Gonna kiss?
shimon: wings naoki: oh he was a fallen angel
hugo: holy f-
*yunyi fangirls* *umu looses shit*
ohhhhhh man, idk about that bruh
yunyi: *still fangirling* sorry
What
whoa
oh that pitch distortion! ohhhh
davis: oh
He's tur- It's the statue
his face is cracking now. Put some lotion on that or somethin
...oh what
what
what
there you go! henry: wow fiona: that was crazy umu: well you had it fiona: i'm glad we watched that henry: i'm confused
I was like everything iss about to make a lot of sense right now
And then it got more confusing
well umu: did you make up your own theory? henry: i don't have time
I think it's all about birbs. everyone's a birb.
umu: ok that's your theory *to fiona* do you have a theory?
that's not a real theory. i'm just making a joke about birbs.
Everyone dead. (umu: ok) except for jin. he's the only one alive. henry: i don't think they're dead- just that they were never really alive. I think they
are kind of like- he's their sort of leader person and everyone else is just kind of like a little part
heee has schizophrenia and has like four- how many char- people are in this group?
well six plus him. fiona: he has schizophrenia and there's six people including himself inside of his own mind henry: wel that would be multiple personality disorder fiona: multiple-
Yeah, and what do you think of the music?
Yeah I really liked it. henry: this one was pretty good. fiona: Yeah, it got really hype really fast
what
I mean- if we're coming up with theories
i feel like he like fell from Grace or something like that
No, but kind of the opposite those wings were like black
no i- look he obviously used to have wings and that statue was representation somebody he used to know
Boy meets evil peyton: and he was just like (jarod: he's evil) "Yo, what's up"
ieeeee
Music is cool
it was definitly bouncin. mv was cool cuz it was the most song-like, other apart from boy meets evil, this is the most like...traditional kpop
Kind of vibe. but wow umu: was it weird coming from like the short films with like
Not like all the members to suddenly this? jarod: yeah where it's like full cast
well f*ck son. damn. (gwen: do we need-)
just pause it just pause it gwen: f*ck me *sings* upppppp
*sings* f*ck me dowwwwnn
hashtag when you accidentally make it magical
woooww
i like how it's not as over the to- like it doesn't you know?
It's like it's still equally artsy
But it's not as it's a more traditional music video-y which I can appreciate after all the short films we watched today.
They won...At like that MAMA awards they won best album of the year kevin: it's a good one. yunyi: they gotta win some awards for this kevin: solid... good stuff
What do you guys think about song like musically like yunyi: progression wise it was not the most
interesting kevin: it was yunyi: but it was very catchy
It's instrumentally satisfying
yeah it's satisfying but it's like
we would heard this progression before it's not- it was more like it dazzled on like how extremely well was produced, mixed and like themimicked and like the
Choices and the actual instruments and the rapping is pretty solid
that was pretty awesome (umu: blood sweat and tears man) davis: I now see why
Thousands and thousands and thousands of comments asking us to watch this video
It all makes sense. really good. So what do you like about it specifically davis: um?
Well, I definitely liked watching all of the videos
Beforehand and being and will be like oh yeah, it's a remember that in this video, and oh yeah
See that was in this video
And then you had this really interesting thing that was created where it was like you have this expectation for the video
But then like because you see the symbols from the other videos
But what they did was they they presented it in a way that like you couldn't really guess lindsey: yeah
lindsey: i was just...kinda thrown for a loop. a little bit. umu: mhm. story wise? and then music?
lindsey: oh it was awesome davis: Yeah, I mean, lindsey: it was just very catchy it was very like- davis: it had everything you want
It didn't allow you to like get comfortable because I feel like if you get too comfortable
Then you stop listening, and so I think I did a good job of keeping you engaged, and like-
There wasn't much that we can like actually analyze about it was it was it was kind of just very like upbeat like I would
hang out while
This is playing like davis: true lindsey: like I don't want to call it party music because I don't know if that's the right
Thing to say about it because it's not really
davis: but i would play that at a party lindsey: but like I would have that like playing as background music
You know people would like low-key vibe to it while they're hanging out davis: but the music video...holy shit. lindsey: yeah
so musically
naoki: the last one was the best. shimon: oh yeah. (naoki: Yeah) that was solid naoki: yeah
so you've seen all the short films. naoki: Yeah
and intro: boy meets evil.....
Did this answer any of your questions? naoki: I guess it does in a way. I feel like maybe it's a guy
Going from good to bad progresively
after he kills his dad he goes through all these different like
Moments, and it's Super representation of his psycho, so I like in a state. his mental state
shimon: but they're all individual people right not just symbolizing one person? naoki: but I feel like they all as a group they symbolize bTS and
Bts is one representation of someone shimon: sure sure
I guess compared to like the first like set series or trilogy right? (umu: HYYH) Yeah?
naoki: i didn't see that so i can't compare shimon: I definitely does give the feeling...like ya know-
the Progressing from like the first set or hyy-
whatever. that was like them
doing the act and then like the short films was like the
the Consequences and them dealing with like you know they were all trapped in like a-
Insane asylum or like yeah like trapped in a box, or is like trapped in a certain way
And then this was like them breaking through almost
That's what I got
mmm no, not quite yunyi: wait you want to go back to that part?
It's not what I just played. yuni: it does sound like bach tho. (kevin: Yeah) it sounds like *sings*
Yeah
It's not that one, but it's the same progression in the opening. God but bach had so many organ works kevin: a lot
yunyi: how are we gna find this kevin: it's not toccata and fugue. Let's start with that. yunyi: no, it's way too slow kevin: scratch that one off
nope,
or I Guess we can just go to this video and someone probably would ask "what's organ piece?" kevin: That's right
They would have answered it, but where's the fun in that?
No, I'm gonna win again
no I'm just going to search it up. yunyi: i'm gna scroll down through the comments and see if anyone- kevin: see who finds it first
*still can't find it*
Okay
It's also very well recorded yunyi: ok first of all
Is it d minor? kevin: yes it's in D iminor- congrats
Thanks, umu: what key is the original song in?
B Minor I think yunyi: oh nice key relations, umu: oh what oh D and b and d minor both: kind of
not even the reddit
page for this has it in the comments
Okay, so we're doing a service to the fan base by looking this up kevin: passacaglia in D minor found it.
yunyi: oh kevin: By whom!?!?!? yunyi: Piano version!? *umu clicks* no no no kevin: we need to find the composer
yunyi: *says dudes name* *i dont want to butcher spelling* umu: da- no, dabreech bufftaheahs yunyi: Oh, oh BUXTEHUDE!!!!! kevin: ofc yunyi: oh he's such an underrated composer
Yeah, this is the first piece where I actually genuinely like buxtehude b/c i haven't heard anything by him yunyi: are you serious? i love buxtehude!
kevin: well now I'm gonna listen to more of him
We ought to find the original we gotta find the original yunyi: but why would you play buxtehude on piano?
yunyi: that's a little upsetting umu: Do you want to do just- kevin: no, I'm gonna. I'm gonna. Oh, it's short, Passacaglia. Oh
Passacaglia's are usually long
It's in thw wrong key
yunyi: baroque tuning
Yeah, yeah, yeah, yeah
is it bugging you, do you want me to- yunyi: nononono kevin: it's bugging me (*has perfect pitch*)
yunyi: no- cmon! mean tone.
yeah, i'm mean to the tone
we finally find the piece after like seven minutes ah
yunyi & umu: AHHHHHHHH
kevin: bi-tonality xD
Không có nhận xét nào:
Đăng nhận xét