hey guys welcome back to another video working on the cr250 build here so I
took a few weeks off spent some time recovering and now it is time to get
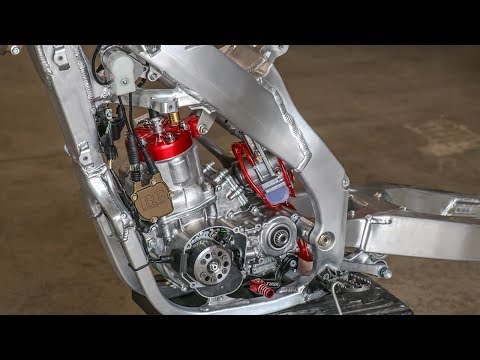
back after it so what we'll be doing today on this bike is building around
the engine gonna be mounting up some electronics the radiators carburetor and
possibly the exhaust as well and just a bunch of cool little bits all over the
bike so I've got some cool stuff coming your way so stay tuned let's get started
I've got a bunch of parts lined up here that I want to install on the bike today
just a matter of figuring out where to start so I'm most excited about this
electronic carburetor heard some really good things about it
so I think I'm gonna start there if any of you guys saw the Red Bull straight
rhythm a few weeks back with only two strokes you'll notice that a lot of
those bikes or at least most of the winning bikes we're running the elektron
carburetor so really excited about that and then I've got this red fuel line and
vent hose from the halo concepts kind of spruce up the carburetor here so
I'm gonna mount this carburetor up first and then see how that hose looks on
there for those of you that aren't familiar with these electron carburetors
what they do best or what makes them so special is they self adjust for
elevation temperature or changes to the bike all right let's get this beauty
mounted up on the bike so once I have the bike all together and running I'll
give you guys a better idea of how exactly these carburetors work
it was a bit of a tight fit with that carburetor going into the intake boot
but definitely better having it tight to loose at least I know 100% that's gonna
seal check out that clear football though that is gonna look so cool the
first time I turn on the field valve so electron provided a throttle cable for
this carburetor so before I mount it up I'm gonna Lube
it up make sure it doesn't run dry on me even though this cables brand-new always
a good idea to lube it up anyways so I'll be using a motion pro cable living
tool I believe this is called the b3 cable living tool and then I'll be using
motion Pro cable OOP as well
all right that should do it squirted quite a bit of Lube in there and at the
other end of the cable here notice there's a film of Lube so we're good to
go now to install the cable onto the carburetor I'm gonna have to tilt the
carburetor outward a little bit just like that and remove the cap and the
cable just threads right into the cap like so
looks like the end of the cable just hooks into the slide through the hole in
the middle I'm gonna hold that down pull it out and slide the spring back into
the slide there we go ready to go back on to the carburetor
now for cable routing I always like to go in between the motor mounts here the
upper motor mounts I'm gonna want when t5 I have the thrall cable and the
clutch cable routed through here seems to work really good just kind of keeps
the cable from getting kinked and it's a nice spot to route it through see if
it's gonna work on this bike to have that cable through there oh yeah perfect
see how clean that looks just right through the upper motor mounts now
before I get too carried away with mounting this carburetor I need to make
sure that throttle operates properly just pulling the cable make sure it
returns yep that's all together perfectly it is time to add some flavor
to this carburetor with this in the Hilo concepts vent hose
just hopefully I have enough to cover
I've got one hose left and I'm just a couple inches short like always damn I'm
gonna have to order up some more but anyways I've got three of the hoses
done looks like they're all around the same length and where I like to route
them is in between the frame and the linkage here at the dog bone so there's
a nice little gap here to tuck them in nice and tidy and I've also got this
piece right here so this bolts on to the crankcase like so you flip it over just
like that and kind of holds all the hoses in tight to the crankcase
so this nihilo hose worked out perfect fits really good on to the fittings here
on the carburetor it's nice and flexible not super stiff like some other brands
I've used and it looks really good just got to order up a little bit more
and I'll be set now this is kind of the unsexy part of the build but I'm gonna
show you guys anyways so the electronics there's really nothing that special
about them so the wiring harness is up first this
just provides power to everything and where they call this the regulator
condenser that basically regulates the power to the ignition coil and servo
motor and this is the ignition coil that provides spark to the spark plug
CDI box pretty much controls everything it's like the computer of the bike and
like I mentioned earlier this is the servo motor for the power valve now
before I get around to installing the wiring harness got to make sure that
there are seals in all of these connectors here so you can see in these
ones there's a little orange seal down inside of there it's really crucial to
have these seals because when you wash the bike you don't have seals water is
going to get in those connectors and your bike is gonna be cutting out if it
runs at all so it looks like we got a seal in there and this one has a seal as
well so first things first this is the wire coming out of the stator and it
plugs into this connector right here and this connector has a little slot on the
backside of it and this clips on to the frame so there's a little tab here on
the frame please zoom into that so that little tab connects with the connector
just slides on like so see it's secured to the frame and that is where the
stator plugs into you and then we've got a few more connectors here this one goes
to the servo motor this one to the regulator and condenser these two are
for the ignition coil and then these two bit connectors run up to the top of the
frame here or the neck of the frame and connect to
the CBI box oh and we've got two more connectors here these two go to the kill
switch that's up on the handlebars I'm just gonna tuck in the wiring harness
just like that like I mentioned earlier water that gets in electronics is a big
deal so it'll make your bike not run or it does run out cut out and it'll just
corrode things and to prevent that from happening this is what I use it is
called dielectric grease you just put it right inside the connector pretty simple
deal and it prevents that connector from corroding so you just simply put a
little dab on each connector here and then you're good to go
and these connectors should be pretty self-explanatory but there's a little
tab on this connector little thing that pokes up that is gonna face towards the
disconnecting tab here on the connector so you'll see there's a little thicker
part or like a little groove where that slot or that tab goes into hopefully
that made sense but this be cautious of which way you're going in with the
connectors and then when you're pushing it in you'll hear a little click that
means it's all the way in and seated and for the stator wire I'm just gonna zip
tie to the frame try to get it out of the way and get it looking tidy here as
well
all right next up we've got the ignition coil of the mount so this upper mounting
hole is also used for our ground and so it's pretty important to have that bare
steel don't want any rust or corrosion on that so I'm gonna take a wire brush
and just make absolute sure that this thing is clean and then for the mounting
clip I'm gonna use the dielectric grease once again just to ensure that no
corrosion happens down the road I'm gonna figure out which way this coil
mounts on the frame looks like it faces up like that the wire pointing up make
sure that lines up with the spark plug here oh yeah looks like the right way
plug that in to the coil so just like I said earlier this ground just goes on
the upper mounting hole gonna dig through my bolt kit here this is from
bolt motorcycle hardware just trying to find a few bolts for this coil found
exactly what I was looking for always super nice to have fresh hardware on
hand so if you guys are looking for hardware for your bike definitely check
out bolt motorcycle hardware I believe their website is both MX comm for the
top bolt I am using a locking style nut so no need to use any sort of lock tight
on it
for some reason that doesn't look right that coil wire is a super kinked it's
like tight bend right here and then at the coil as well there's really only one
way that can go on I wasn't quite sure about the routing of the coil wire and
just the mounting of the coil so I looked up a few pictures online here and
that is indeed how the coil is mounted so I'm just gonna leave it I don't know
it looks weird to me but apparently how it's supposed to be all right now I've
got the cd-i box the mount up but first here is the CDI mount so the CDI two
slides on to these three little tabs here with the rubber grommet and once I
get this into place I can just plug it in and I'll be set and I would say that
CDI connectors are probably the most important for trying to avoid water and
corrosion so you definitely want to use the grease inside the connectors and
once again you want to make sure these connectors go all the way down and make
a click when they see it all the way now it's time for the servo motor this motor
here controls the exhaust valve on the bike come over and show you guys here
this here is the exhaust valve and this valve controls how much exhaust gases
come out of the engine and having this valve gives the bike a broader range of
power so before I mount this servo motor I'm
gonna have to test it I've never tested or taken one of these apart so this will
be completely new to me here I've got the a 12 volt battery I'm gonna hook up
the battery to the connector here and see if the motor operates properly so
I'm gonna need to pull this little plastic cover off to see if the motor is
turning over it's pretty clean underneath here a good
sign here I've got two separate wires to run from the battery to the connector on
the servo motor alright the manual states that the positive wire coming
from the battery goes to the black / white wire on a connector this one here
and then the negative wire leads to the white / green wire you can see when I
connect the battery to the servo motor the motor turns in a counterclockwise
direction which is what it's supposed to do that's a really good sign looks like
the servo motor is working properly now I'm gonna take it apart which I've never
done before and just make sure everything is in good shape inside by
the way the screwdriver that I'm using is called a JIS type screwdriver which
stands for Japanese industrial standard I believe so the screws that come on
these Japanese bikes have a little different head than Phillips so they
have a little dot or a little punch mark and that mark indicates that it's a JIS
type head and so you need to use a JIS type screwdriver for it to fit the head
properly so you can see this one fits perfectly in there and reduces your risk
of stripping out the screw so I'll put the link to where I bought these
screwdrivers down below in the description box
screws are out let's see how this thing splits apart pretty much just like an
engine you got two cases I'm really curious about the condition of this
thing inside hope it's not super rusty
wow that's actually in really good shape I thought it was just gonna be rusty and
corroded so from here all I see is the motor and a couple more screws so
there's got to be some gears inside this thing and that's mainly what I want to
look at got those screws out and I believe this thing should come apart
even further it's gotta be really careful see a bunch of gears in here and
I don't want to have them all fall apart on me I'm just gonna check over these
gears and shafts make sure there's no damaged or missing teeth grease things
up and put it back together this side looks pretty good check out the motor
side of it it's actually remarkably clean in here for a 15 year old bike I
thought for sure I was gonna run into some rust and I'll be using this mini
grease gun to squirt the grease exactly where I want it it's got this needle
size tip link to where you can buy this will be down below
so going back together what after worried about is getting this Halfmoon
shape into this gear here and then all of these posts will line up with the
holes on the other half I think it's going to be easier to have all these
gears on the other half instead
so this should go back together a little easier with everything on one side so it
looks like I got that gear and the motor lined up when I turn the pulley you can
hear inside of the motor here that it's turning so that's a good sign and all
the rest of the gear should be lined up as well
before I get this thing all the way back together I'm gonna test it one more time
just to make sure everything is together correctly all right everything checks
out fine I'm gonna put the other half of the casing on and then I can mount this
servo motor on the bike
actually before I mount up the servomotor and the rectifier on the bike
I'm going to clean them up with the prime MX cleaning pad here on the buffer
oh man these turned out sweet always impressed with results of the cleaning
pad if you want to pick one of these up they are available over on my website
prime em XCOM i'll put the link down below in the description box one last
thing to do before I mount the servo motor on to the bike no lube up the
servo motor cables score it a little bit through this end here it's a really
short cable so doesn't really take much to get lube all the way through it so
I'm trying to find the correct hardware to mount the servomotor and rectifier to
the bike but this is how I got all the hardware when I bought the bike it was
already partially disassembled so I have no clue which bolts go where so I'm over
here on Rocky Mountain atv/mc comm and they've got the OEM microfiche on their
website basically a parts diagram so I've got the servo motor pulled up and
number five is the correct bolt used to mount the servo motor so it looks like a
ten millimeter head with a washer attached to it so right there bolt
washer six by twenty eight so that indicates it's a six mil thread by
twenty eight millimeters long so I'm gonna go ahead and find two bolts for
that so if you guys need a great resource on figuring out which parts go
where or you just need to order om or aftermarket parts Rocky Mountain atv/mc
comm is the place to go I found the hardware I needed let's get
these things mount it up I believe it goes behind the tabs let's see here in
front doesn't really line up so yeah it goes behind the mounting tabs
in looking at this wiring harness and how I've got it routed I believe I have
it on the wrong side of the frame so looking over here at where the harness
is supposed to clip to the way I've got it situated nothing really lines up so I
need to switch it over to this side of the frame
I've got the wiring harness switched over to the other side and it looks so
much cleaner now that is definitely how it is supposed to be runs all the way up
to the neck of the frame and next up I'm gonna mount the servo motor cables down
to the power valve I almost forgot this little bracket that holds one of the
cables in a place just mounts on to the cylinder just like that let's figure out
how to get these cables on to the exhaust valve I'm going to turn the
servo motor give this cable a little bit more slack there we go it looks like one
nut goes on one side of the cylinder here and just in a place the other one
goes on top along with the washer now to get this front cable on I think I'm
gonna have to loosen up the servo motor just take out the top bolt and I should
give me enough room to get this cable on to the power valve arm
now that I've got both cables attached to the power valve I will need to set
the tension on them so I'm gonna start with the back cable first I'm gonna turn
the pulley on the servo motor all the way clockwise for this and then I'm
gonna adjust the back cable until it starts to bow into the front cable so
watch as I turn this adjuster out or loosen the adjuster it is gonna bow into
the front cable and that's it for the back cable to adjust the front cable I'm
gonna turn the pulley on the servo motor counterclockwise all the way and so what
we're looking at here at this cable is the amount of slack here in the middle
so you can see it's moving up and down quite a bit and so that indicates the
cable is loose take my 8 millimeter wrench back this adjuster out a little
bit well continually check in the slack and I'm gonna go until there's no more
slack left in this cable or just a little bit of slack you don't want to
tighten it too much so it's very much like a clutch cable adjustment got a
little bit of play there and it go maybe two more turns no it's a little tight so
there's this a tiny bit of play there and I'm gonna call that good and then
down here at the bottom I'm gonna lock the top nut against the cylinder let's
secure the cable into place cover it all up and we are set just got to bolt the
power valve covers back on and I'll be all finished up with the electronics
just to make sure I've got all the electronics assembled correctly I'm
gonna pull out the spark plug and check for spark to check for spark I'm gonna
hold the spark plug you get something steel such as one of these nuts on the
head and then turn the bike over by hand with the Kickstarter
well guys got some bad news no spark so I'm pretty sure I've got everything
together correctly all the connections are good grounds are nice and clean but
I'm kind of running out of time in this video to figure it out but write your
suggestions down below in the comment section for what to look forward to
figure this issue out I do have some good news though so earlier in the video
I ran out of red vent hose for the carburetor but I worked some more up
from the helo a couple days ago showed up already they were super quick about
it whoops only needed one pack anyways so
let's get this lecture on carb all dialed in with the hose
all right that's gonna be it for this video the pipe and radiator install is
gonna have to wait for another video so the next time we'll work on this baby
we're gonna have to figure out these electrical issues and I watched your
guys's help with it so write your suggestions down below in the comments
section on what you think this no spark issue could be and we're gonna figure
this thing out together so actually I head back into the hospital tomorrow for
more cancer treatment so it might be a while till the next video do you guys
would like to support me in this fight I do have camp strong hats t-shirts and
stickers available over on the website let me grab and I'll show you what
they're all about for the shirt just a nice clean white shirt with camp straw
in the front Prime the next logo on the neck sticker is just a nice clean simple
little camp strong sticker so if you guys would like to support me that would
be greatly appreciated till next time keep it Prime

 For more infomation >> История героя: Эш | Overwatch - Duration: 1:47.
 For more infomation >> Cib - Hilos y Huellas👣 - Duration: 3:21.
  For more infomation >> 10 Pokemon Evolutions That Were CANCELLED! - Duration: 11:04.


 For more infomation >> Lethal Weapon 3x06 Promo "Panama" (SUB ITA) - Duration: 0:21.
 For more infomation >> Historia Ashe | Overwatch (PL) - Duration: 1:47.
 For more infomation >> Jag kan inte välja... - Duration: 0:23.
 For more infomation >> Les origines de Ashe (VF) - Duration: 1:47.
  For more infomation >> Hintergrundgeschichte: Ashe | Overwatch (DE) - Duration: 1:47.

Không có nhận xét nào:
Đăng nhận xét