bangladesh news 24
Subscribe the Channel get More new video
Đăng ký:
Đăng Nhận xét (Atom)
-------------------------------------------
Visakha Utsav ~ Shakthi Veshalu II Festival II MusicHouse27 - Duration: 8:59.
Please Share and Subscribe Our Channel Or Interesting Videos.
Please Share and Subscribe Our Channel Or Interesting Videos.
Please Share and Subscribe Our Channel Or Interesting Videos.
-------------------------------------------
Zrobię stronę WWW w 2018 roku - 3 sposoby na postanowienia noworoczne - Jestem Interaktywna - Duration: 6:33. For more infomation >> Zrobię stronę WWW w 2018 roku - 3 sposoby na postanowienia noworoczne - Jestem Interaktywna - Duration: 6:33.
 -------------------------------------------
Superstar "RAJINIKANTH" Kind Request to his Fans | RajiniMandram | RajiniCastsWeb | kalakkalcinema - Duration: 2:52. For more infomation >> Superstar "RAJINIKANTH" Kind Request to his Fans | RajiniMandram | RajiniCastsWeb | kalakkalcinema - Duration: 2:52.
 -------------------------------------------
【香川】あん餅うどん食べに行って来た。(手打うどん三徳) - Duration: 5:20. For more infomation >> 【香川】あん餅うどん食べに行って来た。(手打うどん三徳) - Duration: 5:20.
 -------------------------------------------
How Can I Dance Well Like Twice ? ☆ Video Toon made by TingGlees' Friend ☆ TingGlees & Awesomehaeun - Duration: 0:59.
Hi Cherry~ what are you doing? Are you practicing your dancing?
Yes.. I want to dance as good as Twice members.
I think it's not going to be easy, so I want to give it up now
What are you talking about? You can do that
I'll be watching you from this side as you dancing. Please do it again one more.
Okay, well, I'll try it again.
Wow, you did so great. It's better than just a few minutes ago.
I think I feel confident on my dancing now
One day I would be able to dance like the Twice. It's not the dream right?
Yes, you will Cherry
-------------------------------------------
ОН СТУЧАЛ КО МНЕ В ДВЕРЬ! МАНЬЯКИ В МОЕЙ ЖИЗНИ - Duration: 0:49. For more infomation >> ОН СТУЧАЛ КО МНЕ В ДВЕРЬ! МАНЬЯКИ В МОЕЙ ЖИЗНИ - Duration: 0:49.
 -------------------------------------------
Keihin butterfly carb rebuild #3 - Duration: 28:10.
Hi.
I'm SportsterPaul.
Today we're gonna put together this Keihin butterfly carb.
First video we gave you some tips and tricks.
Second video, it's all about getting it apart and getting it clean as a whistle.
Look at this thing.
It's gorgeous.
Between the Berryman's® Chem-Dip® carb cleaner and three trips to the ultrasonic cleaner,
it's got a beautiful polished look.
The brass cleaned up everything.
The stuck float … or not stuck float … The float bowl was plugged.
This passage right here was plugged in the float bowl.
And I thought about how there was so much paraffin, junky gas residue down there.
I don't think I … one bowl of gas, evaporated, wouldn't have done that.
I have a petcock problem on that bike, where the petcock slowly drips a little bit in over
the months, and maybe a half a tank of gas went into this float bowl, and then evaporated
off in the hot Florida summer, and that's what clogged up this passage and caused all
those problems.
Nothing that Berryman couldn't fix.
So it's in beautiful shape.
Look at the body.
I told you about the trick for this black plastic fitting that they put in in the factory.
They all leak.
You gotta drill them out.
Showed you that in the tips and tricks.
Drill it out.
Put in a brass fitting.
They must have a really stubborn middle manager, because the CV carb, which is '88 and later
… I had a '96 Sportster in California that I ran, and this is just an eBay carb.
But see, they're cracking, right there, right at the same spot.
Do they never learn?
Keihin engineers are great.
They're like a Honda affiliate.
But they never learned about that.
Everything else is pretty much stock.
Well, not quite.
I have a little 0-80 screw into this hole.
These are the detent holes for a little ball that pushes up on a spring for the choke.
By putting a 0-80 screw there, short little guy, it keeps the choke from flapping shut.
So that's modified.
The last thing I did … this might be silly … took a pencil, and I put it in the brass
seat for the needle, and I just turned it a few times.
And I figure it burnishes the brass, any oxidation, cleans it up.
Nothing too radical.
I don't want to take a drill or machining tool down there.
So we got that dialed in.
So the body's in pretty good shape.
The float bowl, nice and shiny.
Still a little discolored on the bottom from that crappy gas, but not bad.
So, I told you in the earlier videos that there's a check valve in the bowl.
Hear it?
That's 'cause it's a diaphragm pump.
Needs an inlet valve and an outlet valve.
There there's … you can see it's swedged in a little ball.
They drop in the ball check.
Then another ball goes here, and they swedge it in in the aluminum, just swedge it all
in there.
Came to of the Berryman's and the ultrasonic.
It rattles, too.
Want to warn you.
On a late model, '79, later, they did a trick, and I'll do a subsequent video to explain
all that with all these six carbs I've got, show you the differences, where they took
the ball check, they didn't need it, 'cause they put a bleed hole in the passage.
So not all of them … if your cap doesn't have this little detent ball, well don't go
nuts trying to hear it rattle.
It'll never rattle.
But the float bowl might work.
I recommend you do what I did.
Fill it up with water.
Test it.
See that it squirts.
The take it all apart, clean it, dry it, and put it together for real.
That's where we are now.
So, where do we start.
Well, things guys forget … and gals … these two little o-rings.
You need those.
This is a pump that's got to be sealed.
Get my 3M Nuvo reading and safety glasses on.
Oh, God.
That's great.
Now these aren't exactly o-rings.
They're more D shaped cross section.
So there's a flat side and a rounded side.
Put the flat side down against that machined thing.
They sit proud of the surface, as you'd expect.
This one, okay, there's the flat, go here.
Now we got it.
Okay.
So that's pretty good.
We got the two o-rings.
Don't forget that, 'cause they leak there, the guys reef on the screws think that'll
tighten it.
They gall out the screws.
Big mess.
So what next?
The diaphragm.
Here it is.
This is the accelerator pump.
It's a diaphragm pump.
Little diaphragm.
Note, it's got a ridge on the outside here that goes in this groove on the float bowl.
It's smooth on the other side.
So that goes down, in this case.
Then there's a spring that also comes in the rebuild kit.
This is the valuable thing.
Let me show you some of these old … This was a sentimental one that I'm keeping for
old new's sake … yeah, for old time's sake.
But they get … the ones that I had in my stash that aren't in these experimental carbs,
they're in pretty bad shape.
Interesting, some of them that look worse, like this, are actually a little more flexible.
They're all stiff.
This one … oh, my gosh.
See, I've played with it a little.
Hear that cracking?
That's the rubber cracking away from like a fiber inside.
I hope you can see that.
It's hollow.
This one's shot, as well as the other one.
This one, really stiff and cupped, like a Belleville washer, where … this would not
be a happy camper.
At least it's cupped in the spring down, so that you might get some delivery.
But it's worth the $29, the Custom Chrome dealer.
Don't do what I did, buy one for $10 on ebay that doesn't explicitly say in a bullet-point
on the cover, Viton.
'Cause you want Viton rubber.
It resists the alcohol, doesn't swell.
We'll see that problem a little later.
And the rebuild kit comes with a new spring.
Not ultra-necessary.
Then you can put the cap on like that.
Just get it close.
Now the screws … Here are the factory screws.
They have a captivated lock washer.
You gotta tiny little head.
You can see here where the guys reef on them, it's actually mushed that over.
Sometimes it mushes over so bad you can't get the screw out.
It's squished it around the threads of the screw.
So, you don't need that.
The problem with captivated lock washers … I worked at a military contractor years ago.
I saw the data that the military takes on lock washers.
After five tightenings and loosenings, they're useless.
They don't … you might as well not have one.
So you need a brand new, fresh lock washer every single time.
So, what I did, I went to Mr. Metric in … or not Mr. Metric.
Actually, these are Olander, another fastener house.
And I got M4 … can you see this, I guess?
M4 by 12 mm screws.
What's nice about these is, they have a bigger head.
And I like that, 'cause it spreads it out, but … and they're stainless, stainless steel,
cool-guy stuff.
So stainless screws, stainless flat washers.
And I didn't think … I'm pretty sure I didn't get stainless lock washers, 'cause I want
them spring steel.
I want them to work better than stainless.
But brand new lock washers.
The other thing I do is the long screw that we're gonna hook the float bowl in, this is
a factory one.
You gotta go to the Harley dealer and pay big dollars to get a bunch of new ones.
I don't know, dollar, two dollars each.
And you can just see how this old one's all galled out.
The head's all galled out, but the brand new one's nice.
I think I mentioned I use anti-seize on everything.Vance Breese the racer, and now gyroplane pilot,
he swears that anti-seize actually sticks things together a little, like Loctite.
It won't get everything apart … and then everything is easier to take apart.
So I've already got some anti-seize in all of these.
So, let's get organized, find my #2 Phillips, here.
So the bowls, ready to go on.
Okay.
Brand new lock washer, anti-seize, M4 by 12 screw.
There's two short ones and one long one here.
The long one's for the float bowl itself.
And on it goes.
Oh, I love when stuff fits.
And on this one goes.
They're slippery from that anti-seize.
So, I will … And then, because you learn with a Harley, you loose-assemble everything,
put the long screw through the hole just to make sure that it's lined up.
You can snug this one, and snug that one.
Okay.
We'll give another pop.
And this came out.
That's a good sign.
You can take the operating rod, now, for the diaphragm pump, for the accelerator pump,
and stick it where it goes.
Oh, it even made some noise, from my testing with water.
It just feels good.
Pops right up that … That brand new rubber, that Custom Chrome, it's nice and springy
and, oh, that's gonna be a happy carb.
So, float bowl.
I warned you about this, warned you about the cracked body.
So now we can start on the body.
I like to put the mixture tube in first.
This is where the air and the gas mixes in this larger main jet passage.
Froths all up, and it goes into the intermediate and up into the intermediate circuit and idle
circuit.
That's why this is better than a Bendix.
It's got an intermediate circuit.
That just drops in, I guess.
I should point out, pointy end goes in like that.
Main jet.
This is a 165 main jet.
I've been getting leaner on the main jets as I get older.
I used 180s or 185s, and I've learned, really they can be pretty lean.
Main jet is wide open.
You gotta go on the freeway, check the plugs, it's quite involved to test.
Okay.
The intermediate jet is next.
This one's an 88.
The other thing on the intermediates, I've been getting fatter and fatter, bigger and
bigger.
Used to have 65s, 75s.
I'm up to 88s now.
They seem, on an Iron Sportster, I have funky exhausts, but it seems to make it happy.
The small straight slot, go in there, it doesn't take too long.
It finds the slot.
Get a feel.
Don't go crazy.
Not too tight.
Then, one of the tricks, this little rubber plug, they're in the rebuild kit.
Make sure you remember, put that rubber plug where the intermediate … it has to have
that or the carb will never run right.
So we got that ready.
We burnished out our seat.
We're ready for the … oh, I love when stuff sticks together.
All right, I'm gonna need these glasses, because there's two needles in the rebuild kit, 'cause
Custom Chrome is cool people.
One needle, must later, it's got a little nib on it that's spring-loaded.
That tiny little nib pushes up on the float and that's what … Like this.
The needle's like this.
So the nib goes here.
I don't know.
I showed you all those pictures in the tips and tricks of the dents you get.
Get a big … from where … you get a big dent here.
These aren't available anymore.
So, you get a big dent here, and that can hang things up.
It makes that pivot.
I figure, well, it's fancy, it's more expensive, maybe we would do without it.
We'll use the same needle that I found in them when I take them apart, which is just
a plain, smooth butt-end here that presses … So that goes on.
Then you need the rod that it pivots on.
That goes like that.
And you can turn it, and you bring the carb, and it'll just drop in if life is treating
you good that day.
So it's loose.
And now it's delicate, because it's got that float.
You don't want to bash it.
You find this little screw here that is countersunk.
That's what they use.
They only use one.
I don't know if that's some clever cost reduction or what.
Now you get a #1 Phillips, the smaller Phillips.
That goes here.
The countersink helps lead it in and line it up, and it goes.
And as you tighten it … what I don't like is this thing is always a little binding.
So that's okay.
So you've got that.
Float works now.
The float level is a critical adjustment.
They give you measurements and all that.
Ignore all stuff.
It's like, just you want it flat.
Now they make it tough on you, because the surface of the float that's against the flange,
it would be so perfect you could just line up, they put a step in it, which makes your
life miserable.
But you can look … this one's a little low.
Now, when I say low, I mean in this position, meaning it's really a little high, which means
the bowl might fill too much, and you'll get overflow through the tube.
So turn this way.
I want to bring it up, get your straight slot.
If you reach in here, and pry the tab down.
That's pretty good.
Now, by the same token, if you want the float to go the other way, if it's sitting too high
in this position, too low when installed on the bike, you don't take your thumb and just
bash the float down, 'cause then you're smashing the seat of the needle.
You hold it up, and you get a screwdriver in there.
You go under the little metal tab, and bend it up that way.
There's another tab on this, right here.
And that controls how far it goes up before it stops.
You don't want the float falling so far that it jams against something.
And I sure wouldn't want it up against the bottom of the bowl, 'cause then all that paraffin
and tar, I have been in a real mess.
I'd have gas leaking out of it.
So that's that.
Now, after a lot of misery, and plenty of practice, I can tell you the next challenge.
Custom Chrome, in addition to giving you two needles, 'cause they're cool folks there,
they give you a whole bunch of float bowl gaskets.
They give you three different ones.
Here's the comparison.
Let's see if I can get them in the middle of the screen.
Here we go.
They're also … this O-ring, that's meant to go here.
I never use it.
I figure it's just something to get pinched and cause an air leak and blow up your bike.
I just use the … they give you two extra paper gaskets.
I think if you have that fiber spacer, you're supposed to use these.
I like this one.
It's a little waxier.
It seems like it would seal against this nice aluminum better.
But the float bowl gaskets … ooh, I did smash this a little.
You gotta be careful.
Usually I'm not making a video when I'm rebuilding carbs.
Perfect.
Life is good.
All right.
So this is the original one.
Separate for this thing.
Little o-ring over that, big o-ring here.
Those are fine.
You hang onto it.
This must be some late model thing, where they had a … after awhile, they put on a
black plastic thing here, so when you turned on the choke it bumped the throttle, 'cause
I guess people can't modulate this throttle.
Yeah, it's still in good shape.
Shouldn't handle this thing that much.
So I don't know what all these extra holes are.
Must be a really late-model thing.
That goes in the garbage.
And then here's the problem.
Because this was an $11 kit I got off of ebay, and God knows … See how it's too small?
The O-ring isn't staying in the channel.
That's really bad news, 'cause you'll see the goofy way you gotta put the float on with
the rod hanging down.
And all that does is end up with a pinched thing.
And that's why these morons go and over tighten and gall out the heads of the screws, 'cause
they think they can tighten it and make it stop leaking, when really the o-ring's gone
in like that, and it's pinched in a couple places.
The way you fix that … shouldn't have so much trouble getting this out.
It's not fitting.
The way you fix that, man's best friend, lithium grease, white lithium grease.
Gasoline dissolves it, so I don't think it's that serious if you use it.
So, oops.
That was a mistake.
Life's … life goes on.
Come on.
There we go.
And get some lithium grease all the way up here.
Get it out of my way.
Get this one up.
Kinda go around.
Get lithium … All right.
And I was a little too generous.
You can clean it up.
Like I say, I'm pretty sure the gas just dissolves it, and there's not a lot of fibrous material
in lithium grease, so it doesn't harm the engine.
Clean it up a little.
Now, check this out.
Put on your o-ring there.
And now, as you get it started, you bury it in that grease.
And it's messy.
No question about it.
But you'll notice, the o-ring staying where it's supposed to stay.
It's not popping out like it was a few seconds ago.
So I keep cleaning.
I'm not saying you should dump the lithium grease in the … This is happy.
This is happy.
Now comes the coordination test.
There's always something goofy.
Check the float again.
Looks great.
Sounds great.
Oh, here's a little trick I forgot.
You can blow in it.
See, no, it doesn't pass.
And then, as I lift it up and it opens, then you should hear the air.
[Whoosh] Nice we got these mics here, you can hear it.
All right.
So here's the coordination test.
There's always something goofy.
Float's hanging in.
It's not down too far.
It's in the right position.
It seems to work.
The accelerator pump rod goes in this long slot here.
From behind.
Gotta do it this way, because it's misery.
You gotta do it as you put it together.
I push this rubber boot up.
It just seems to help things being in that position.
And you hold it like that.
This brass part of the float is gonna go up in this hole right up here in this corner.
So you eyeball it, and you go down, careful not to mash that float, bend it.
Could do neurosurgery, or you could work on Sportsters.
Take your choice.
Ah.
There.
And if we have some decent light … Yeah, you can see the end of the rod through the
slot.
It didn't go anywhere.
And you can just feel.
When they're right, there's just something about … the bowl makes a thwump, or feel
when it's not pinching the o-ring, closes up.
You can look.
It's not dead flush, because the o-ring is an o-ring.
But it's just right.
And you can tell that and you can feel it, and it's worth getting some lithium grease
to give you that confidence.
Now we got, same thing, brand new lock washers, M4-12 stainless steel screws, stainless steel
flat washers.
#2 Phillips.
Come in here.
Get that one a little snug.
I like to go back here, get this one a little snug.
And this one here.
That's the third one.
And the fourth one's the long one that I showed you that I bought brand new at the Harley
dealer.
Where'd that go?
Here.
It's got its captive lock washer.
You gotta live with that.
But a little anti-seize never hurt anything.
So.
I don't put anti-seize on the jets or anything.
The gas in there, I'm sure, would just wash … It's aluminum particles in oil.
That feels pretty good.
Snug enough.
Snug enough.
Like the wheels on your car, you do them in rotation.
Pulls down evan.
That feels good.
See, these smaller heads are also easier to gall out.
Just slipped there.
Doesn't help that they're a little slippery from anti-seize.
That feels good.
Which one haven't I done?
This one, I don't think.
Yeah.
Don't have to reef them.
But you can feel them snug up.
Okay?
So we're happy.
That's working out.
Next, well, the idle speed screw.
That goes on this side, here.
And all it does as you screw it down is it cracks the plate.
I got this thing so clean it actually cracks when it opens.
But you're gonna screw it down a little bit.
Anti-seize on this and anti-seize where the spring goes, 'cause when you're at a stop
light, and you're trying to adjust the idle, you don't need all this binding up.
You'd like to do it with your fingers if you can.
Dry fingers, hopefully.
And you can see it there.
You can watch it crack the plate open.
See now it's not wedging the plate into the throat.
It's actually stopping against this screw.
I'll leave it like that.
Next thing is the idle mixture adjustment.
This is rich/lean as it sits idling.
So between the two of them, you get the bike so you can at least try this.
You gotta get it under the advance curve, so that it starts loping and idling like a
Harley's supposed to.
So this thing, same thing, a little anti-seize on it.
Put Teflon tape, like I talked.
I'm not gonna put silicon, silicone here.
We're just gonna count that it's still sealing.
Oh, that's that trick.
You take your finger, and you can feel that needle actually come through the little hole
down here.
Idiots reef on them so hard, for some reason I don't understand, they'll actually break
out a little chunk of aluminum, and the carb's ruined then.
You got nothing going then.
So this one … And then, if you're really gentle, neurosurgeon, ah, it just tightened
up.
Then half a turn open, a full turn open.
Let's try that, 'cause it's easy to remember.
I thought it was a turn and a half, but that's a place to start.
Hopefully, between the accelerator pump, you get the bike warmed up, it'll do okay.
I should have warned you, there's a short, stubby screw, shorter than the five other
ones.
That goes up here to hold the choke bracket.
Now I've smashed my choke bracket flat, because I did a little coat hanger chopper kind of
thing.
I'm going to a conventional choke cable.
Got that from J&P Cycles.
It's on the way any day.
So I'm gonna bend this back to a little curlycue cup where it's sits that outer sheath of the
choke cable sets.
Meanwhile, aha.
All right.
Take this.
Get a #2 Phillips.
There we go.
And don't cross-thread stuff.
Get a feel for it.
There's anti-seize on this, too.
It's got a captivated lock washer, but that's life.
So that's that.
Next we're gonna … like I say, I like this waxier one.
I don't put the o-ring in.
The theory, the reason I don't like an o-ring metal to metal, is 'cause that brings more
heat out of the engine into the carb, heats up the gas.
I've never had vapor lock, but still.
I could see even using multiple ones to give you more thermal resistance or … let's not
go crazy, right?
And then, since we're getting ready to put this on the bike in a little bit, two flat
washers, two brand new lock washers … Home Depot, Orchard Supply, you name it.
Here are the new lock washers.
Here's one … here, let's just do one.
Here's the old one.
Now you tell me which is gonna look better … right? … which is gonna work better?
This one still has a big offset and a spring to it.
This old one?
Goes in the rubbish.
So this goes next.
Might as well keep things put.
So then, start the nuts on it.
There'll be anti-seize on this when I mount it on the bike.
And then the final thing from the rebuild kit is the air cleaner cover gasket.
They are not symmetrical.
They go on … that's the wrong way.
See how it's not fitting?
This hole is for the … this is the vent for the float bowl.
Flip it over, and suddenly you'll find it fits.
So, another little trick.
So there you go.
Our little … other than some anti-seize damage to make the video.
Keihin butterfly carb, hopefully working, won't leak, won't … accelerator pump will
work properly.
I'm really … really went the whole hog on this one.
No pun intended.
So, we'll see how it works.
I'll let you know if the bike starts up.
And then we'll do that other follow-on video, just a little extra if you're really into
this stuff, where I take all of these and I hooked up a clear tube, like I did in the
beginning, and squirt, squirt, squirt, and see how much accelerator … I've learned
a whole bunch of stuff about that.
This one works great, that new Custom Chrome rebuild kit.
So, thank you very much.
Signing off now.
We'll see you next time.
Thank you.
-------------------------------------------
গোপন রহস্য তাফহীমুল কুরআন কেন বন্ধ করা হল || Sheikh Motiur Rahman Madani - Duration: 5:43.
গোপন রহস্য তাফহীমুল কুরআন কেন বন্ধ করা হল || Sheikh Motiur Rahman Madani
-------------------------------------------
Tip on the fabric and embroidery frame - Duration: 0:20. For more infomation >> Tip on the fabric and embroidery frame - Duration: 0:20.
 -------------------------------------------
392872 - Duration: 3:53. For more infomation >> 392872 - Duration: 3:53.
 -------------------------------------------
Keihin butterfly carb rebuild #1 - Duration: 18:58.
Hi.
I'm SportsterPaul.
Today we're gonna rebuild a Keihin butterfly carburetor.
I've got one of them here along with six others, we're gonna rebuild them all, get
them going, show you the tricks.
This is the Keihin butterfly carb.
This isn't to be confused with the CV constant velocity carb.
That was '88 and later.
This one's about '76 to '87.
Here's the CV carb.
And you can see, I'll put them next to each other down here, it's bigger.
The CV is a fantastic carb, no argument there, but it's bigger, it's taller.
It's got a big dome on the top for the venturi to slide up and down.
The problem with that is if you've got custom tanks, like I do on two of my Sportsters,
the dome bangs in.
Whereas this one you can see, let's try to put them equal.
This one you could see, yeah, it's a lot lower.
So if the gas tanks swoops down….
This one I've customized with putting the choke up here.
I decided after ten years that's Mickey Mouse and I don't do that anymore.
I'm gonna put a conventional choke.
But let's go through the tricks first.
You're gonna wanna learn all the tricky things.
I'll get that right up front.
Then I'll take this one apart, clean it, rebuild them all, show you-- compare-- the
accelerator pumps.
This time I'm actually gonna put a tube on the outlet of the float bowl accelerator
pump right here.
And I'm gonna take that and I'm gonna put the tube on, here I'll do it now.
Put the tube on, squirt, squirt, squirt, with the accelerator pump and see how much fluid,
use water, I don't wanna kill myself.
So it's big project, we're gonna go through it all.
Next, tips.
Okay, tricks.
First thing is they all leak, they leak through the fuel inlet fitting right here.
So you've got to drill that out, put in a solid brass fitting.
I've done that with all seven of these, plus a couple more that are on bikes out in
the garage.
They crack up at the top.
I'll put some pictures up so you can see.
There's white ones, white plastic over brass, those crack.
There's black plastic over brass, those crack.
You drill it out, I think a size Q drill.
I'll put the, I'll put the bottom third to show you, drill it out, tap it, little
bit of Teflon tape on the fitting.
Let's see, I gotta couple fittings here.
Here's a couple fittings, so you can get a straight fitting.
I prefer the right angles.
You can get them long, you can get short, and then the fuel just comes between the jugs
usually, or up under the carb and then into here.
So that's trick number one.
Okay, trick number two.
The float's accelerator pump.
Here's the flow bowl.
Here's the little cap that goes on it.
There's a diaphragm that goes on it.
The diaphragm's ribbed on one side, for your pleasure, smooth on the other.
Make sure the rib goes down into the groove, like that.
There's a spring that goes against this metal cup on the diaphragm.
And the cap comes and goes over the whole mess.
There's two short screws that hold the cap to the float bowl, and a long screw that goes
all the way through.
There's two O-rings, one goes in this pocket, two little tiny O-rings, one goes in that
pocket.
Be sure to put those O-rings in.
But the big trick that everybody screws up, you'll see it, I'll assemble it, you'll
see me do that.
It's a little pump, it's an accelerator pump, a little diaphragm pump.
So it's got two valves, an inlet valve and an outlet valve.
One's in the cap this little cap, and if the check valve is stuck with grunge or corrosion,
the carb will never run right 'cause you won't have an accelerator pump.
You'll never see it squirt when you give it a handful.
You can hear the check ball, [rattling sound in the background], hear that?
So, if that's not happening, back in the carb cleaner, back in the ultrasonic cleaner
till you can hear it rattle.
Same, there's a check valve in the float bowl.
There, [rattling sound in the background], there, hear it?
OK.
If you don't have that, give up, get back in carb cleaner, get back in the ultrasonic
cleaner till you can hear them rattle.
So check valves, check number two.
Okay, trick number three.
It's a better carb than the Bendix 'cause it's got an intermediate circuit.
It's not quite as good as a CV carb but it's smaller, cheaper, all those things.
But this intermediate circuit, let's see if I can find one.
There's this little rubber plug, comes in the rebuild kits, should be in the carb when
you take it apart.
It goes right here.
You know you screw, you screw in the intermediate jet.
You screw in the velocity tube here, and the main jet.
But after you do that, you've got to put this rubber cap on or the carb will never
run right.
It has to draw through the main jet into the intermediate.
So that's trick, what are we up to, three?
Trick number three.
All right, trick number four.
The chokes, let's find one, ah, there's one I fixed.
The choke, where it attaches to the shaft right here, let's put them down.
You can see, you see this one's all brazed up.
That's because they get loose.
Here, I'll hold the choke shut with my thumb and I'll... see that big motion?
Not good, sloppy.
You can just braze them up.
That's trick number four.
Trick number 4a, equally important, this little 8...
0-80 screw, it doesn't even screw into, these holes are for a ball detent, there's
a little check ball.
But putting a little 0-80 screw right there does, it means when the bike backfires, and
they always do, the choke only closes that much.
It doesn't slap it all the way shut, then you kick it 5,000 times wondering what's
wrong, you've flooded it, the plug's get wet, push it.
So that little 0-80 screw and one of these, in this particular detent hole, that limits
the choke travel.
In Florida here, I don't even use a choke at all.
I just leave them on, or just leave them off, whatever you call it.
So that little screw will save you a lot of grief.
Another little trick I guess four, 4, what are we up to, c?
This screw, when the choke cable goes in, if you put the screw down you can't get
the air filter on.
You gotta tighten it with the screw pointing up, at least the after-market air filters
that I've been using.
That chrome back plate, when it slips on there's not enough clearance down here if the screw
points down.
That's trick 4, a, b, and c.
All right, trick five, we're up to five now.
The idle jet circuit, well, it's not an idle jet, the idle circuit that's part of
the intermediate jet comes up through here, ends up up here.
There's a little needle that goes in right here.
That's what you adjust to get the idle speed just right.
So the idle circuit, they've got a, what we call it in the auto business, a Welsh plug,
like they use on radiators plugs or what do you call it?
Water jacket plugs in a V8 Chevy, just a little cup that presses in.
They leak and then your idle's never right because there's air leaking in there.
Some guys take a little silicone, I'll have to clean this silicone out 'cause it's
old and grungy.
Some guys put a little dab of silicone there just to make sure no air's leaking.
Same thing, you can put some pipe dope or Tef lon tape on the needle itself to make
sure air is not leaking.
The important thing is to get it clean.
Here's one that some guy had a cut-apart penny.
Literally.
He ground down a penny and stuck in there and then glommed stuff over it.
Probably not the smart thing to do, but you can see the construction.
There's four little holes drilled in this slot that feed gas as you crack the throttle
open off of idle.
That's gotta be smooth.
You can see from the underside, we'll flip it over here.
One hole for the idle jet itself, the needle, then the four holes.
So where's the main intermediate come from the bottom, the idle circuit goes all the
way up through these passages, goes up here, goes across, goes here, and then you adjust
the screw and the idle falls from the top, which kinda makes sense, you don't have
a lot of velocity.
That's the problem with the butterfly carb compared to the constant velocity carb.
So that's trick number five.
Clean the daylights out of it, make sure it's really clean, spray carb cleaner in there.
I've got an ultrasonic cleaner I'll show when we tear this one down and that does a
fantastic job.
If it's missing one, of course you're gonna have to fix it and put it back together.
And I don't know, I'm of a mixed mind, is it better to have it missing so you can
really get down there and make sure it's immaculately clean.
Any junk in there could cause you all kinds of grief, a little piece of particle that
falls into one of the holes.
So then sometimes when you roll it on, it stumbles, other times it doesn't.
So I guess what, we're up to trick five, that's trick five.
All right, trick number six.
The rebuild kit, you want a rebuild kit that uses Viton rubber, V-I-T-O-N.
It's a particular kind of rubber that doesn't swell.
This new gas has got all kinds of crap in it, alcohol, you name it, additives, and that
swells it.
And some of the problems you get with old gaskets made originally in the '70s, once
you pull the flow bowl, maybe you're gonna change jets, get the bike tweaked in, the
O-ring that seals the flow bowl pops, and 'cause it's swollen from alcohol in the
gas and then you can't get it back on or you pinch it and it leaks and it's misery
and you don't need that.
With a Viton, this is a Custom Chrome, this is one I got on eBay.
The add showed the little bullet points and one of them was Viton.
This might be $11.00 because it was pre-Viton, I don't know if all of Custom Chrome's
are Viton or not, we'll find out the hard way.
So that's trick, what are we up to?
Six, all right.
Okay, trick seven.
See how this choke is sloppy?
That's why my little chopper-style thing, I figured oh, just take a coat hanger or piece
of welding rod and do that.
That's pretty good because just, it's so Kludgey it gives it a little resistance.
But what really works is the old factory choke rod and the steel thing and the wire 'cause
that one, when the bike backfires it resists slapping the choke shut.
So trick seven, I guess we're up to, aren't we?
I don't know, anyway tricks for days.
All right, that's another trick, what other set up tricks?
Right here, this is an accelerator pump volume limit.
So you screw this screw in and it, and as you do the throttle, let's see if I can
do it here, like that, it limits how far forward the pump goes.
This, this is the one that came off the '79.
This was on for a couple months and already it's screwed up.
The accelerator pump doesn't work, I mean oh, there, finally it's starting to go down.
I don't know if it's gummed up.
When we take this one apart I'll show how to clean them, a lot of the tools you need,
we'll get into that, and you can see what's going on with this screwed up one.
But get the choke right, get the accelerator pump, this is the idle mixture, rich or lean.
You usually want it to make the bike idle as fast as it can, then maybe a quarter turn
open, unscrewed, untighty.
This is the idle speed right here.
So this is the one you turn to get the idle down, get under the advance... in the bike,
the ignition advances then it idles really fast.
You gotta get under that.
And then you can use this to get it down, then you can mess with the mixture, that's
why I always drive the bike for a few days with no air cleaner on, so you can reach your
hand in here at a stop light and adjust these just the way you need.
So that's trick seven.
Okay, trick eight, not really a carburetor, it's the manifold.
There are two types after '79, they went to this style manifold, before that they had
the O-ring.
This type takes a whole rubber band that goes around this and the carburetor.
Oh, we don't have any cylinder heads to show you, duh.
So the tip is if you've got the rubber band style, you've got to have that ugly little
bracket that supports the air cleaner and keeps the carb from flopping.
No matter how tight you make the clamps for these, you're still risking tearing these
O-rings.
Once you get an air leak, you'll burn a piston, like I did back 20 years ago, and
you'll get to rebuild your entire motor because the aluminum goes everywhere in the
oil system and ruins everything.
So tip eight, if you got the rubber-band style, which some guys prefer, be sure to have that
little ugly bracket that goes down to the valve lifter block.
And in that strap, that's what supports the whole carb from flopping up and down.
Put these down here you can see the difference between an O-ring style.
You know the O-ring's got a little groove here and it's just an O-ring that snaps
in there.
Now if you do have the O-ring style, the tip there is here's the factory strap, it's
not too bad, it's simple.
Let me tighten it with a Phillips head, number two Phillips head screwdriver.
It does okay but if you wanna be a chopper guy and not have that strap, have some cool
little carb hopefully with a filter that's not too heavy what you can do is get S&S style,
here's a couple.
I know S&S makes them, I think a lot of after-market people make them now but S&S was the first
to figure it out.
You can see the difference, I mean for crying out loud, look at this.
You can put a socket wrench or a nut driver on this thing and really reef these tight.
If you reef them tight enough then you might get away, if you have an O-ring style manifold,
you might get away without using the strap that supports the carb and air filter from
flopping.
What else?
There was something else about strapping stuff.
It'll come to me.
I'll mention it later.
Maybe I'll put it in a little bottom third description.
So what are we up to, eight, nine?
A whole bunch of tricks.
It's really a manifold thing but it keeps you from blowing up your bike.
Air leaks, I assume you know the air leak discovery trick where you take some carb cleaner
and spray it, make careful it's not spraying into the air filter 'cause the bike'll
speed up or slow down because of that.
But you spray it around here and around here and if anything changes, it means you got
a leak there, a vacuum leak and it will burn a piston so get in there and make sure that's
okay.
If you got an unknown bike or a bike you haven't messed with for years, might be worth it just
to yank it off.
Side tip, what are we, a, b, c?
Never put the carb and manifold on as a unit, you know, like this.
It's, you wanna just put the manifold on separate.
You can get your finger in, feel that the O-ring isn't pinched, make sure it's lined
up – oh, now I remember the other tip.
When you put the heads on, you don't tighten the heads until you put the manifold on, hopefully
with these big beautiful S&S clamps, and that rotates them to the perfect 45-degree angle
that matches the manifold, then you tighten the head bolts.
When, and same thing with the cylinder base nuts, you may get everything so, 'cause
it's sloppy, it's old-school Harley, so then you let this control the rotation of
the cylinder and the heads within the limits, you know you don't get a lot of motion but
at least it'll get you closer so that, and you'll be able to see, you'll rock it
back and forth and when everything's flushed up tighten the heads, tighten the cylinder
base nuts.
Then you can either take this off and put the O-rings in or, you know, go and do final
assembly.
One of the many little miseries of assembling a Sportster.
Okay, tip nine, the early model Harley air filter, carb goes here, this is the little
pocket, why you have to have that choke cable screw pointed up instead of down otherwise
it interferes here.
There's a vent, there's some other stuff, not a big deal.
The trick, if I can open it up.
You don't wanna use these wino fiber... they're more like a grate than a filter.
You can get a Fram CA77 air filter, meant for go-karts or ATVs or gosh knows what, and
it squeezes on.
It does get a little dented here, a little pushed out, but that doesn't matter 'cause
everything goes on, it's just wide enough so that it actually seals on the inside, a
good thing.
And then you have a decent air filter instead of some oil-soaked copper strainer or some,
somethings that look more like a grate than a paper air filter.
You can see this one came off the '79, that carb had on, you see how much dirt is on the
filter.
So I got the new one ready to go when we get one of the carbs, one out of seven's gotta
start running right, we'll get it on the '79 and hopefully a happy ending.
So that's tip nine.
Now we're gonna go and tear into, tear into disassembly.
This'll be the end of this video, don't wanna make them all too long.
We'll do the next video will be disassembly of this carb off the '79, figuring out what
went wrong with the accelerator pump.
Part of it, we're gonna measure all these, I won't bore you with that but we'll see
that all the accelerator pumps work, we'll play around.
And then we'll show you the tools you need, get it apart, get it clean, and then probably
with time we'll probably do subsequent videos about the particular little assembly tricks.
I'm not sure, we'll see how that works out.
So nine tricks, nine tips, hopefully that'll get you right up front, some things to look
out for in your Keihin butterfly carb rebuild.
Next, disassembly and cleaning.
-------------------------------------------
פתאל רוק פסטיבל 6 - מספר החדרים מוגבל! - Duration: 0:06. For more infomation >> פתאל רוק פסטיבל 6 - מספר החדרים מוגבל! - Duration: 0:06.
 -------------------------------------------
Dota 2 Tricks: 1 SEC COOLDOWN! - Duration: 1:44. For more infomation >> Dota 2 Tricks: 1 SEC COOLDOWN! - Duration: 1:44.
 -------------------------------------------
[ENG] BOYS MIXNINE NEW YEAR MESSAGE RELAY! HAPPY 2018! CUT - Duration: 3:01.
Hello Byeongkwan! I'm Hangyeom!
We got closer in mix9.
Happy new year and you worked hard in 2017!
Stop being naughty!
Let's make better friendship in the future! Bye~ Go get lots of money!!
Hello Inseong-hyung! I'm gonna say my 2017 wishes to you!
Please listen!
Stay healthy in 2018.
Just like your name, you have lots of humanity.
Keep helping someone who needs it like me! Cause you are always cool and helpful!
The end!
Heejun-hyung! I'm happy that we can share the last stage of mixnine in 2017 together!
In 2018, I hope we can all show better and greater performances in mix9!
Just like in 2017, let's work hard in 2018 too!
Happy new year and I hope for good things only for you!
I LOVE YOU!
Hi Seyoon-hyung, it's Geukheon!
You still haven't done the first filmming and is waiting..
Happy new year!
Ever since (i cant hear it sorryz), I have found out how kind you are!
You are fully capable to do well, so I hope you do well!
I hope to be able to continue meeting you in the future! BYE~
Jo-young~ (playing with his name?)
Hello~ It's MingMing!
You are actually in front of me now... And I'm filming this now.
I have something to say to you...
Happy new year and I hope you succeed in 2018!
Fighting..! If we have time let's eat a meal together!
You are now coming out here...
happy new year and i love you!!
From Salgumatt (Our house) team to this other team,
We have always been together and experience new things!
You are able to show off your leader ship skills! As expected from ONF leader!
I learnt a lot of leadership skills and hope to learn more from you!
Since there's no time, 2018 happy new year and hope you receive lots of love! BBYONG!!~
-------------------------------------------
Keihin butterfly carb rebuild #2 - Duration: 35:20.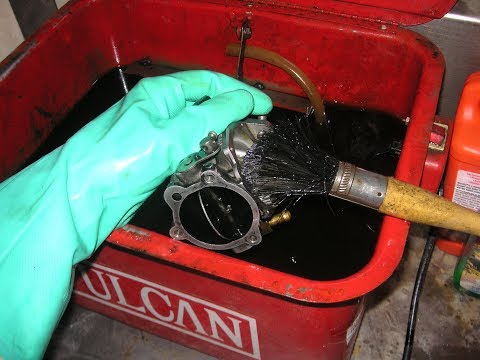
Hi, I'm SportsterPaul. Today, we're going to disassemble and clean this Keihin butterfly
carburetor. It's used '76 to '87 Harley Sportsters. My interest is iron-head Sportsters, so kind
of exclusive to that. The tools you're gonna need – well, first you need a tray because
then you put all the parts in, you don't lose it, stuff doesn't get scattered.
When you get your tray, safety, gotta have safety glasses. These are 3M Lumo – I forget
the name. Muvo, that's it, M-U-V-O, they are fantastic because they are reading glasses
as well as safety glasses, so if you're getting old like me, you need reading glasses, you
get them both with this. This is a 2-point whatever diopter.
Tools, you're gonna need No. 2 Phillips. You're gonna need a No. 1 Phillips. You're gonna
need a fairly large straight slot for the main jet, and a narrow straight slot for the
intermediate jet. If these are recalcitrant, like for the main jet, here's a big hefty
Craftsman right-angle straight-slot, so you can unscrew the main jet. Same thing for the
Phillips that most of the carb is built with, here's a little ratchet. Works pretty good.
So we're gonna put some tools there.
The other tool you may need if you're taking it off the bike, nitrile gloves. Just like
Viton O-rings and stuff is called, nitrile gloves are way better than latex. They're
tougher, they don't tend to cut as much. I've got this brand here that I use when I'm handling
a wet carb with gas in it. There's this brand here as well. I like this brand. It's still
taped up from moving here to Florida. It's got date codes and stuff like a medical hospital-grade
stuff. So I like that. In case there's a recall, I'll be notified.
The carb kit, we talked about having a Viton rubber carb kit. Not sure if this is one or
not, so it can go in the little tray as well. Everything's in one place. The tools, I'm
working on this video, usually the tools should be in the toolbox replaced as you go, especially
if you got buddies and you're working in a garage. But we'll go through this now. I'll
learn about how to do fast-forward and speed it up. I'm not trying to bore you.
To drain the carb, turn it upside down. This one's been sitting around for a week or two.
First thing, I build this custom, goofy kinda choke thing here, and we're gonna get that
off 'cause it's kind of sharp and pointy. The screw points up like I taught you in the
tips and tricks video. Not too bad. It comes out. There it is. There's a little holder
on there I forgot about.
Then this was a little cup thing that used to cradle the steel-shrouded choke cable,
the factory cable. I bent it flat. I'm gonna bend it back curly because I'm going back
to that style choke cable. I like to get the float off next. Three screws – three short
ones and one lone one. These screws, I went to Mr. Metric when I lived in San Jose area,
and bought metric screws of the right thread, metric lock washer, metric flat washer, and
you're – I've got a bag of them. I'll show you later when I put this together.
You just replace the lock washer every single time, even if you just pull the bowl after
ten minutes to change the jets, new lock washer every time. And what else? Here's the other
short one. This one comes out. Okay. This one comes out. And then here's the long one.
So like that. Now, the fuel bowl, these two just hold the cap onto the float that does
the accelerator pump. So now you should be able to kinda wiggle it off. Oh, God, yeah,
lots of junk in there. This is not good. I said in the first video, the tips and tricks,
I said it's only been on for a couple months; wrong, it's been almost a year. So in the
hot Florida garage over the summer, the gas boiled out. And I bought gas at RaceTrac.
I'll never do that again. I'm not sure if it is the RaceTrac gas, but there is a lotta
crud in here. This would explain why the accelerator pump's bad.
After you pull the bowl off, this is a little operating rod that the accelerator pump works
with. It goes here. So that's that. The bottom of the bowl looks terrible. Let's open up
the accelerator pump and see what was so grungy in there that that rod wouldn't operate. Take
off this short screw. Take off this short screw. This'll let the little cap. Just a
little trick. People reef on these so hard they crush the aluminum and kinda captivate
it. You can hone that out or clean it out with a drill. Oh, yeah. A little bit of gasoline.
Should get some paper towels.
I really can't see – I should have the nitrile gloves on. The spring's okay. I can't see
what made this thing so resistant to motion. So it's grungy. Let's do the trick. In the
tips and tricks we talked about the check valves. And I should've mentioned, there's
a little ball that's put into a passage to be a check valve, and it's wedged in. You
can't get them out. There's another ball that's just wedged into the aluminum and peened over.
I can hear it. That's good. That's a good sign. Float bowl. I'm gonna stop things now.
I'll get a rag and clean up the gas.
Now we've got the float off, and it's delicate. The float's a little delicate, so you wanna
get that out right away. That's where you use the No. 1 Phillips, the smaller Phillips.
It goes – there's one screw right here. Right in the corner there's a rod, and they're
getting kinda cheap and fancy 'cause there's one screw holds this rod in a pocket, and
that's what lets the float pivot up and down. So let's get that out. Not too bad. I put
this together so it's not all reefed and impossible to disassemble.
Okay. There's the screw. Here's the float. The needle comes out with the float. Talked
about using safety glasses. Now I need them, so let's put them on. The float comes out.
It's gonna be hard to see. The float comes out there. And there's a little wire, the
theory being when the float, the needle points up, stops the gas coming in, so the theory
with that little wire harness thing is when the weight of the float comes down, it pulls
the needle down so that it's more positive.
So the float – oh, trick. Another trick. Floats wear out right here where the needle
touches. They get a big dent in there, and if that dent is bad enough, and you go to
a different needle with a different profile, maybe it hangs up. I don't know, they're not
– they don't make them anymore. They're unavailable. So maybe I'll go to the jewelry
class here or the jewelry club, and see if they can weld it up. This one is in very good
shape. This one's almost as good as new. I'll try to get a close-up picture of that put
up here so you can see how little this dent is, and I'll have a couple others you can
see how bad the dent can get.
That can be a real problem. That can cause you – the float doesn't go up all the way.
It doesn't go down right. The needle, the needle looks pretty good actually. We're gonna
put the new one from the rebuild kit. But save the old one. I can smell that gas. All
right. In the tips and tricks we talked about this rubber plug in the intermediate circuit,
so out comes a rubber plug, in goes the narrow slot. There it is. And when it makes that
nice crack.
If they don't come out, like if this one doesn't come out, there's the intermediate jet. I
get them pretty fat. For Iron Sportsters, it just seems like up in the 80s. The one
I just put together for the '77, it's an 87 main jet which I think is 0.87 millimeters.
I don't know. So it's a pretty big hole there to get them to run right low. The main jets
over the years, I've leaned them out, and I think I'm to 160s or 1 – what's this one?
I might be able to read it thanks to my safety glasses – 165. So it's got a 165 main. I
might go down to 160. I got bags full of jets.
Intermediate. Here's, you use the big straight slot. Okay. There's the main jet, 165, a little
film of gas in there. This brass tube, it sticks up on the inside. Sometimes you can
get at it from here. Sometimes it doesn't come out, and you're just stuck with it. So,
no, it popped out. It won't come out, but other than that, maybe that's the last tool
I should show us, this little brass.
It's the mixture tube. It's where the air and the gas mix together in the main jet area,
and that's one of the reasons why you plug, you don't draw directly from the bowl. We'll
get that out. Trust me. What else? Well, you can take the idle speed screw – this is
where you get it down roughly, and then you use the idle mixture here to tweak it in,
and get the maximum RPM, then back it off a little. How it comes off idle, that's all
dialed into the mixture.
Get that off. Oh, nice and loose. Maybe too loose. This is where there could be an air
leak, and I talked about using some Teflon tape. It's dangerous because if you use the
Teflon tape and you put it too close to the beginning of the threads where the needle
is here, then a piece of that Teflon could fall in and cause the exact problems I was
talking about where the bike acts different every week.
So we got that out. Overall, it's pretty good. Let's get this gasket off. I don't know why
this carb was just non-functional, but once we get it cleaned, I can guarantee you – nothing
easy with a Sportster, I swear to God. There we go. I wanna rip it. I mean, sometimes you
save these. I got a bag of these too. There should be some new ones in the rebuild kit.
I like these paper ones. I like the studs too. I used to think it was cool to come in
from the back. The studs kinda help when you put it together. There we go.
That there. There's also an O-ring here. To my knowledge, do you really wanna bolt metal
to metal? When I showed you those manifolds in the tips and tricks, one of them had a
fiber spacer, the theory being less heat from the engine gets transferred into the carb
and makes the gas hot. So then it depends how much you've run the bike, how hot the
bike's running, hot gas, cold gas, all these other problems.
So we'll get that little mixture tube out. How about that? Force does everything. It's
still a little wet from gasoline. There's little tiny holes here. This is where the
ultrasonic cleaner just does wonderful. Little tiny holes that let the air in. They bring
the air in through a vent. Right here you can see – maybe you can't – you can see
this little tube. That's where the air goes in and mixes with this thing.
You don't touch a lot else. One nice thing, carb cleaner will mush out this silicone that
I put in previously, blue silicone gasket material, and so then you have to get it all
cleaned out, new silicone. This is where it could leak. Here's another Welch plug from
the idle circuit where it comes up, goes across. I might not have been clear in the tips and
tricks video, the idle, this one little hole right here, that's the idle mixture. That's
where the little needle sticks down into, and you adjust that when the bike's idling
which means the plates are completely closed.
The other holes that you see further down, if the light's good enough here, the other
holes here are for the off idle. That's so it's idling nice, and you start to crack it,
those holes come in, and that's where they machine through this, through where this plug
is. Those holes are what gives you the character of the bike just coming off of idle which
is a critical time.
And because they're great engineers at Keihin, they figured out how the size of the holes
and the spacing of the hole, so as you crack it open, it tends to make a nice smooth transition,
and then once it cracks a little more, well, then the intermediate jet takes over, and
you're bringing gas up right through that tube, that brass tube that's where the main
is. So, big fun.
Intermediate... main. This thing's in pretty good shape. It stinks. Shoulda maybe done
this in the garage, but then we wouldn't had the nice lights. So what's next? I'm gonna
leave the throttle cable thing on. There's seals here. You don't wanna get too – that's
why carb cleaner is a little dicey. We'll go out, maybe I'll do a little remote setup,
show you dropping them into the ultrasonic cleaner later, but what I learned, important
tip, don't throw this dirty – look how dirty it is.
I mean, there's tons of dirt on this carb. Just road dirt on the outside. Don't just
throw it in the ultrasonic bath 'cause it gets the bath all black and ugly and disgusting.
Throw it first in your, not carb cleaner; you don't have to go right to carb cleaner,
but just part solvent. So Safety-Kleen is what we had in shops. So part solvent does
a great job getting the big chunks and the grease. You don't wanna put grease in an ultrasonic
cleaner. It's supposed to – it has trouble with grease because the grease is mushy in
the ultrasonic, waves of the water and the chemicals.
So we'll get the, maybe one more tool is an X-Acto knife to get this gasket out. Let's
see. There we go. So there's two. That also wasn't clear on my tips and tricks. There's
this gasket. Let's see if it swelled much. See there's a Viton gasket. Cool-guy stuff.
And then there's a little O-ring around the sprayer, the accelerator pump sprayer which
is right here. And that's got a little gasket too. So we'll get that. So I'm gonna shut
things down, go out, drop this in the Safety-Kleen. Kerosene and detergent is what I think it
is. It's not too hard.
That's another place to use gloves. For me, it tears up my cuticles. They all start chunking
out. So get it roughly clean. I'm gonna even ultrasonic the float. This float isn't too
bad. It's in much better shape. I guess most of the grunge ended up in the bottom. And
we'll get that figured out. There's gas in the carb. I'm really surprised that the accelerator
pump, as good as it looks – I'll put a picture up. Somewhere here – here's one. Look at
this one. How's that for a diaphragm?
We'll compare it to the – of course you always lose the thing you're looking for.
here's the rib side up. That goes into the float body. There's this groove cut here and
so these aren't symmetrical. They go in one way, like that. And look at this mess. That
was in the carb I took apart. It looks also like it's pinched, so I probably put it together
wrong. Gosh knows all the mistakes you can make. Hopefully we'll solve some of that in
this video series.
Next, cleaning this off, then we'll show you – I'll take some stills out in the garage.
You can see the cleaner. It's no big deal. All right. See you in a minute. Okay, back
from the garage and the part solvent, parts cleaner. Got the big chunks off. One nice
thing because I'm gonna put this in the ultrasonic cleaner now is you gotta blow it out with
air now 'cause it's water.
You know, you wash it off with water. You don't wanna mix the part solvent with the
ultrasonic cleaner aqueous bath. Bad thing to do. So you just wash it off. The water's
your friend. I mean, you're blowing water in passages. It's taking dirt out. Tap water's
pretty clean, and I've got water softener. No dissolved solids, better yet.
So I've got it out. You can see it's better, but, you know, you can see this black. Let's
see if we can take it off. Yeah, so it cleans up a little. I brushed and brushed it. Apparently,
it didn't brush it enough. The inside, still pretty grody, if you can see that. Lots of
junk on the inside. That varnish from that year worth of having the bike sit. The inside
isn't too bad up here. There was something I wanted to get. This little piece of gasket.
Think of an ultrasonic cleaner, like a teeny-tiny little bead blaster. So all the stuff that
a bead blaster would have a problem with – adhesive tape, glue, gunk, grease – the ultrasonic
cleaner will have that same problem. So there's a little gasket material right here. See if
I can scrape that off while we're having fun. Yeah. That's the kinda – I mean, it's good
that the big areas are all shiny and clean, but it's the gasket and sealing areas that
you want immaculate.
All right. Well, the carb body cleaned up pretty good. I mean, it's shinier. It's still
got some discoloration here. The inside – this camera auto-focuses for crap – the inside
is still pretty filthy. Same thing, it's got like a film. It'll clean up a little bit with
some paper towels. Some guys try the dishwasher. I have a dishwasher here in paradise. Maybe
I should toss it in the dishwasher, but not sure about that.
So next is gonna be the ultrasonic cleaner. I've decided I'm not gonna go in there and
drag all the cameras and show you the thing buzzing. You can get it for about $220 on,
$220.00 on eBay. I saw, internal, there's an eBay where something broke on one and a
guy fixed it or tried to fix it, and you could see the internal construction's pretty good
for Chinese stuff. It came out of Canada. A guy in Canada responsive, answers emails.
Good enough. It's worked so far. I've had it, I don't know, I've used it five or six
times.
So here's the big parts, the float. Here's a picture of the cap where the accelerator
pump goes. I'll put a picture up what I did. The rubber and stuff, I don't put in the solvent.
Same theory, maybe it'll swell the rubber and it'll be back. Now, the ultrasonic is
water. I might toss all the rubber in the water. I've got a nice basket that parts won't
fall through, the jets won't fall through. Let's get those.
You can see that jet's a little dirty. The mixture tube, a little dirty. I guess we're
out of business. I can't find the intermediate jet. Here it is. Here's the intermediate jet.
Not too bad. It's really not how they look on the outside; it's all the little tiny holes
and passages, and that's what the ultrasonic cleaner does. It gets into the tiniest little
nooks and crannies including that problem spot under this Welch plug here. So when it
comes out of the ultrasonic, that's when I'm gonna blow it off.
So what we did in the garage, to recap, put the pieces right in the solvent. Wore gloves,
nitrile gloves. Little pieces, the metal stuff, went in a basket. That went in the solvent.
A picture of that. The rubber and stuff, I kept all that out. A picture of that. Now,
put it back. See how nice it is to have a little tray. This happens to be a photo tray
from back when there was photo developing. Yeah, I gave up on trying to monitor stuff
with the table. It's just "look up at the camera and see what's it's doing," the overhead.
So it'll be curious to see how this cleans up. I'm gonna leave it in – the ultrasonic
cleaner has a heater, unlike some. And just the ultrasonic itself, you use it for an hour
or two, that water gets heated up just from the ultrasonic energy pouring into it, but
this one actually has a heater-heater. You power it on. I'm using MC-3 Branson, Bransconic.
Expensive stuff, but use the right stuff.
I did a bunch of these with MC-1, and it kinda tarnishes them, and then I read, "Oh, not
for aluminum." Duh. So hopefully we'll be able to get – maybe these are zinc. Not
sure. This MC-3 would polish this up pretty good. We'll see how this brass fitting comes
out and stuff like that.
Keep the carburetor kit here. Okay. Now, I'm off to the second bedroom where I've got the
vanity sink set up with the ultrasonic cleaner. I showed you a picture. I'll take some better
pictures now, and we'll see how this looks. It'll be an hour or two. I'll watch TV or
something. And then we'll see how we did with this ultrasonic cleaner that's a very important
part of this whole project. All right? Okay. See you in a minute. Or an hour.
Okay. We're back from the ultrasonic cleaner. It didn't fix the problem. I found the problem.
I'll show you in a sec. I had to put it in Berryman's carb cleaner, 5-gallon bucket.
Love Berryman's, but they sell you the basket now for $27.00 extra on top of the $137.00
for 5 gallons of carb cleaner. I love you guys, Berryman, but throw the basket in the
bucket, then you don't have shipping or any of that problem. It just comes with it.
So here's what the problem was. Oh, look at this thing. This is two, 50-minute sessions
in the ultrasonic. Found the problem. Didn't fix, the ultrasonic didn't fix it. And then
Berryman's overnight, I left it in all night, and then another 50-minute ultrasonic, but
look at this carb. It's gorgeous. It is bright and shiny. The ultrasonic, it's like it polishes
it. Look at another carb here. Look how dull this one is compared to the ones I did. All
of them. Look, here's another one. Look how bad that looks.
The mistake here on these dark ones was using Branson MC-1 which is not recommended for
aluminum. Maybe I should've read the instructions before I bought it. That stuff's not cheap
either. It's hazmat stuff. But MC-3, which is what I used for this, fantastic. Bright,
shiny, gorgeous.
Okay. The problem. Remember all the paraffin that was at the bottom of this that the ultrasonic
didn't clean even after two 50-minute sessions still was kinda grungy. Well, that paraffin
got into this passage here that is used for the squirt, for the accelerator pump. So I
took it out of the ultrasonic, 100 minutes total. I took it to dry it and blow it off.
So here's, this passage here, it's got a check valve. See, you can hear the check valve,
so this one might work.
This passage right there, this little hole right here, this is the one that goes, you
can kinda line it up, right. It goes right here. And then it goes along here, comes up
here, and goes out a tiny little orifice in this brass thing. I'm blowing it off, cleaning
it good. I put the cleaner – I'll show you a picture of an air blow off. It's got a little
rubber lip on it. Put that lip right there, hit full air pressure, 100-some pounds, nothing
came out the brass. No spray, no squirt, no nothing.
So that's when I realized, ultrasonic might be fancy high-tech, but it doesn't always
do the job. It didn't for this. And the other failure in the ultrasonic, 100 minutes total,
I had a heater in it, it got up to about 45 degrees centigrade on the first 50-minute
session, and it got up to 54 degrees by the second session. So I'll put pictures up. Carbon
everywhere. The ultrasonic has trouble with the carbon. It's not hard enough or whatever,
so that the carbon didn't come out of the throat.
Okay, we can solve that. Got the 5-gallon jug of Berryman's brand new. So I put it in
the Berryman's. Use gloves. I'll show you pictures. Berryman's is wicked. Do not get
your fingers anywhere close to that stuff. It's got some nasty stuff on top, that's pretty
bad, but the real stuff that does the work is underneath. They float the nasty stuff
'cause it's less nasty than the incredibly nasty stuff. You stick your hands in that,
your skin will be tingling. Gosh knows, you'll grow three ears. No telling what happens.
So, after the Berryman's, we can see – I can put pictures up as we do this – but
I did take a toothbrush after the Berryman's and clean it a little bit. No carbon. I know
I left it in the Berryman's too long because of the seal. There's two seals here so air
doesn't come in on the throttle shaft. The throttle shaft was sticking a little. I mean,
it was real slow closing. It's fixed now because I put it back in the ultrasonic. Washed it
all off, threw it in the ultrasonic for another 50 minutes, and that kinda frees up stuff,
you know, a lot of water to clean it.
Interestingly, the ultrasonic makes the choke kinda sticky 'cause I guess it gets in there
and just cleans it, every bit of lubricant and whatever so a little Tri-Flow will fix
that. We'll get that going. But it came out great. I should mention that I wasn't even
happy with the Berryman. Berryman's worked great. The first time, I saw a little spray.
Second time, I heard that little "thwap" that tells you there was a piece of something that
just went through the whole mess, then I got a can of regular conventional carb cleaner,
buy it at any store, and I sprayed in that little hole right there, put the air fitting
on. I must've done that four or five times, and sprayed, you know, it's a little nasty
'cause it is almost an aerosol when it comes out of the squirter here, but that squirter
goes like this, and that's where it sits in the throat, the carb throat.
And I tell you, there's people that say you can adjust them and so it squirts. It's pretty
crude. You just throw some gas up there. I'd rather not touch it. There's an O-ring that
goes around here, and then the big O-ring. So we've got it nice and clean, nice and shiny.
The rest of the stuff, we got our Custom Chrome, hopefully, Viton. I know the later one, the
ones you can buy for $29.00 are Viton, and worth every penny. Thank you Custom Chrome.
The float, it's closed-cell foam, that's why it floats. I didn't wanna leave that – certainly,
I didn't put it in the Berryman's. Here's a picture of everything. You leave all the
rubber out of the Berryman's. Remember the carb body had a silicone around this Welch
plug I told you about in the tips and tricks, had this blue silicone in there to seal it
in case there was an air leak. Probably not necessary. I probably won't do it again. That
came out. Berryman's gets that out. It just kinda dissolves everything.
Swells rubber; that's why the seals got tight. But the rest of the stuff, so I left the stuff
out. There's the picture of what I left out. But I didn't put this for the third – none
of this went back into the ultrasonic for the third time. They were perfectly clean.
Well, no, I shouldn't say that. The jets and the mixture tube, and the cap I put in for
the third session of ultrasonic.
The cap is getting so clean it looks like finish is coming off of it. It's turning gold
here like it had some die cast or zinc plating or galvanized finish, and now it's getting
back to nature. So, remember the trick? There's a check valve in here because it's a diaphragm
pump. It's an inlet valve and an outlet valve. Hear it? It sounds better, right, than the
one that I was playing with before.
It's crisper. You can just hear that ball is all clean and happy in there. Same with
the float. It's all clean and happy. So happy project. Successful project. Look at this
main jet coming out of the ultrasonic. It looks like it's brand new. So that was a pleasure.
I don't see the point of leaving the jets in forever. Enough ultrasonic's enough. I
wanna get this together. I'm not gonna rebuild all of these. I wanna get this thing back
on my bike and see if I can get it running around the block.
So this is all disassembly, figure out the problem. Hopefully we'll fix that. The diaphragm
for the accelerator pump looks pretty darn good, certainly better than that chewed up
one I showed you before. A little bit better than this one. You know you got a problem
when this comes out of your carburetor. But I'm not gonna reuse it, although I would as
a cheapskate.
Got this beautiful carb kit. We'll get the carb kit on there, and then these will go
in these which I'll probably sell on eBay. Sorry guys. Used parts. I'll tell you in the
description. So that was disassembly. Just use these four tools – No. 2 Phillips, No.
1 Phillips, a big straight slot for the main jet, a narrow straight slot to get the intermediate
jet out. Those four tools, you're ready to go.
Next, third, final video in this series is gonna be putting it back together. We'll go
through the tricks. This is when I'll do that trick about taking the – keep everything
together. That's why you want a little bucket. Keep everything together. The little trick
I talked about in the tips and tricks first video about putting a clear plastic hose on
the accelerator pump, filling the bowl with water, taking the – putting the accelerator
pump stuff on down here, and then taking the operating rod, screw, screw, squirt, and count
how, not count, but watch how much fluid gets delivered with x-number of accelerations,
and then I can compare them to these.
We'll see, I'll do a couple of them, at least two, to show you if there's any difference.
The bowls do have differences. Some of them have a little hole right there 'cause they
were trying reduce the amount of gas you got. That's in addition to this screw which can
reduce the amount of gas in an acceleration event. Anyway, they felt it was necessary
to add a little hole there.
This one doesn't look like it has it. Let me put on my safety reading glasses. These
are great. And, no, this wasn't doesn't have that little hole right there, so that's good.
All right. See you next time. We're gonna put it together. I'll even get on the bike
and maybe take a video of the damn bike starting. It's about time. This thing has sat for too
long. I've been driving the other ones too much. So thank you. See you next time.
-------------------------------------------
Solid Star Leaves His Record Label|NVS News - Duration: 1:29.
Solid Star Leaves His Record Label
Talented singer Solid Star, has officially taken his leave from label Acheivas Record.
The OMOTENA crooner, who has been with the label for 10-years made the announcement via his IG page writing;.
"I Joshua Iniyezo AKA SOLIDSTAR wish to use this opportunity to thank my former label Achievas Ent for being there for me over 10yrs Words cannot express how grateful I am, Special S/O to @ossyachievas@colepeter my Bosses and the entire team for having my back u r still my family even as I begin another chapter career wise #Shaba!".
-------------------------------------------
The Pore fessional Pearl Primer: Demo and First Impression - Duration: 11:07.
welcome back to my channel so today's video is a high-end makeup review I am
reviewing the professional pearl primer I did just get this in my December 2017
Birchbox so if you'd like to see that then please keep on watching make sure
you also subscribe to my channel hit that notification about I upload a video
every single day of the week I don't want you to miss any so let's gonna get
started so this is point a leaven fluid ounces and it's just like a really
really cute little bottle I have tried the original pore fessional and I really
really do love it but this one I guess is kind of like more pearlescent so
let's go ahead and
so it comes out kind of pink because so guys I'm gonna get kind of close because
I'm only gonna do primer on half of my face I want to see if it will come
through as more of a pearlescent so it says that this target pores and dullness
the soft radiance primer instantly minimizes loads of pores locks on makeup
and helps skin look bright boosted and awake so let's go ahead and try this out
so I'm gonna go in and put the primer on this half of my face and I'm just gonna
go ahead and just dot this on and I'm just gonna go ahead and
so I'm not seeing like like a real pearlescent look to it quite yet but we
shall see glides on really really smoothly it
doesn't have as much of a silicone fill as the original Porefessional
but
so right off the bat I'm not seeing much of the difference says it's oil-free
it's silky so yeah so that it's a matte finish that how can it also be glowy I'm
confused anyway so I'm gonna go ahead and go in with my Rimmel stay matte
foundation this is one of my favorite foundations and I'm gonna be also using
my ELF ultimate blending brush so guys I'm gonna go ahead and I'm just gonna
put some of this on the back of my hand
okay and I'm gonna do the side with no primer on at first that way we're not
you know mixing it
guys I have done lots of videos about this foundation it is very matte and it
is full coverage and it's like four dollars five dollars at Walmart
just on my eyes
and in my opinion you do need a brush to apply this foundation so
okay so that is just the foundation without the professional pearl primer so
I'm just going to go ahead and start applying it to the side with the primer
okay so close I do see a little bit more radiance but it's also kind of looking
like it's breaking up the foundation Oh
this is the other side so I can't see a little bit more radiance coming through
on the side with the Porefessional so
I don't then I'm gonna go ahead and just go in with the matching powder and just
set a whole entire face
and it looks pretty dope you guys
did you see some poor minimization on this side compared to the side we shall
see
um let's see um I honestly I do see a difference compared side to side this
side is definitely more matte this site definitely does have more of a a pretty
kind of knock as a dewy because it's not dewy but it's a little bit more of a
glow I guess um it is really really pretty
they feel the exact same so yeah so guys I think I'm gonna do a little bit of a
wear test and see if it affects the wear time at all the Rimmel stay matte is a
very long lasting foundation but we're gonna go to do a wear test on the
professional pearl primer I'm so far it's not making a huge enough difference
where I would say yeah go out and buy this because this is like between 21 and
$45 but we shall see so guys I will be right back in a little
bit for we're testing everybody so it's been about two hours I'm sorry if I got
a little bit of black on my face I was trying out something for a video and
anyway um so here we are as you guys can see it's still looking about the same I
am a little bit more matte on this side I also do feel like I got better
coverage on the side that I didn't use the Porefessional pearl primer so like
the pores are minimized on the side but I still feel like it's kind of breaking
up the makeup a little bit and they kind of diluted the coverage here once again
I don't feel like that there is you know still I don't feel like there's a
problem with my pores on this side of my face but it's just I don't know it just
feels like it's breaking apart on the side and it is a little more shimmery on
the side with the primer guy's not all primers work with all foundation so I'm
not saying that this is a crappy primer but I do think it does not play well
with the Rimmel stay matte guys I have combination skin and personally I don't
like a super do weak literary Marie primer so if I do ever use it like
you the what was it the Smashbox radiance primer that was a beautiful and
it's a beautifully under the Rimmel stay matte and it did give a very lit with it
lit within from within look to the skin but this one I don't know I just don't
feel like it plays it nicely with the Rimmel stay matte which is fine it's
nothing bad against that primer but once again I do feel like it's kind of
glittery like I'm seeing glitter like around here and I don't I don't think
it's picking up on camera but this side I just like the way it looks better so
personally I'll have to keep playing with this but my first impression is
that it's kind of not worth the hype in my opinion in my opinion it kind of
diluted the coverage it made it starting to separate a little bit and yeah I'm
just not digging it I will definitely try it underneath some other foundations
and give you updates down in the description box but you know if I was
going against the high-end primers I would definitely take the Smashbox
radiance primer over the pore fessional
pearl primer just my opinion but it felt really nice going on the makeup went
over it beautifully but it is starting to separate and I just don't like the
way it looks I do prefer the side without the primary but anyway you guys
that is my little update and my first impressions of this if you do love this
primer would you please let me know what foundation drugstore foundation you use
it under I'd really really appreciate it you guys if you did enjoy this video
please go ahead and give it a thumbs up make sure that you share this video I
would love to get some more tips and tricks with using this primer or you
know just if people are wondering about this product you guys can also follow me
on my other social media my Twitter and Facebook is that budget plan baby my
instagrams that came out makeup and I will see you guys tomorrow for another
video hope you guys have a good one
-------------------------------------------
荒廃未来探索記【フォールアウト3】シーズン2 #1-4 - Duration: 10:01.
PS3 Fallout 3 # 1 - 4
-------------------------------------------
কিয়ামত পর্যন্ত শহীদ ও মুমিনদের রূহ কিভাবে ও কোথায় থাকে || Sheikh Motiur Rahman Madani - Duration: 5:32.
Subscribe the Channel get More new video
Không có nhận xét nào:
Đăng nhận xét