The dota world is vast and rich.
From the treacherous waters around cladd isles, to the ghastly eyrie in the sky.
From the glaciers in the bitter north, to the thorny wastes and hazardal desert in the
south.
Asian inspired cultures, south american inspired gods, and european inspired kingdoms in constant
battle.
Together we will embark on a journey to discover the biomes, cultures, people and stories of
the different regions of the dota world.
This, is dota geography.
In this episode we will just take a quick overlook on the map, and how the ancients
came to existence and influenced the dota world.
There was very little concrete information to go from for the mapping, so a lot of this
is guessing based on what is logical.
First and foremost because time in the dota universe is… complex.
Most of my decicions ive made based on the map from an old dota tutorial, and then ive
placed other things according to how it relates to that.
Ive also tried to see what type of culture and biome from real life the places are inspired
by, and then drawn conclusions.
For example asian inspired in the east, and cold places in the north.
Bear in mind that where exactly things are placed is not that important, its just so
we have something physical to relax our brain on while we discover the stories and relationships.
Because time in the dota universe is so scattered and we lack evidence, im gonna describe what
has happened, give my thoughts on it, and then its up to you to decide when you think
it happened and in what order.
Let me know your thoughts!
Each video covers each their region, and will go deeper and deeper as the video progresses.
I will first give an overlook of the region, and show the different places, then describe
the biome, as in landscape, flora and fauna.
Then i will go over the people, heroes and factions you can find in the region.
After that, we will talk about the different artifacts, gods and culture of the people.
Lastly, we will dive deep into the history, and my own personal speculation.
The end part of the video i will explain my decicions and other options i considered.
I have mapped out every single place mentioned in all of the cosmetics and events.
I dont think im missing anything, but if you see something big let me know.
So, this is the terrene plane.
The dota world our heroes battle on doesnt have a name we know of, neither does the planet.
The only thing we know is that its referred to as the terrene plane.
We also have other planes, and other realms, which will be its own video.
But they are not on this map.
In the terrene plane, i have divided the map in different regions which has some shared
history and biome.
We have the north, the cladd isles, the western mountains, the wailing mountains, vuur, the
western forests, the ruelands, the western tropics, the bleeding hills, the eastern isles,
nishai and the barrens.
Each of these will have their own video.
Additionally, theres 3 oceans we know of: the northern sea, the boiling sea and the
samareen sea.
In the north we have most notably icewrack where crystal maiden resides, cobalt where
tusk is from and crey where siltbreaker took place.
On the cladd isles we have the stories of tidehunter and kunkka, as well as sven.
In the western mountains you might recognize knollen where sniper is from, the fields of
endless carnage where pudge has history, and stonehall where legion commanders bronze legion
is from.
In the wailing mountains we find the places the elemental spirits originated.
In vuur we find the ancient oglodi ruins our oglodi friends come from, as well as druud
where the centaurs reside and hunt.
We also have the volcanic vuur mountains and underneath them, the abyss, nether reaches
and font of avernus.
Roshan also lives in these underground caves.
The western forests is the home of the windranger, and the nightsilver woods is where luna and
mirana worships selemene.
We also find augury, roseleaf and the nation revtel - the home of many heroes and interesting
races.
The ruelands is a big region that covers many kingdoms - some still around, but many destroyed
long ago.
The western tropics includes the ash archipelago, jidi isle where venomancer was reborn, and
bloodseekers home in the far south west.
The bleeding hills has tar running down from them into the hoven, a big forest with trolls
in it among other things.
A bit south we also have the yama raskav jungle, where batrider is from.
To the west we have ultimyr and the ruins full of treasures that meepo frequents.
The eastern isles contains not only juggernauts fabled home, but also pole and ashkavor, the
homes of phantom lancer and grimstroke.
To the north we also find the ghastly eyrie, high in the mountain tops, unavailable to
those who cant fly.
Nishai is the home of earth shaker, broodmother and also one of the two places we know from
the siltbreaker event.
The barrens is a vast desert in the south, where we find nyx assassin, sand king and
lina.
The circle you see overlapping some parts of cladd, vuur and the western forests and
mountains, is where the artifact lore took place.
When i cover these regions i will avoid the artifact story, because that will be an episode
of its own when the game is released.
But dont be afraid - the regions have a lot of lore to cover already, even without the
new knowledge from artifact.
To start off this series, lets talk about the origin of the world.
The archrnonicus tells us that before there was life at all on our planet, the mad moon
containing the ancients came into its orbit.
The mad moon was their prison, captured by zet the arc warden.
Zet and the ancients among others are fragments of the primordial mind – a presence that
predates time.
Based on arc wardens lore, it seems like after something resembling the big bang happened,
the primordial mind was turned into many fragments.
2 of these, and 2 of the biggest ones, were radiant and dire.
They are the opposite forces we call the ancients.
Zet the arch warden is a smaller fragment, who trapped them in the mad moon to bring
harmony to their conficts.
This prison found our planets orbit, and arch warden made sure they didn't escape.
But he grew weaker over time, and their conflict within the mad moon grew stronger.
As their conflict in the sky grew more and more vigorous over the millennia, life on
earth flourished.
If we understand the artifact lore correctly however, the ancients had their effect on
the planet long before they later landed.
Prellex and kanna were priestesses for each their ancient power, and prellex had visions
of a sundered moon.
These visions were true, because eventually the ancients couldn't be contained any longer,
and the mad moon shattered, spreading radiant ore and direstone all over the planet.
One other thing that might have come from the mad moon though, is selemene.
Selemene is the goddess of the moon, and is worshipped in the nightsilver woods, by luna
and mirana.
On lunas cosmetic item "Moonfall" we learn that when the nightsilver woods were still
young, a shard from space fell, and they built a shrine of selemene there.
Could it be, that she was also part of the original primordial mind?
Or, that she is just another interpretation of the radiant?
From the artifact card temple of war, we know that the bronze legion worships a war goddess.
Maybe this is the dire equivalent of selemene?
We will talk more about selemene in my western forest video.
Anyways, the ancients landed in a cataclysmic event, and over time twisted things around
them.
The dire with its destruction, and radiant with its creation.
Don't be fooled though, they are both each their side of an evil coin.
The radiant is in no way "good".
All its creations are enslaved to it, and blind followers.
The dire, if we can understand kannas motivations correctly, is more free and rebelling.
Maybe we can describe it as the dire being a anarchistic nation, while the radiant is
a totalitarian one.
And as you can imagine, anarchism and totalitarianism don't really get along, and conflict is
inevitable.
Over time each side – now with loyal followers on both sides – became more and more consumed
with destroying the other.
The ragnarok-like event that eventually must happen, when the sides clash in the final
battle between heroes, the battle we know from our games in dota 2.
Now what created our planet, plane, realm and reality itself, will be covered in my
video about everything that is not on the terrene plane.
So don't worry about that yet.
Also – there is a few species and races that overlap between regions - some are even
present in the entire world.
Dragons and keens, for example.
And some have so many different kinds and types that i cant fit it all into a dota geography
video.
For this reason, i plan on doing a dota biology special episode, to really dig deep into the
bats, shadow cats and troll types.
Just to make it 100% clear - this map is made by me, and for that reason there is almost
certainly a few errors.
Its unavoidable, because so many things we know very little about.
But after reading through every single courier, hat, mount and hero lore, this is to me the
most logical way to place things.
If i change my mind a lot though, i will make a video when the series is done covering everything
ive altered or later added.
Let me know what you think, or how you would have done it differently.
I hope to see you around for these coming episodes, which i hope wont be in very long.
This was incredibly fun to make, and i kind of prefer valves secrecy so we can feel like
real historians and archeologists when we find connections.
Together we can discover the hidden stories and secrets and unveil the mysteries and red
threads.
If you wanna see the original map, and my map in full res, look in the description and
comments.
You can always contact me in my discord server, and i hope you do.
Make sure to check out my other lore videos.
I especially recommend my 1 sentence hero lore videos, to freshen up on the origins
and stories of each hero - in just one sentence.
Now if youll excuse me, i gotta go finish the second episode so we can get started for
real! peace

 For more infomation >> Nhạc chế 20/10 | Đừng Quên Chúc Mẹ | Rất hay và ý nghĩa - Duration: 36:37.
  For more infomation >> Josh Gates on Preparing for the Unexpected - Travel Channel - Duration: 0:54.
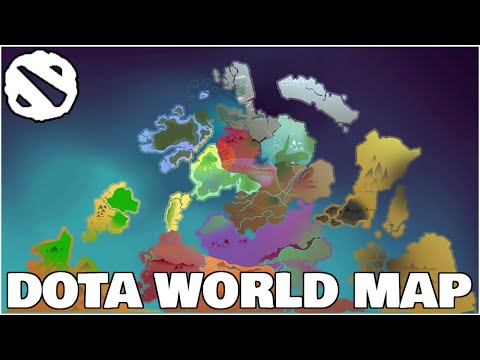

 For more infomation >> Train Colors for Kids | Unstoppable Train | Superhero Fun Rhymes - Duration: 20:32.
Không có nhận xét nào:
Đăng nhận xét