Thanks for watching video !
Please SUBSCRIBE to BeeKids Learning TV!
-------------------------------------------
Curren$y Type Beat - Karma (Prod.Proffeny) - Duration: 2:53.
E-Mail - Proffenyofficial@Gmail.com * Subscribe Me *
-------------------------------------------
[3d audio] 볼빨간사춘기(Bolbbalgan4) - 좋다고 말해 (Tell me you love me) - Duration: 3:28.
Hi, you're sitting on the same seat near the window in the bus as usual
I'm saying hi to you who is sitting there
Hi!
As expected, you don't accept my greetings
You're popular and handsome
You're only so cold towards me
But do you remember last night?
You told me you liked me
Under the pretty street light
You told me you liked me
Even if you pretend you don't remember
or you don't like me
You have to know that
You have to know it definitely
That, you told me you liked me
Yeah
If you like me or love me
Just say yes yes yes
And then I'm your girlfriend
And you're my boyfriend
Tell me you love me
Without me knowing, you're sitting at the very front seat in the library
And I said hi to you again today
Oh Boy~
As expected, you don't accept my greetings
You're popular and handsome
You're only so cold towards me
But do you remember last night?
You told me you liked me
Under the pretty street light
You told me you liked me
Even if you pretend you don't remember
or you don't like me
You have to know that
You have to know it definitely
That, you told me you liked me
Yeah
If you like me or love me
Just say yes yes yes
And then I'm your girlfriend
And you're my boyfriend
Tell me you love me
Oh~
I really like you a lot
Can't we get together?
I feel small with my school uniform skirt
looking big on me yeah
The tall pretty girls
are all around you
Woo~
If you like me
If you love me
Yeah~
And then I'm your girlfriend
And you're my boyfriend
Tell me you like me
If you like me or love me
Just say yes yes yes
And then I'm your girlfriend
And you're my boyfriend
Tell me you love me
-------------------------------------------
ПРОЕКТ ПЛАТИТ!!! ВЫВОД 34$#FATHERFOREVER ОТ АДМИНА ДОБРЫЙ ПАПА - Duration: 3:09. For more infomation >> ПРОЕКТ ПЛАТИТ!!! ВЫВОД 34$#FATHERFOREVER ОТ АДМИНА ДОБРЫЙ ПАПА - Duration: 3:09.
 -------------------------------------------
Dragon Ball Super - Watashi no Mirai - Tributo Trunks (Especial 8k) - Duration: 3:16. For more infomation >> Dragon Ball Super - Watashi no Mirai - Tributo Trunks (Especial 8k) - Duration: 3:16.
 -------------------------------------------
Прикольное поздравление Менеджерам YouTube из Академии Интернет Профессий №1 Выпускникам 6 поток - Duration: 2:19. For more infomation >> Прикольное поздравление Менеджерам YouTube из Академии Интернет Профессий №1 Выпускникам 6 поток - Duration: 2:19.
 -------------------------------------------
Avengers Infinity War Trailer Update, All Characters CONFIRMED, Thor Eye & Avengers 4 Phase News !! - Duration: 5:57.
What is good youtube Wartu Here with a video on the Avengers infinity war and
Marvel phase four so as you all know that trailer is coming soon it was
leaked then removed so the Russo brothers are kind of trolling us they
posted three which most likely is inferring it to the infinity war
official trailer as what we've seen is only part trailer and didn't have
finished CGI on characters like Thanos so three which they posted on their
Instagram obviously means three days or December the third so we will find out
within three days it didn't mean three days or if it did mean December 3rd so
remember a while back there's some footage came out on Mark Ruffalo who
plays Hulk filming behind the scenes with Vin Diesel who plays baby Groot
saying that Groot and how will be smashing it together soon which is very
interested and now we know this was for a vanity photo shoot where literally
everyone inside infinity war and Avengers 4 would be in it obviously they
can't reveal the title Avengers 4 because apparently that is going to ruin
stroke be a spoiler for the movie which is interesting this included people like
Nick Fury spider-man Captain America Thor nebula star-lord
happy Hogan war machine Groot Drax vision Scarlet Witch Hawkeye Falcon
Doctor Strange Black Widow Valkyrie Gamora Winter Soldier Wong wasp Tony
Stark even Kevin Feige himself and Stan Lee but what's really interesting about
thought is those eyes back and also his hammers back so if you remember in the
post credit scene that gigantic ship turned up
Loki stole the vessel and they were talking about whether they should take
him back to earth after us guard exploded and then from the d23 footage
we can divulge that Thor try to take on Thanos lost his eyes got gouged out from
what we can see of what being told and he ends up smashing into the garden
of the galaxy ship which is very interesting and obviously Loki ran off
with that what's really interesting about these images that is he's got an
interesting scar above his eye which does infer that maybe he did lose his
eye but if he lost his eye how would he actually get his eye back
I've got no ideas maybe they use one of the Infinity stones maybe Thanos gives
it back to him in order to maybe retrieve one of the actual stones
because it's gonna be pretty obvious that in affinity wars he's not going to
get all the stones in the first movie so guys what do you think about these
images do they reveal anything I don't really think they do reveal anything but
the suits do look pretty interesting as it is really that just remote Marvel as
a whole so Kevin Feige did give away some interesting things about phase 4
he said Marvel Studios says that's up to 20 Marvel movies that will be completely
different Avengers infinity war will be a finale of sorts producer Kevin Feige
says so does that tell us that some people are actually going to die and
Marvel are going to get themself at this PG we're not PD era this 12 era where no
one can really die unless you include people like Thor's mum and other people
like that people that aren't really main to the narrative it's not like they're
gonna kill Thor off because that would just be silly but it doesn't fer that
they could potentially kill some people off very symfony towards you in may 2000
18 brings things you've never seen in superhero films says Feige told Vanity
Fair for the new holiday issue so it's interesting there will be two distant
periods everything before venues for and everything after I know it will not be
in the ways people are bettin so that's interesting to have you all you know
Captain Marvel she her movie will be set in the cosmic
world essentially and will be set before iron man's era although it's gonna be
interesting to see where she's been all this time and why she hasn't appeared in
any The Avengers movies or anything like that so there's gonna be a lot of
Avengers infinity war Avengers for face for coming out we know we've got a
Spider Man movie coming out post Avengers 4 but these 20 movies I can't
find it anywhere they're not listed they did go on to say there was 7,000
characters they can use and they're going to be using them so it does sound
like they're going to be tapping into some new movies in the sense of bringing
out movies characters that we have never seen before which would be quite
interesting as Marvel movies have been getting stale again the generic Iron Man
the generic Captain America just generic movies basically so it's gonna be quite
interested in saying that as they appear to be going for more the cosmic side we
know we're getting another garden galaxy movie but we don't know what's gonna
happen with the cosmic side post that so it's gonna be very interesting anyway
guys please like scrum comment what do you think what the rusev was wearing
ferns who do you think of me three days or do you think it means that December
the third anyway guys I'll catch you in that notification squad down below hit
that Bell button and I'll see you soon guys catch ya later
-------------------------------------------
How to Make Powerhouse Granola Bars | Man of the Kitchen - Duration: 7:23.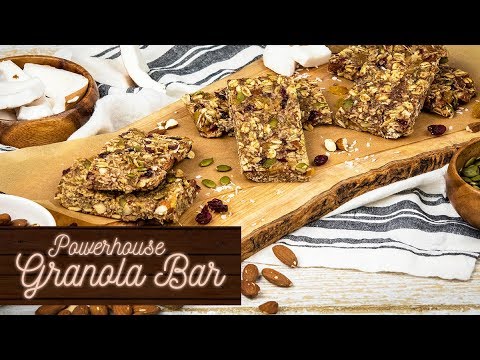
We all love our kids, but they can be exhausting. Every night I have to walk
with Kairo till he falls asleep and before I know it I've got to wake up go
to work, and then it's the afternoon and I hit a wall, so I've created this power
surge granola bar full of nutrients and real ingredients for when you really need a
pick-me-up.
Our powerhouse bars begin by reconstituting some dried fruits that I
really love. So I've got some apricot and cherry, some raisins, but any dried fruit
that you have on hand, by all means throw them in for natural sweetness and
chewiness. So I've got some hot water here and just pour them on to
reconstitute them, soften them up a little bit. I'm doing this first in the
process so that they can chill for five minutes, kind of get soft and do their
thing. So leave them to the side let them kind of absorb the water and soften up,
it'll give our bar a great, great texture. So while that happens, I've got a dry
bowl. We're gonna start with three cups of oats. You can see the beautiful
texture on the oat, gives it a great nutty flavor. And then
we go in with a little bit of whole wheat flour. You can use white
all-purpose flour but this is a great trick to get a little more healthy with
our bars. So go in, a little bit of flour, beautiful whole wheat flour, I've got
some ground flax seeds, so you buy the flax seed whole and then you grind them
up. You could do it in a spice grinder if you have a nice clean grinder, but the
the flaxseed will give me protein, will give me fibre, these are all superfoods.
Really really great way to get heart-healthy stuff into these bars.
Same idea with the chia seeds. Now chia seeds are one of my wife's favourite
ingredients. One of the first things she made for me was chia seeds and yogurt,
and they got all in my teeth, but it's a superfood that she loves and when I
baked it into a bar the chia seed will absorb a lot of the liquid and kind of
dissolve into the bar so won't get it all in my teeth and that's what I like
to do with these. A little bit of cinnamon of course plays really nicely
with the dried fruit, all into the dry bowl and then of course we need salt. I
always season everything, I want to taste the cinnamon, I want to taste the
oats, I want to taste the fruit. All into my dry bowl. So we go in like that you
could see the cinnamon already giving me a nice color put a protein powder in
there if you want to make your own protein bar take the same recipe put
away protein or vegetable powder in there that any dried fruit
that you like here we go simple got my dry Bowl done now I've got
my wet bowl so I've got all-natural maple syrup real natural sweetness right
in a little bit of olive oil a healthy fat heart-healthy fat you can feel good
about these bars a little bit olive oil keeps our bar moist as well so I
actually have shelf life with these bars for up to a week I've got a little bit
of espresso powder I'm gonna pour it into my wet Bowl I had a lot of coffee
before we had a baby now I have you know those big that kind of size I'll have
five of those a day I'm gonna mix this
just like that and then one at a time two eggs the eggs are a glue they allow
everything to stick all those dry ingredients will incorporate and combine
and cook together with the help of these eggs so there's one I'm gonna go in with
one more for all that dry dry bowl mix to incorporate just like so I smelled
the coffee waking me up already fruity olive oil and of course the maple syrup
love that natural sweetness it'll play really nicely with the cinnamon and the
fruit here's the wet Bowl and then we go right into our dry Bowl just like so
couldn't be easier just like this I mean you do get the
caffeine crash in the afternoon so that's why these bars are great and
they're better than the store-bought bars sometimes you get a store-bought
granola bar or a protein bar and you think they're healthy and you feel good
about yourself but they're full of sugar they're full of preservatives you don't
know what's in them this is a great alternative that has natural sweetness
natural sugars it's awesome when it's almost totally incorporated that's what
I want to go on with my extra flavors so I've got a little bit of unsweetened
coconut that I truly love for texture for flavor right in some pumpkin seeds
nice crunch great flavor as well almonds chock full of protein as well
unsalted almonds really really nice and then this is what happens to my fruit
after they've kind of reconstituted in that warm water just for five minutes
you can see that they've softened and that along with the maple syrup will
give us a chew and a sweetness naturally at the very end we're gonna slowly and
gently fold it in making sure it's evenly incorporated without over mixing
and you can see how tasty these are gonna be the oats the almond the
cinnamon smells good so now I'm gonna take this mixture over to a greased kind
of baking tray and you put it in you pour it in and you could do this with a
spatula you want really really nice even thickness throughout you can start it
off like this spread it around and if you want to really get into the corners
stamp your hands and get into the corners like so you want them all to be
an even thickness so you have a nice uniform bar 25 to 30 minutes 325 degrees
to cook all the way through it'll still have a little bit of a chew and it'll
stay nice and moist the whole week this is one of those recipes that you can
throw in your Sunday afternoon repertoire and it gets into the habit of
you have it all week they keep you know in an airtight container all week and
even getting Cairo or your kids involved in doing something like this they can
pick their dried fruits they can pick whether it's maple or honey and
different flavorings and it gets them in the habit of those heart healthy natural
snacks throughout their childhood check this out our granola mixture is totally
cooked and I've let it cool for 5-10 minutes just so that I can easily remove
it I've got the parchment paper lip here to help me ease it out onto my cutting
board the smell of the cinnamon and the fruit is really waking up my senses here
and then you just want to cut them to your desired shape here just like so as
big or as small as you like and I like to actually have these that's a suitable
portion I think just like this
awesome look at that all natural ingredients you know what the next time
you have to fight the afternoon slump pack these bars away in your diaper bag
and you'll never go tired again honey I made us a snack these energy bars what
do you think Hey thank you okay
you
-------------------------------------------
DOUBLE LEG tutorial - How to JUMP #19 [ENG. SUB.] - Duration: 8:09.
Hi and welcome to our channel.
[HOW TO: DOUBLE LEG]
We're getting closer and closer to the end of our series. This is episode no. 19.
Today: double leg which is something like this.
Let's go, step by step.
[STEP BY STEP]
Here I am, on my favourite trampoline.
We'll do this step by step, but before we start,
I'm going to need a mattress.
Let me just use my magical... lasso.
Mind your heads when you're at JUMPCITY.
Don't know what's just happened, but we've got our mattress.
Let's do this.
I'll just put it here,
since we don't need any mattress for the first jump.
I'm going to use it when jumping on my hip.
Unfortunately.
This is some ordinary jump on our back.
It's similar to sideflip.
Now the most important thing is to choose your spot just right on this side.
If I'm doing this left-wise, twisting to the left, I'll be looking at you.
If I'm doing this right-wise, I'll be looking the other way.
That's why I'm going to do this left-wise.
First step, we're twisting, trying to look at the camera.
First we choose the spot on the trampoline.
I'm twisting, looking at the spot where I'll be Jumping on my back.
There's our double leg with some bounce from my back.
One more time.
Jumping a little.
There's my spot.
Looking there.
I'm doing this to fix my axis,
since in a double leg we'll be trying to make our legs go like this.
We add some rotation,
but about that later on.
One more time.
Jump.
Twisting my body.
My legs go over.
I start with twisting my body first
to stretch the body and get some altitude.
When I can twist no more,
I flex my abdomen and make my legs go over.
Let's take our mattress.
We'll try to go for the hip.
A little massage so it doesn't explode.
We were jumping on our back,
now let's try with the hip.
Keeping my fingers crossed so it works.
One more time, higher.
If I flex a little more, I might even land on my legs.
As in sideflip.
One more time.
Looking.
Let's try a little harder so that our feet, instead of our hip, hit the mattress.
Keep your eyes on the spot.
Let me move this a little not to fall up there.
One more time.
Jump.
Twist.
That was close!
Going to give it all I've got, and try to land here.
Specially for you.
Today.
Live.
Almost :)
Me doing the double leg.
One more time.
Jump.
Twist.
This was the double leg.
[CORRECT JUMP]
[CORRECT POSITION]
[CORRECT POSITION]
Now I'm going to show you an exercise that might help you
in fixing your position and your axis and all the important technical stuff.
We're going to do the double leg using our hand and the mattress.
All rules are valid, despite doing this over the mattress.
Jumping, I fix my eyes on the mattress,
but doing the double leg, I fix my eyes on the spot in front of me.
We support our hand on the mattress and jump over it.
Jump.
One more time.
Relax.
Yet, don't get used to this,
since the jump is not high enough. If
If you do this too often, your double leg will get low, and that's not the point.
One more time.
Jump.
Looking.
Higher and higher, try not touching the mattress.
So, you thought you were going to make it, that it's going to be a picnic?
[BASIC MISTAKES]
The usual. The most important thing. Mistakes.
To make a double leg look like one,
don't bend your legs,
not to do this too much to the side,
making it a sideflip.
Another thing, looking.
It's important to get a double leg.
I've seen some people doing something opposite, despite being told how to do this right.
Another thing, make sure you're getting your right angle here,
your legs neither too far from the trunk nor too close to your head.
That's all as far as mistakes go.
Now for a little bonus to finish with.
A quick dive into the foam
with a little evolution of the double leg.
Double leg twist.
The drill is the same.
Jump as in the double leg.
Once we feel we've started, we make our body straight,
rotating like crazy, and land in the pool.
That's all for today.
Remember to subscribe.
If you like our videos, give some thumbs up.
If you're having problems, leave a comment, and we'll try to sort this out.
Oh, and this trick in capoeira is called the armada dupla.
If you're going for some combo, depending on whether you're looking for capoeira,
enter the 'armada dupla', or for tricks or parkour, enter the 'double leg' in your search engine.
Take care!
-------------------------------------------
Gift Buying Guide for Writers | Featuring Storiarts, Book Beau, & More! - Duration: 18:55. For more infomation >> Gift Buying Guide for Writers | Featuring Storiarts, Book Beau, & More! - Duration: 18:55.
 -------------------------------------------
Fantastic Four: Rise Of The Silver Surfer (2007) CLIP 8 | CoolestClips 4K - Duration: 2:58.
General Hager. Access granted.
The board draws it here.
How do you fight something that eats planets?
We have to get to the board and lead it away from here.
Well, do you think the general will go for that?
He'll have no choice.
Thank you, general.
But I'm afraid...
the truth is...
sometimes Reed is right.
What...?
Hey, you. Come here.
Let me ask you something.
Nice.
Crap.
Ben!
Okay, that one hurt.
- Where's Reed? - Back here.
-------------------------------------------
ONE DOCTOR OUT OF MANY EXPLAINS HOW PRESCRIPTION DRUGS ARE KILLING US - Duration: 7:03.
ONE DOCTOR (OUT OF MANY) EXPLAINS HOW PRESCRIPTION DRUGS ARE KILLING US
BY ARJUN WALIANOVEMBER
Many concerns have been raised about the use of pharmaceutical drugs, often by the very
doctors who were told to use them. We now have, moreover, an overwhelming amount of
evidence to corroborate what many of these professionals have been trying to tell us
for decades:
�The medical profession is being bought by the pharmaceutical industry, not only in
terms of the practice of medicine, but also in terms of teaching and research. The academic
institutions of this country are allowing themselves to be the paid agents of the pharmaceutical
industry. I think it�s disgraceful.�
� Arnold Seymour Relman (1923-2014), Harvard Professor of Medicine and Former Editor-in-Chief
of the New England Medical Journal
In fact, the most widely accessed article in the history of the Public Library of Science
(PLoS) is entitled, Why Most Published Research Findings Are False. In the report, researchers
stated that most current published research findings are false, and this was more than
10 years.
Dr. Peter Gotzsche, co-founder of the Cochrane Collaboration (the world�s most foremost
body in assessing medical evidence), hopes to make clear this very problem. He is currently
working to inform the world about the dangers associated with several pharmaceutical grade
drugs. Based on his research, he estimates that 100,000 people in the United States alone
die each year from the side-effects of correctly used prescription drugs, noting that �it�s
remarkable that nobody raises an eyebrow when we kill so many of our own citizens with drugs.�
He published many papers arguing that our use of antidepressants is causing more harm
than good, and taking into consideration the recent leaks regarding antidepressant drugs,
it seems he is correct.
According to Dr. Gotzsche:
The main reason we take so many drugs is that drug companies don t sell drugs, they sell
lies about drugs. This is what makes drugs so different from anything else in life�
Virtually everything we know about drugs is what the companies have chosen to tell us
and our doctors� the reason patients trust their medicine is that they extrapolate the
trust they have in their doctors into the medicines they prescribe.
The patients don�t realize that, although their doctors may know a lot about diseases
and human physiology and psychology, they know very, very little about drugs that hasn�t
been carefully concocted and dressed up by the drug industry� If you don t think the
system is out of control, please email me and explain why drugs are the third leading
cause of death� If such a hugely lethal epidemic had been caused by a new bacterium
or a virus,or even one-hundredth of it, we would have done everything we could to get
it under control.� (taken from video below)
Here is an example of his work:
Peter C Gotzsche: Prescritpion Drugs Are The Third Leading Cause of Death
The most recent example of this kind of corruption in relation to antidepressants comes from
a study that was published last week in the British Medical Journal by researchers at
the Nordic Cochrane Center in Copenhagen. The study showed that pharmaceutical companies
were not disclosing all information regarding the results of their drug trials:
Researchers looked at documents from 70 different double-blind, placebo-controlled trials of
selective serotonin reuptake inhibitors (SSRI) and serotonin and norepinephrine reuptake
inhibitors (SNRI) and found that the full extent of serious harm in clinical study reports
went unreported. These are the reports sent to major health authorities like the U.S.
Food and Drug Administration.
You can read more about that and access the study here.
Gotzche�s two main areas of focus are antidepressants and �non-steroidal anti-inflammatory�
painkillers like ibuprofen, tylenol, celecoxib, and diclofenac. Another is Vioxx, which was
actually withdrawn after it was discovered that it caused more than 100,000 cases of
serious heart disease in the United States during the five years that it was on the market.
According to Gotzche, these deaths are just the tip of the iceberg when it comes to the
failure of the drug regulatory process to protect patients:
These terms for our drugs are invented by the drug industry. They had a huge financial
interest in calling these things anti-inflammatory. It lured doctors into believing that these
drugs somehow also had an effect on the disease process and reduced the joint damage.
He also notes that antidepressants have replaced drugs that were found to be harmful, like
Valium and Xanax, but are just as addictive and their side effects just as dangerous.
According to Professor Gotzsche, here�s a list of things you want to avoid:
Antidepressants for all, because they probably don�t work for severe cases of depression
All brain-active drugs in children Anti-psychotics and other brain-active drugs
for the elderly. Psychotropic drugs should be used as little as possible and mostly in
very acute situations, as they are very harmful when used long term
Non-steroidal anti-inflammatory drugs used for arthritis, muscle pain and headaches,
including over-the-counter, low dose ibuprofen. These drugs should be used as little as possible
Mammography screening, as it doesn�t prolong life whereas it makes many healthy women ill
through over diagnosis and leads to the premature death for some because radiotherapy and chemotherapy
increases mortality when used for harmless cancers detected at screening.
Drugs for urinary incontinence, as they very likely don�t work
�The case against science is straightforward: much of the scientific literature, perhaps
half, may simply be untrue. Afflicted by studies with small sample sizes, tiny effects, invalid
exploratory analyses, and flagrant conflicts of interest, together with an obsession for
pursuing fashionable trends of dubious importance, science has taken a turn towards darkness.�
� Dr. Richard Horton, the current Editor-In-Chief of the Lancet
-------------------------------------------
Clever Parenting Hacks For Toddlers - Duration: 3:58.
Raising a toddler takes parenting to a whole new level.
Toddlers can move around on their own, talk back, take a stand, refuse to agree, and totally
do their own thing.
But before you throw in the towel on the terrible twos, these experts and real life parents
dish the hacks to get you through!
Feeding-time activity bag
If you're wrangling more than one little one, things can get tricky.
Keep your toddler occupied while you're feeding your infant with a feeding-time activity bag.
Krystal Rogers-Nelson, parenting and child safety expert for A Secure Life, and mom of
a 3-year-old, says,
"The bag could include things like: sticker books, coloring books, fun puzzles, modeling
clay [or] finger puppets."
"The key is that your toddler can only play with it during baby's feeding time.
This helps your toddler feel special instead of jealous and gives you a chance to focus
on your baby."
Yes or no
Instead of asking toddlers multiple choice questions, stick with questions that can be
answered with "yes" or "no."
Mark Aselstine, dad of a 6-year-old and 2-year-old, says, "Our little man isn't the biggest talker,
but like every toddler he knows 'yup' and 'no!'
Asking yes/no questions seems to help a lot since it gets to what he's trying to accomplish."
Two choices
Try giving your toddler just two choices when presenting options to them.
Mom of two, Jodi Zaharris, says,
"Give them two choices; do you want to take a nap now or in five minutes?
Do you want to wear the red coat or the blue coat?"
This way, you're simplifying the decision-making process so that they can develop problem-solving
skills — without feeling overwhelmed.
Band-aids for safety
You've baby-proofed your own house, but what happens when you're traveling?
If you've brought along a box of bandages, you don't have to worry.
According to a Parent Hacks reader, using bandages to cover electrical outlets works
roughly the same way as the plastic outlet covers.
Just make sure you keep an eye on how well they're sticking, and don't forget to remove
them when you leave.
Healthy alternatives
Swapping some of your kids' favorite snack foods for healthier alternatives can truly
feel like a win for everyone.
Jessica Zelfand Munroe, mom of two toddlers, and founder of Supplet pregnancy boxes, has
a strategy.
She says, quote,
"For parmesan cheese [swap] Bragg's Nutritional Yeast, seaweed makes a healthy swap for salty
snacks, zucchini noodles for spaghetti, pumpkin and zucchini muffins for chocolate muffins,
Lara Bars for granola bars, and sweet potato fries for French fries."
Safe sleeping
You can use things you already have lying around the house to make your child's transition
from crib to bed much easier.
According to a Parent Hacks reader, rolling up a towel or blanket and sticking it underneath
the fitted sheet of your child's bed, keeps them from rolling out of it.
And it even works while you're traveling.
Naptime — done!
Picky eater chefs
Cooking with kids can be especially helpful if your little one is a picky eater.
Mom of two, Jennifer Usher, says,
"My daughter has become a pickier [eater] as she's grown older."
"To help combat this, she helps make (some of) her meals."
"I put all of the ingredients in measuring cups and then she adds them to the mixing
bowl.
She cracks the eggs for breakfast, mixes her own pasta sauce, it keeps her engaged and
more excited to eat what she has prepared."
Cleaner craft time
As if you needed one more reason to hit up your local Starbucks, according to blogger
Michelle Sybertof Be Brave, Keep Going, empty iced coffee drink cups can double as neat
paint receptacles for craft time.
Simply pour some paint in the bottom of the cup, fasten the lid, and stick a paintbrush
where the straw would normally go.
Craft on!
Use toothpaste to clean
It's almost inevitable that your toddler will discover permanent markers.
But worry not.
There's an easy way to get that rogue art cleaned up.
According to blogger Anna Luther of My Life and Kids, all you need is some toothpaste.
Apply the toothpaste on the stain and then scrub it away with a brush, or damp cloth.
It might take a little time and elbow grease, but your floors (or your furniture) will be
saved.
Thanks for watching!
Click the List icon to subscribe to our YouTube channel.
Plus, check out this other cool stuff we know you'll love too!
-------------------------------------------
[Thai Sub] SUGIZO INTERVIEW at ABEMA TV 2016 - Duration: 15:11. For more infomation >> [Thai Sub] SUGIZO INTERVIEW at ABEMA TV 2016 - Duration: 15:11.
 -------------------------------------------
Drift Corvette Build - EP3: Installing Steering Column & Fire Suppression | Donut Media - Duration: 12:52.
(upbeat music)
- So the steering column came in today,
super, super nice stuff.
All Woodward fab, really nice U joints,
these are the steering column mounts.
This is the steering column itself.
It's really nice because this end right here
is collapsible so the mounts go here and then you can
basically adjust your length here
and if you do crash and end up smacking
the steering wheel, you won't die.
So this is the lower pieces, the OEM Corvette,
that's a piece of 3/4 tube that we welded on there,
it's gonna be going right through the firewall.
Tilton floor mount pedals are just sitting in here,
not mounted yet 'cause we wanted to get our
steering column all situated.
Seat brackets, C&C billet seat brackets for the seat.
This is the seat out of my S14 while I wait for Cobra
to come up with some more seats for the Corvette.
But this is gonna be going basically just like this
and bam, we're in business.
- That is nice.
- So nice,
they just make it too easy.
Bolt on, quick release hub.
There she goes.
Alright, we got the steering column stuff put together.
This is my view.
Some pedals.
This Woodward stuff is just so nice
and man, the Corvette is so easy.
The steering column goes straight through the hole
that it was intended for.
You put your seat brackets on that you just buy.
You get your floor mount pedals and they mount
right to the floor.
(upbeat music)
Alright, so today we're gonna be working with
the fire suppression system, the guys at Safecraft
just sent me one over
and of course they included real sweet Tyler McQuarrie
stickers on there.
- Hello. - Thanks guys.
We're also gonna be finalizing the steering column,
making mounts for it, for the front and the back
part of it.
I'm actually trying to plan out where the
fire suppression bottle's gonna go
so I'm gonna get these seat brackets in on the
passenger side 'cause I'm worried about
where we're gonna be running our water lines,
how the seat's all gonna fit.
I'm thinking about putting the fire suppression
bottle right here, how the lines are gonna come
through the firewall so this is like one of the
toughest parts in actually planning out the car
because you don't know exactly how big the parts are,
how small the parts are, and where you're gonna put them.
So parts are starting to flow in,
it's kinda been a slow week.
We're still waiting for more parts,
that's kinda the nature of the beast when you're
building a race car, I guess.
So hopefully more things show up
and we'll be able to get some more stuff done.
Until then, I'm gonna work with what I have
and get these parts on the car.
(upbeat music)
So I was thinking about a couple of different places
to put the fire suppression bottle,
maybe up underneath the dash somewhere,
but it's not the lightest thing seeing as it's filled
with fire retardant foam, soapy water stuff,
so I figure if I can put the more weight in the back,
the better.
It seems like I might have some open space here
so that's why I was getting the dash 20 line for the
water lines because I really want the water lines
to run up here and go through the firewall to the rear.
So, maybe it will fit right here,
I guess we'll see.
(upbeat music)
So I'm figuring out how I want to route the pull cable.
I like it old school.
Safecraft obviously makes a ton of cool like
self-igniting fire suppression systems
and push button ones and all that stuff,
I just like it mechanical, I like it old school.
A cable, it's simple, doesn't need power or ground,
or blah, blah, blah, constant power, or nothing.
So I like it like this,
it makes it maybe a little bit more difficult
'cause you do need to make sure that the angle of the
cable and everything is proper and doesn't have
kinks and stuff like that but I have a pretty good
routing idea.
I wanna mount the bottle here,
have the pull cable run down along the trans tunnel here,
come up and then over to the A pillar.
Formula drift rules say that you can either mount
a single pull cable, as long as it's within 12 inches
of the window opening.
Or if you want it like on your dash or something,
then you have to put another one like either on the
outside of the car or still within a window opening,
so that an official can pull your cable if you need to.
So, I usually like to do both of them at once
by mounting it on the A pillar.
So this should be able to just have a mount right there,
that way it's safe for me to grab and for the officials
to grab and then the cable will just route along
the firewall and come down here.
(upbeat music)
So I'm gonna take the clamps off and then mount the
bracket into the car.
Now would you look at that,
look at these sweet Tyler McQuarrie stickers
that those guys at Safecraft.
Damn you guys.
You're lucky I love you Tyler.
Alright, let's mount these up.
Alright, so I positioned the first mount,
gonna go ahead and mount it,
check it again to make sure that the bottle's
gonna fit correctly, hopefully,
and then we're gonna rivnut it in.
(upbeat music)
Alright, now that the mounts are in the place
that they need to be, I'm gonna pull them out
and then put in these rivnuts.
It makes life a lot easier in the future,
I mean, you saw me reaching back and having to screw
a nut on the back, it's just super annoying.
So we put these in the chassis so it's like a rivet
but it's a threaded rivet.
So when it's in the chassis, all I'm gonna have to do
is just bolt the bolts right in.
And it's funny because Chevy uses a lot of those
on this thing, seeing as it's like either aluminum
or fiberglass or whatever, so they have a lot of
threaded holes all in the chassis.
We just add some more.
I got a little rivnut set up,
this bites into the rivnut to keep it from spinning.
So we put the rivnut on here, put that in the hole,
hold the rivnut, and turn it in.
So what it's doing right now is it's pulling
the backside of it flat so that it holds in the chassis.
Pull this out, and bam, we have a threaded hole,
no welding needed, nothing.
Keeps it simple, makes it easy, it's quick,
best way to build a car.
(upbeat music)
Now that the bottle's all mounted,
I'm gonna start figuring out the lines,
pull cable routing, 'cause obviously we need nozzles.
Formula D rules say we need a nozzle spraying
at the fuel cell, at or in the vicinity of the driver
in the cockpit, and then one in the engine bay.
Alright, so next I'm gonna make the mounts for the
steering column.
We got this all set up, that's with the wheel sitting
all the way down.
Where I'm comfortable is if it's raised just a little bit.
So I'm gonna make two tabs to go on either side
so that this mount can sandwich itself in.
So I'm gonna drill two pilot holes,
and then I'm gonna go ahead and drill the 5/16 hole
that we need for the steering column mount.
(upbeat music)
Alright, holes are drilled,
let's deburr it, trim 'em up, see how it fits.
So I'm pretty happy with the tabs that we made
for the steering column, so I took it all apart.
Those are the tabs there, we have our firewall bearing.
Now, this is what the shaft that connects to the
steering rack passes through there.
I have it marked on the back where the stock hole is
and this is how much room we're gonna have to drill
and rivet and then bond this in.
You can see like a lot of the holes
we can't weld them in because it's a fiberglass
firewall so they're bonded in.
So we're gonna do the same with some rivets
and bond it in.
Alright, so I'm about to put this firewall bearing
into the firewall.
As you can see, I put some sealant on it
and drilled holes for 1/8 inch rivets.
Since it's fiberglass we gotta bond it in
and rivet it in so I'm gonna go ahead and do that.
By the way, this thing, the best ever.
Pneumatic rivet gun, oh my god,
especially when you're doing like big panels
with way too many rivets in it, oh my god,
my hands used to get blisters
but thank God for Allstar.
So now the steering column center bearing
is all done, look at how nice that stuff
all goes together.
Looks good from the back, nice and centered.
So now I can go ahead and tack this in,
and then build our second mount right here.
Alright, no joke, I've been for like at least
20 minutes like moving the steering wheel
a little bit this way, a little bit that way,
up, down, uh, uh, just to get it just right.
And you know what the funniest thing is?
My S14, the steering wheel is like definitely
not centered with the seat and I've never cared about it
but I'm just being a picky little (bleep) right now.
Alright, I think I got it,
I think I got it straight.
Set, it is what it is.
Flick on our new Miller welder here
and we're gonna go to town.
Alright, it's tacked in place.
Now, I'm gonna go ahead and build this secondary
mount here, up to this.
Usually you don't need that for a Woodward column.
Usually just a single one off a dash bar is plenty
but since this column is so long and I'm sitting
so far back, we wanted to put a secondary support on it
right here, just to help it from rocking up and down.
And then this mount here is gonna go up towards the top
and that's gonna be for my Aim dash mount right off there
'cause the dash pretty much ends right back here
so it would be quite a long view.
So mounting it right off here is gonna be perfect
for me looking through the steering wheel.
Alright, so I got the second mount mostly fabbed up,
it's on the welding bench.
You can see this pinches the steering column
so I had to actually like set the right amount of
preload in the piece, which is why I made it out of
three pieces 'cause if I was just going to try to break
it, it would be very difficult to get the right squish
in there.
So I'm gonna TIG weld here and here
with our Syncrowave 210 and we will be good to go.
After I get this welded, I haven't quite decided
if I'm gonna use a piece of round tube or box tube here
to connect it to the chassis and the firewall
so I'll figure that out.
(upbeat music)
Alright, so since I got that clamp welded,
I decided with blocks tube, it's really thin,
super light, and small so it doesn't really even matter
but I just think it's gonna look good.
Let's see how this piece fits in here.
I just had to regrind it to fit it.
Alright, so I'll TIG weld this around the base
and MIG that to the car
and the steering column will be mounted.
(upbeat music)
Such a little piece takes so long.
So I did something stupid.
I was planning on welding that part into the car,
as you can see here.
I cleaned the paint and I was like huh, here's a magnet,
that's steel, that's aluminum.
God (bleep) it, back to the drawing board.
Alright guys, that's it for the week.
It's late, I gotta go home, I'm tired.
Be sure you tune in next week,
we're gonna be putting in our mock up engine,
figuring out all the super charger brackets
and power steering pumps and all that stuff that's
involved with the engine bay.
We're gonna finish up the interior
and kinda go from there.
So make sure you like, share, subscribe,
and let us know what you like and didn't like.
Catch you guys next week.
-------------------------------------------
Button Box Necklace-Sentimental Memory Jewelry Tutorial - Duration: 25:50.
One of the reasons I love making and giving handmade gifts is that they are
so meaningful. They're meaningful to the recipients because it's something I
made especially for them, but you can also incorporate other kinds of meaning
such as adding words or phrases that are meaningful or you can use objects that
have meaning. In today's video I'm going to show you how you can use buttons to
make jewelry that everyone will be able to relate to. Hi there, Sandy here.
Welcome to another polymer clay jewelry video at keepsakecrafts.net. So I'm
guessing that many of us have button boxes from relatives. I know I have my
grandmother's. I have my mother-in-law's. I just received a bunch of buttons from
a neighbor. I have quite a collection of buttons. Not everybody in the family sews
or crafts or has any use for them but I thought of this way of creating
jewelry that I could give to the relatives and the family and tell them
that the patterns were from their mother-in-law's or mum's button box. So
we're going to form beads using imprints from buttons, and I've shown you how to
use this molding putty before. If you want more detail I'll link to a video
that I did a while back that shows you all the details. All you do with the
molding putty is you take an equal part of each color and just mix them together.
Some of them you have to work a little bit more quickly than others, some of
them start to set up pretty quick on you so you have to be fast. So you just keep
smushing until there are no more streaks and it's all one uniform color. Once you
have your molding putty all molded just roll it into a smooth ball so that you
don't have any creases or wrinkles, set it on your surface and then go ahead and
press in your piece that you want to mold. Now you can see when you press...
I'll lift this up so you can see how this kind of comes up over the edge of
the button, just to make life easier on yourself go ahead and flatten that down,
because remember we're going to be trying to put two pieces to get
to make a lentil shaped button and this will just make it easier. So then you
just have to wait for these to cure. It depends on the brand how long it's going
to take you can tell it's cured, though, when you poke a fingernail in and it
doesn't leave an impression. If I poke now you can see that that's still in
there. Once your molds are set then you can mix together some clay and I went
ahead and mixed together about two parts Pardo translucent and one part pearl, you
could also use white but I liked a little bit of shimmer that the pearl
gives, and you could of course experiment with other colors but we're trying to
make a faux porcelain look. I think this is a nice mix. So then you're just gonna
grab yourself bits of clay, and it's kind of trial and error finding how much
works in each button mold. Now if you want your buttons to be the same front
and back you'll need to make two molds of each button, but I think it's kind of
cool to have something different on each side. So roll your ball so that it's nice
and smooth and it doesn't have any creases. Pop it into the mold... I can tell already
that's going to be too much... I'm going to take another one and press it on the
back and when I peel that out you can see that that was too much because I
have this whole edge around here. So I'm just gonna pull off some of the clay and
try again, and this is what you'll need to do for each of your beads, is just
kind of experiment and often it's really better to err on the side of making it a
little small rather than a little large because if it's a little small you won't
end up with this lip like I've got on this. So if I take out like a third of
that I'll show you what I get. Remember to always roll your clay back to nice
and smooth because any creases that are in the ball are not going to get pressed
out, they will be in your finished bead.
And now by making that smaller I don't have that lip. This is a little thin so
you'll have to just try experiment with different shapes and sizes until you
like what you get. Now I don't mind that this is a little off-center, I kind of
like that look, but you might want to be a little bit, take a little bit more care
and have beads that are perfectly centered. So if you have a nice deep one,
like say, this one here, you can use a bit more clay and then you have a really
cool two-sided bead. It's a nice flat bead which hangs nicely. Once you have
your beads all done you really need to let them sit overnight, at least a couple
hours to firm up before you try to put in the hole. Here's a bead that I made
yesterday and I'll use this one to show you how to make the hole. My favorite
tool for piercing holes and beads is a doll needle because it's hard, it's sharp,
it's thin, it's nice and long, and you can pierce all kinds of things. So you
want to start at one side where you want the hole and just twist the needle and
be looking- focus your eyes right where you want that needle to come out, it's a
hand-eye coordination thing, and most of the time it will come out right where
you want it. Now that's coming out a little close to this side that I'm
looking at, a little too close for me, and that's fine. I'm going to back that
out and then put the needle in right where that hole is but more centered on
the bead, and you can just kind of take your finger and stroke that and make
that hole you made go away, and now I'm going to look right at this hole, twirl
and press lightly, and just hold very lightly with your left hand or your
non-dominant hand, and it will pop right out that hole. That's pretty cool. Now let
me show you what happens, here's that the I just made, and it's probably gonna be...
already it's distorting around that hole. No matter how lightly I hold it, it can
be done, maybe it depends on the brand of clay if you have a nice firm brand. Okay,
I wasn't looking where I should have been so that didn't come out where it should
have, but that's okay I'll just back it out, stroke over that spot ,see how this
is becoming a little bit more oblong and my texture is a little bit flattened? It
really is better to just let your beads sit. That's not bad but, yeah, see how it's
all flattened and smushed? That didn't happen on this bead. So let your
beads rest before you make the holes. Now another thing that you can do is
make some bigger beads for your focal and what you might want to do for the
focal is not drill the hole right down the middle, in fact you could drill them
all off-center. Here's one I thought was pretty done with the rose button mold
and I actually made my hole about a third of the way down and that will keep
the bead from spinning and flipping and keep it hanging nicely on your necklace.
You could do that with all of your beads and have them all strung that way.
if you were doing a bracelet you might want to make two holes in each one, two
parallel holes to keep them nice and flat. Once you have your beads made and
the holes pierced, then you can bake them according to the manufacturer's
instructions. So for this project once your beads are all baked it's time
to add color and in this case we are using liquid clay and alcohol inks but
the alcohol inks that I'm using, I don't know about other brands, all I own are
Ranger inks, but they require a little bit of testing and experimentation. The
first thing I did was I pulled out all of the liquid clay that I have including
Kato liquid polymer clay, Sculpey translucent liquid sculpey also known as
TLS and fimo deco gel. I mixed into each of those a single drop
of alcohol ink in Cranberry which is a beautiful bright red color, What was
amazing was how different the colors looked when being mixed into the clay
but then once they were baked I ended up with this very different kind of orangey
pale sad color. I was not impressed so I decided to see if I could get a purple
that I liked and I picked three different blues that I had, these are all
Ranger alcohol inks. Denim I added to this one with the deco gel, stream I
added to the TLS and sailboat blue I added to the Kato, and you can see how
very different they look when they're all mixed up, but that's a very little
indication of what they're going to look like when they're baked. This is what we
ended up with so although the cranberry by themselves
they look pretty similar, we got kind of different unexpected results from the
additional inks, so this is why I say you really need to do some planning. If
you're looking for a particular color it may take quite a bit of experimentation.
Now I've seen this project done also with Pinata alcohol inks and I don't
know if there's quite so much color shifting. I don't have any Pinata inks
but I hope to test them sometime soon. So I would call this a fail. I am really
truly not happy with any of these colors. I tried a few different things. I tried
adding more alcohol ink to the liquid clay to see if I could get more of a
true color. I thought perhaps it was diluted too much and that was why my
cranberry was more of a pink. And it is a little bit darker but it's still got
that kind of yellowish quality that I don't like. This, of all of them this is
probably the one I like the best, but I still don't love it, but it occurred to
me that something about this process with the Ranger inks is causing a bit of
yellowish-ness to get introduced into my colors so I
actually went ahead and made a whole new batch of beads and decided to go with a
different color. By the way this is a good warning to not have too much of the
liquid clay on your bead because it will cause drips and just make a mess. So
these aren't a total waste. I may paint them someday with something else but I'm not
going to use them for this project. So I thought about it and decided: Well, if
it's adding a little bit of yellow to my mix then what colors look good with
yellow added to them? Not the blues and purples that I usually go for but
green, which is blue and yellow, so we can make it a little bit more yellow, that'll
be okay, or orange, which I wasn't in the mood for (I'm not very often) and I'm
adding just about a drop of alcohol ink and you could put in a little bit
more liquid clay than that. Mix the two together and then paint them on your
beads and this will be a slightly stronger mix because I've got more of
the ink in proportion to the liquid clay so I thought it might make it a little
darker. And all I have here is a piece of 20 gauge wire that's a little bit wider
than my baking tray and this makes it so much easier to just do, to do first of
all to do two sides at once because now I can flip it over all at once and I
don't have my hands all in there getting all gooky, which was kind of a mess, and
you can do both sides at once. A much more efficient way of doing it, and now I'm
just gonna gently wipe with a paper towel Like I said, you don't wanna leave
too much on, but you want to take some off so that it's white on top and left
in the crevasses, and you can see here that if you choose
items that are nice and deep, like this one looks fantastic and this one is okay.
It'll look nice when it's done but it doesn't show up the color nearly as
well. This is my bead baking tray, it's just a disposable aluminum foil baking pan
and like I said I cut my wire a little bit wider and used an awl and poked a hole
on each side, bend it up and bake away. By the way, a quick tip for you. I've seen so
many different tutorials saying to use binder clips to hold these together but
they're metal and they stay hot. What I love about using wooden clothespins, I'll
show you what I mean. Here's another pan that I'm putting upside-down on top then
I use wooden clothespins on all, one on each side, even coming out of a
275-degree oven I can touch this, take it off and take a look.
Don't touch the metal part! So then go ahead and bake your beads. I bake them
for probably 15-20 minutes. So here are the beads out of the oven,
this is what I ended up with and I'm satisfied with it. I kind of wanted a
little bit more color. but these will be pretty especially once I choose some
nice accenting beads. I'm going to string them I think with two strands of bead
stringing wire having double strands of smaller beads in between them. Here are
several of the beads that I pulled out as possibilities to go with my button
stamped beads, and the very first thing I did was, of course, I went into my greens.
I pictured maybe something with some crackle and sparkle like these beads and
this is definitely a yellow-green so I pulled out some yellow greens. I really
like this, it's got a matte finish so it's kind of a different texture and
these are nice, these are from the dollar bead box, they're Czech glass rondelles
in opaque olive green travertine, these are agates which I
don't think I'm going to use. I was thinking of maybe doing something a
little different than I usually do. I'm very comfortable with choosing a whole
variety of one color and then a metallic. So dark and light greens and antique
brass or antique gold. Awesome with that, but I wanted to kind of push myself, so I
was thinking what about if I threw in some orange, or I don't want to do red
it's too close to Christmas we're gonna have enough red and green, orange sounded
interesting, a pop of that. So I opened my orange and yellow box which are all in
one box because they're probably my least favorite colors, and I was looking
at these. It's a clear plastic box so I was looking at these and they looked
really green to me and I was thinking, "Wow, did I misfile them? Did I put
them in the wrong box?" And then I realized the bottom of the box was clear
and the yellow beads were showing through it and I had it sitting on my
lap, on top of my blue pants. So the blue through the yellow made these look much
more green than they are. So, yeah, funny story, but good to keep in mind that you've
got to consider what kind of reflections and what other things are around you
that are going to influence the appearance of your colors. I also pulled
out these crystals, these I just found Michaels, I think. And so many of you have
told me that you really enjoy watching me figure out and plan and design so
I'll just speed up that process and show you how it worked out. Here I'm trying to
decide if I'm gonna use these glass beads. So many of you have told me that you
have been inspired by and benefited and learned from my videos and that makes me
so happy because that is what I have set out to do with my blog and this YouTube
channel. If you want even more inspiration and benefits for yourself
you might consider becoming a patron, because my patrons, in addition to
getting sneak peeks and bonuses and behind-
the-scenes, my patrons can also get up to two bonus videos every month and they're
video tutorials. Patrons get other things, they'll get, like I said, maybe a sneak
peek video that everybody else doesn't get. Something to think about. Not only do
you get the satisfaction of knowing you're helping keep these tutorials
coming for everybody but you get extras for yourself. What I really pictured
here was having two rows of beads in between these. You know so many times
I've designed a piece of jewelry and and lived with it for a while, wore it a few
times even, and then went back and took it apart. So don't feel like you have to
get it exactly precisely the right way the first time. Is there a right way? If
you're not thrilled with it after wearing it for a while try again! So
there, that is what I have settled on. I think I need to find a couple little
bead cones or something to finish these ends. I'm just going to have two strands,
one strand will have some of these matte beads which I think are a really nice
enhancement to these all these other beads, and then the other strands will
alternate the dark green crystal cubes and the Czech glass beads, and then it's
just a matter of stringing. So to get started I have slid a crimp onto the end
of a piece of bead stringing wire and then slid the end back through it to
make a loop of the bead stringing wire, then slide the crimp up to leave just a
little loop, and ideally it should be small enough so that when it's inside
your bead cap it's hidden, so that's awesome.
And then you can use regular crimping pliers, I'm gonna use my One-Step Crimper
and flatten that crimp and to make sure it's secure just tuck your pliers in
there to the loop you can give it a pull and
make sure it's not going anywhere. Once you're sure of that you can trim off the
excess wire and repeat this step for a second wire. Now I've just taken an eye
pin and attached both those loops to the eye pin and then I can slide on my cover.
That will cover up those ends, if I had had a gold bead stringing wire I would have
used that. I just, I didn't, so this is all I have so I'm going to use this and make
it work. The tricky thing with doing two strands
is that sometimes at the ends a bit of the wire can show. So here you can see
that dilemma, where in this case it looks like all I really need to do is add
another one of these frosted beads. Let's see how that works out, and so that looks
pretty good. Now you can still see a little bit of the wire here and if that
bugs you what you need to do is find some very, very small beads. One thing
that stands in great for small beads is crimps. You can use those as filler. I've
used them in place of, they're basically teeny tiny beads, and they were great to
fill in spaces that need to be filled in. So that looks pretty cool I'm happy with
that. Now if I had gold wire I might not have bothered adding that extra little
bead in but I think that'll be nice because I'm going to have gold caps on
the sides and then gold chain going around the sides in the back of the
necklace, so those little tiny beads will not only fill in the spaces but they'll
also help tie it all in together. Another thing you might find helpful in filling
in these gaps when you're stringing multiple strands this way is, well this
all really depends on the kind of beads you have, but I'm using these frosted
matte glass beads and you'll notice that they vary quite a bit in thickness.
Here's one, here's the other, quite a bit thinner. And so if
you find these skinnier ones, reserve those for putting on the ends closer to
the beads and that will actually help things nestled together more easily. And
here's another tip for you. Sometimes your holes will be just barely
big enough to string through, especially with the two strands. Here some of them
are just a little tight, so what you do is you take your pliers, flat nose pliers
are great because they're nice and wide and give you a good grip, and you grip
your wire real close to but not right next to your bead and so you maybe leave
a millimeter of wire showing and then you push. Now if you grab it out here, too
far, it's just going to bend as you push. So the secret is to be patient and just
grab it a little tiny bit each time. See that, even that, what was that? Two
millimeters, that's too much, it starts bending. So just a little tiny bit, and
you can do this with other things, too, with head pins and things that just
barely don't want to go through. Just grab it real close, be very patient, don't
get greedy and leave too much space, and eventually you'll be able to work it
through so that you can pull it through the other end. Now I've done all my
stringing. I'm just going to go ahead and add my caps on the end and just finish
everything off, and you could do this with a simple loop or wrapped loop. I'm
going to do a wrapped loop so it's just, it just has a decorative element and
it's nice and secure. If you want to know more details about how to make wrapped
loops, I've done an entire video just showing all the little step by steps and
the finer points of how to do that. Straighten up that loop and this is
where you'll attach some necklace chain in whatever length you want. Now when you
get to this stage it may be hanging a little bit funny because it's we've got
two strands, they're a little bit stiff and it just,
yeah, it's funny how much less nice if a piece of jewelry can feel when the beads
are strung just a little bit too tightly. It doesn't make a huge difference over
the length of a piece of necklace, maybe an eighth of an inch, and now suddenly
can you see how much nicer that's draping? So just give it a little bit of
room, even if you have a tiny bit of the wire showing that won't be nearly as
noticeable as a necklace that hangs awkwardly. Take your time and adjust it.
Once you're happy with the way it's hanging go ahead and string a crimp bead
on the wire end, send the wire right back through that bead, if you're attaching
this to something with a closed loop this is the point where you would put
this wire through it but since I'm attaching it to an eye pin that I can
twist open it's just so much easier to manage without having to deal with the
eye pin right now, and again I'm going to use my one-step crimper and if you want
to learn more about using the crimpers I've also done an entire video on them.
These are just a great tool for making your jewelry making a little bit easier
and more efficient, but no matter how wonderful the tool always check, you
don't want your necklace coming apart on you. Repeat for the other wire, attach
them to your eye pin, slide them into your cone, add a bit of,
add a clasp and a bit of chain at a length it suits you, and your necklace is
done. Thanks for watching, be sure to subscribe if you haven't already, take a
look at my Patreon page for how you can get bonus tutorials and great rewards
and help support these videos. Happy creating!
-------------------------------------------
Channel trailer - Juston Bibero 2017 - Duration: 0:38.
Mada Mada!
More memes coming soon! 👌
-------------------------------------------
Inside an ICE CAVE! - Nature's Most Beautiful Blue - Duration: 6:47.
[MUSIC]
Thanks to CuriosityStream for supporting PBS Digital Studios.
What color is ice?
Snow is made of ice, and it's white.
The ice most of us get out of our freezer is clear or cloudy.
But glacier ice is different.
It's blue.
But a blue you've never seen before.
Until today.
[MUSIC]
Glacier ice may be the most beautiful blue in all of nature.
Today, we're going inside a glacier, to find out what makes this curious color.
[MUSIC]
I'd seen pictures of blue glacier ice before, but they didn't do any justice to actually
being there.
This is an ice cave.
It's a cavity formed underneath tons of ice.
Which means it's the perfect place for us to figure out why ice is blue.
[MUSIC]
Look at that incredible blue.
The sky is blue because light hitting the atmosphere is scattered and blue light is
scattered predominantly, down into our eyes.
But glacier ice is blue for a completely different reason.
A much cooler one.
Snow is also made of ice, and it's definitely not blue.
Though it can be yellow.
A single snowflake, viewed up close, is actually clear.
But when snow piles up, it's mostly air, and when light hits those air pockets, the
faces of ice crystals act like a bazillion tiny little mirrors that scatter the full
spectrum, white light, in every direction.
Glacier ice begins its life as snow, but year after year, it's squeezed by so much weight,
the air bubbles between the crystals disappear.
And without those air bubbles, white light isn't scattered.
But still, even a block of ultra-pure ice doesn't show any color.
It's only when light travels deep into the glacier that the ice it can work its physics
magic.
Inside a glacier, the water molecules in ice are actually absorbing all light that isn't
glacier blue.
And to understand how this works, we need to explore three ideas: wavelengths, frequencies,
and overtones.
Because light always travels at the same speed, the wavelength of light also tells us its
frequency, the number of waves that cross a point in a certain time.
Violet light?
High frequency.
Red light?
Lower frequency.
It's similar to how we think of sound waves: Higher frequencies
[sound] and lower frequencies.
[sound]
Now you might not know this, but water molecules, even in ice, can vibrate, sorta like the atoms
are connected by little springs.
But like atomic pendulums, these littie springs only vibrate at a certain special frequency.
If light at this special frequency comes along, if it's in sync with the jiggling atomic
spring, the molecule absorbs that energy and keeps vibrating, and that frequency–or color–of
light is subtracted from the rest.
Light that isn't the right frequency passes right through.
The thing is, a water molecule's favorite vibration frequency is outside of the visible
range.
So how can it have any effect on the colors we see?
We can explain with some music.
This is the A-string on a guitar [beat].
It's tuned so that it vibrates back and forth 110 times per second, or 110 Hz.
But we don't just hear the 110 Hz sound when it's played.
We also hear "overtones".
A whole series of higher frequencies that depend on the instrument, how the string is
plucked, a whole bunch of things that make a note on an instrument sound unique.
The vibrations in water molecules can also be excited by "light wave overtones":
This light wave overtone has a higher frequency.
Not every wave syncs up with water's vibration, but some do, and they get absorbed.
For solid water, one of those absorbed overtones sits right in the red/orange part of the spectrum.
When white light from the sun passes through the glacier, the red and orange frequencies
are just right to be absorbed by the water molecules.
They start vibrating.
And what's left when all the other light frequencies have passed through, is this beautiful
blue color.
That red and orange light isn't absorbed very strongly, So it takes many many feet
of ice to achieve this effect.
That's it: White light, minus red-orange light leaves us with this.
Brilliant, blue ice!
Sadly, ice like this is disappearing.
This cave in Alaska will be gone within a couple years as the glacier melts and recedes
up the mountain.
Color in nature arises in many different ways, from the blue sky to butterfly wings, but
this might be the only example where color comes from vibrations.
Clear liquid water absorbs sunlight in much the same way, and when you consider that about
70% of Earth's surface is water, these good vibrations are the very reason our planet
is a pale blue dot.
Or maybe it's a minus red dot.
That's the physics that makes a place like this so beautiful, and it's hard to be blue
with science that cool.
Stay curious.
Big thanks to CuriosityStream for supporting PBS Digital Studios.
CuriosityStream is a subscription streaming service.
They offer documentaries and nonfiction titles from some of the world's best filmmakers,
including some exclusive originals.
You can watch "Ancient Earth" a CuriosityStream original that shows what we think the world
was like in the Permian, Triassic, Cretaceous, all the best eras.
You can get unlimited access today.
For our audience the first two months are free if you sign up at curiositystream dot
com, slash smart.
Use the promo code smart during the signup process.
We'll see you next week.
Hey, before you click away, freeze!
And check out this other video we made in Alaska about why glaciers move.
It's cool.
I'm out of ice puns, sorry.
-------------------------------------------
КАКИМ ЗНАКАМ ЗОДИАКА НЕЛЬЗЯ ДОВЕРЯТЬ😣❌ - Duration: 8:19. For more infomation >> КАКИМ ЗНАКАМ ЗОДИАКА НЕЛЬЗЯ ДОВЕРЯТЬ😣❌ - Duration: 8:19.
 -------------------------------------------
Reyhan saves the day | Elif Episode 611 (English and Spanish Subtitles) - Duration: 4:02.
How can I help you, do you have an appointment?
Oh, no, I don't have one, but...
I definitely have to see Mr. Kerem.
If you don't have an appointment, I cannot let you through.
And if you were given an appointment, I am afraid that would have been by mistake.
Mr. Kerem is busy throughout the whole day.
I get it, but I need to see him, today.
I'm sorry, there's nothing I can do.
I would like to ask you to look at the reports regarding these images...
...that you can find in the files in front of you.
While you're looking at them,
...I'd like to inform you about the materials we use in our manufacturing process.
The materials are partially ordered from the domestic market, and partially imported.
They are all approved by the Ministry of Health...
Mmmh...
While Mr. Kerem prepares his documents,
...I'd like to talk to you about a very important topic.
In the files in front of you, third page,
...our cost reports are included.
Look, I haven't made myself clear, I guess.
But I definitely need to see Mr. Kerem, right now!
Ma'am, I understand you, but I need you to understand me.
Mr. Kerem's schedule is completely filled today.
It's not possible for you to meet today.
You can leave your name, so he can reach out to you when he finished up.
Look, I don't want to leave my name or any such thing...
I want to see Mr. Kerem!
Unfortunately...
At least, let him know!
I'm sure that he'd want to see me!
I can't inform him right now,
...but if you have any notes, I'll make sure to give them to him after his meeting.
What?
How?
The meeting already began?
Ouch... This means I didn't make it in time?
At least give this file to him!
What's this?
It'll be helpful for Mr. Kerem in this meeting.
He forgot this, you definitely need to deliver this to him!
You've mentioned that some of the raw materials will come from the domestic market.
What is the percentage of these in production?
And also, we'd like to have some information concerning the quality of these goods.
Sure, let me put it this way...
Well... As a shoe manufacturer,
...for such materials as leather, rubber and haircloth...
for these important materials, we make an effort...
...to import them... partially at least.
But, as Haktanir Holding, we care about domestic production, so we'd like to...
reduce the percentage of imported materials.
Which leads us to...
I am very sorry.
This is the file you requested from me, Mr. Kerem.
Back to the matter at hand, I would like to return to your question...
...and tell you that domestic production has a share of around 68%.
But in time, we intend to raise this share.
Moving on to production quality...
Không có nhận xét nào:
Đăng nhận xét