hey friends it's Kara with iStampin.com Thanks for joining me today today
I'm going to show you how to make this
super cute and very easy treat box using
these spooky sweets bundle this is in
the holiday catalog and this is my first
time I'm getting around to using the
bundle I did use the stamp set a couple
of weeks ago but I wanted to show off
the adorable
spooky bats punch so I thought that I
would make this really cute little treat
box you can fit lots of different types
of chocolates in there but it's really
easy to make and you know especially if
you like to make treats for your kids
classes for I know they really don't
call them Halloween parties and more but
fall festivals and things like that this
would be a great thing also if you'd
like to do craft fairs and this is
really easy to make and you can sell
these at a craft fair alright so why
don't we get started I'm gonna first go
over all the items that you'll need to
recreate this and then we'll make the
box so the first thing that you will
want to get out is these spooky sweets
bundles so that's the stamp set and the
spooky bats punch like I said you can
get it as a bundle and when you do that
you do say 10% you are going to need to
get out you're gorgeous grape mini
striped ribbon I'm using a couple of
other pinches as well I'm using the 1
and 3/8 inch
scallop punch along with the 1 and a
quarter inch circle punch for the inks
I've pulled out my gorgeous grape and
memento tuxedo black ink I'm also going
to be using the whisper white Baker's
twine and for the cardstock and designer
series paper I have some basic black
whisper white in gorgeous grape and
these two just get out some scraps and
then I have the toil and trouble
designer series paper I've chosen the
really cute little ghost pattern the
stripes are on the other
bicha you're going to need three of
these and each one measures two and a
quarter by two and a quarter and then
other than some snail adhesive I'm also
gonna be using some dimensionals and
glue dots you may also need some tearing
tape but you may be able to get away
with that but other than that we are
ready to start
okay so first let's make the box so
you're gonna start off with a piece of
basic black cardstock and this measures
eight inches by four and a quarter and
we're gonna do some scoring so this is
our simply scored scoring tool and I'm
gonna start off in portrait and these
are the dimensions that you'll want to
score your cardstock at we're first off
gonna start it a half inch one inch then
we're gonna move to three and a half
inches and then the last one is four
inches okay now let's rotate it to
landscape and we are going to score at
two and a half inches and three inches
and then let's move over to five and a
half inches and then six inches and all
of our scoring is done next take your
bone folder and burnish on all of the
score marks you want to do you wanna
make sure you get really crisp score
marks or score lines with your bone
folder and then you'll want to get out
your scissors we're going to be cutting
off quite a bit of the sides that will
be removed to create the box
all right so if you look at the box
you're gonna notice that the this side
is wider if you look from this score
mark to the end of the cardstock than
this one so this is actually a two and a
half inches wide in this one's two
inches like so what I'm gonna do is I'm
going to take my scissors and I'm gonna
cut off from this mark right here and
all the way down on both sides that's
just trash all right the other thing
that you are going to do is on the
thinner side or the the shorter side if
you have a corner round punch just
whichever one just go ahead and round
that and that will just kind of finish
off the edges and then the other thing
we're gonna do now is go ahead and get
one of your pieces of designer series
paper like I said each of these is two
and a quarter by two and a quarter and
go ahead and round just one of those
just on the bottom and I'm gonna go
ahead and put snail adhesive on here but
I'm also going to put a piece of Terran
tape at the very top when I've made this
before when I just use adhesive it
doesn't it pops up so if I do the
tearing tape when you when you fold this
part because that's gonna be the lid of
the box
it stays I mean you could just use tear
and tape if you wanted to over the whole
thing but I'm just gonna use snail the
snail is actually keeps the other part
it here's it well to the box
and I also recommend putting your
designer series paper on first before
you put the box together because that
will make it a lot easier maybe use my
paper piercer to get this backing paper
off all right and so what we're gonna do
is just come right here and just place
that down so as you can see when the lid
folds this part will not pop up now pop
up now and so how its gonna fold is like
so so here we're gonna want the ghosts
going this way as well when you have it
a pattern like this you do want to make
sure that you're not putting it upside
down so you may need to put the box
together to kind of see how how its how
you need to have your patterns going
okay so you can see that this we're
gonna want our ghosts going that way if
that makes sense so the back this piece
is the opposite of the other two okay
we've got whoops mmm
try to line it up to the best of your
ability there we go okay so next what
we're gonna do is go ahead and build our
box and what I'm gonna do is just put it
my snail adhesive just on this thin
strip and then on this wider strip over
here and so how you build it is just
match the ends to the side of this of
the lid and the exact same thing over
here
and there we have it so that's what it
looks like when it's all done isn't that
super cute and so now you would be able
to slip in your chocolate or whatever
little Halloween treat you'd like to put
in there but let's go ahead and do our
stamping and then we can finish
decorating this so I know that we're
just gonna need I'm just one scallop
using the one and three H three eighths
inch scalloped edge so I've just punched
that out and like I said that's in
gorgeous grape and then I think this
should be big enough for both of my
stamps I'm gonna ink up the spooky
sweets gorgeous grape right here and I'm
using the 1/4 inch punch so it was
punched out and then let's go ahead and
stamp our bat so you're gonna want to
get these out and we're going to stamp
that and momento tuxedo ink it just that
you know the star and this moon that
matches a punch that you can find in our
annual catalog so that's really nice so
if you have that punch already it
matches that perfectly with spooky
sweets so it's always nice when there's
other stamps that match our punches okay
now this one you kind of have you may
have to cut some paper to get it in
there properly let's see here
cut this off but it does work there we
go
okay so now just line it up and really
I'm only concerned about the the middle
bat but if you're wanting to get them
all perfect you know you should be able
to line them up all the same but really
I'm just interested in this in this
middle one so this is what it's like to
be left-handed you have to do things
upside down
there we go okay and so there's that one
and then you can save these for future
projects alright so let's go ahead and
put this together but before I adhere
this um to the gorgeous grape scallop
I'm gonna go ahead and poke a hole with
my paper piercer just about right there
cuz I want to feed the whisper white
Baker's twine through first
so if you do that first then you won't
have any problems putting the tag on
okay so next let's just get some stampin
dimensionals and I'm gonna go ahead and
put two on here I'm gonna line this up
where it's at the top or where the UM
the hole is is my top so just make sure
your scallops are even there we go and
then I'm gonna get one glue dot and I'm
just gonna put the glue dot right be
here right behind the center of the body
and then that's just gonna kind of hang
off so the wings are gonna hang off the
top of the tag like so alright okay so
now we can bring this back in and let's
go ahead and tie our ribbon around the
box so let's get out our mini striped
ribbon and we're gonna go ahead and just
so go ahead and put your candy in there
before you do this obviously but you
know some people may forget to do that
and then you hear um you can either just
do a square knot or a bow I'm gonna do a
bow hopefully I got enough ribbon and
I'm gonna slide this up a little bit
like so and then just tie a pretty bow
this ribbons really nice you shouldn't
have any issues making a pretty bit with
it it's that's one thing I love about
our embellishments and our ribbons
they're so nice
now I do have a hostess code for this
month and so you will want to use that
if your order is a hundred and fifty
dollars or more before tax and shipping
don't forget to not use the hostess code
you will still qualify for the free gift
that I get that I send out to my
customers at the end of the month or
actually the following month but also I
just want to let you know that I have a
new program that I started this month
that you will be able to get free
tutorials so this month it's all about
Halloween there are six tutorials if you
do not um went to place an order you can
purchase it for nine ninety five and
I'll have that oh no
I'll have that information posted on my
blog on how you can purchase it just
just purchase the tutorial by itself
okay so I tied the bow and I just um cut
off the tails and now what I'm doing is
I'm slipping the Baker's twine under the
not-so and then I'm just going to attach
it like this
just gonna make a knot you do want to
have a little bit of a give where the
tag can dangle just a little bit but you
don't want it to loose and then I'm just
gonna hide the knot behind the ribbon
okay so I'm just gonna come in and cut
off the extra and then you can just kind
of feed the not behind the ribbon there
we go and there is our final project how
adorable is that I just love making
these boxes they are so easy to make
they're so quick it's just a little bit
longer so quick and so fun um I just
love it they I I think this is a great
choice to make if you like to make
treats for your co-workers your
children's class anything like that so
again that was using the spooky sweets
stamp set along with the spooky bats
punch notching punch this is a bundle
like I said previously you do save 10%
if you have any questions over anything
about today's project feel free to
comment below and like I said if you
shop in my online store don't forget to
use that hostess code you'll get a gift
and the month of October for this month
and you will also get free tutorials
alright guys have a great day and join
me later this week for a fun Christmas
project bye

 For more infomation >> 3D Model of Cartoon Triceratops Review - Duration: 0:31.
  For more infomation >> 3D Model of Baby Cat Rigged Review - Duration: 1:06.
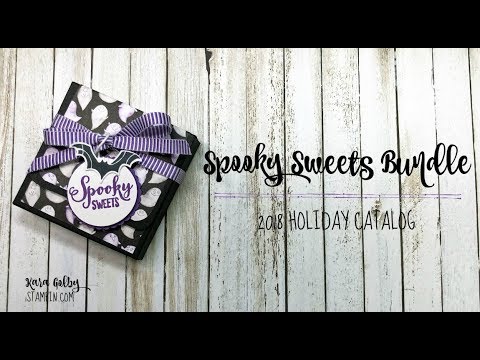
 For more infomation >> 3D Model of sabercat Review - Duration: 1:16.
  For more infomation >> 3D Model of Canon 70D Review - Duration: 1:36.
  For more infomation >> Rock Steady Boxing and Parkinson's Disease - Is it enough? - Duration: 7:23.
  For more infomation >> 3D Model of Duck Review - Duration: 0:16.
  For more infomation >> Critical Ops: Map Awareness with Kingeh - Duration: 4:47.
  For more infomation >> 3D Model of Samsung NX100 Camera Review - Duration: 2:16.
  For more infomation >> 3D Model of Samsung NX100 Camera Review - Duration: 2:15.
  For more infomation >> 3D Model of Road camera Review - Duration: 0:56.
 For more infomation >> 3D Model of Road camera Review - Duration: 0:56.
  For more infomation >> 3D Model of camera Review - Duration: 0:25.
  For more infomation >> 3D Model of Cat Review - Duration: 0:16.
  For more infomation >> 3D Model of Nokia Lumia 1020 (White) Review - Duration: 0:56.
Không có nhận xét nào:
Đăng nhận xét